주요 콘텐츠로 건너뛰기

Lenovo Yoga 3 11 Wireless Card Replacement

필요한 것

  1. Lenovo Yoga 3 11 Wireless Card Replacement, Lower Case: 1 단계, 이미지 1/1
    • Remove the eleven 6 mm T5 Torx screws securing the lower case.

    • Gently lift the lower case up and away from the device.

  2. Lenovo Yoga 3 11 Wireless Card Replacement, Battery: 2 단계, 이미지 1/3 Lenovo Yoga 3 11 Wireless Card Replacement, Battery: 2 단계, 이미지 2/3 Lenovo Yoga 3 11 Wireless Card Replacement, Battery: 2 단계, 이미지 3/3
    • Remove the two 3 mm Phillips #00 screws securing the battery.

    • There are arrows on the battery indicating the location of the screws.

  3. Lenovo Yoga 3 11 Wireless Card Replacement: 3 단계, 이미지 1/1
    • Use a pair of tweezers to gently disconnect the battery connector.

  4. Lenovo Yoga 3 11 Wireless Card Replacement: 4 단계, 이미지 1/2 Lenovo Yoga 3 11 Wireless Card Replacement: 4 단계, 이미지 2/2
    • Use a pair of tweezers to gently disconnect the speaker cable.

    • Remove the wires from underneath the battery tabs using the tweezers.

  5. Lenovo Yoga 3 11 Wireless Card Replacement: 5 단계, 이미지 1/1
    • Carefully remove the battery from the device.

  6. Lenovo Yoga 3 11 Wireless Card Replacement, Wireless Card: 6 단계, 이미지 1/1
    • Use a pair of tweezers to disconnect the motherboard-size of the trackpad ribbon cable. Gently lift up the black tab, and the cable should come free from the ZIF connector.

  7. Lenovo Yoga 3 11 Wireless Card Replacement: 7 단계, 이미지 1/1
    • Use a pair of tweezers to disconnect the keyboard ribbon cable from the motherboard ZIF connector. Gently lift up the white tab, and the cable should come free.

  8. Lenovo Yoga 3 11 Wireless Card Replacement: 8 단계, 이미지 1/1
    • Use a pair of tweezers to disconnect the motherboard-side of the SD board ribbon cable. Gently lift up the black tab, and then ribbon cable should come free from the ZIF connector.

  9. Lenovo Yoga 3 11 Wireless Card Replacement: 9 단계, 이미지 1/1
    • Use the tweezers to unplug the USB port from the motherboard by gently lifting the white connector up from the black motherboard connector.

  10. Lenovo Yoga 3 11 Wireless Card Replacement: 10 단계, 이미지 1/1
    • Use a plastic opening tool to gently pry up the screen cable from the motherboard.

  11. Lenovo Yoga 3 11 Wireless Card Replacement: 11 단계, 이미지 1/3 Lenovo Yoga 3 11 Wireless Card Replacement: 11 단계, 이미지 2/3 Lenovo Yoga 3 11 Wireless Card Replacement: 11 단계, 이미지 3/3
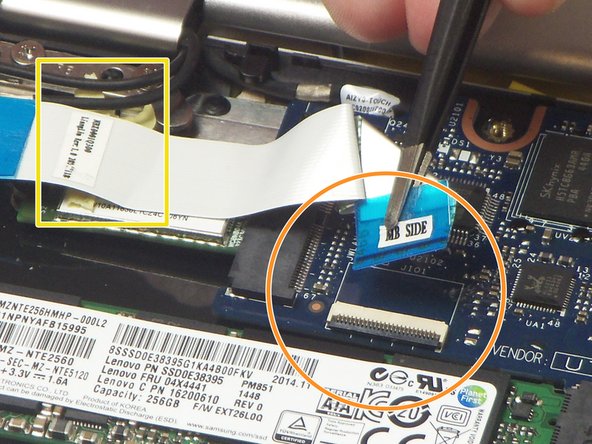
    • Use a pair of tweezers to disconnect the "I/O Side" of the ribbon cable connecting the audio jack/USB port assembly to the motherboard. Gently lift up the black tab, and the ribbon cable should come free from the ZIF connector.

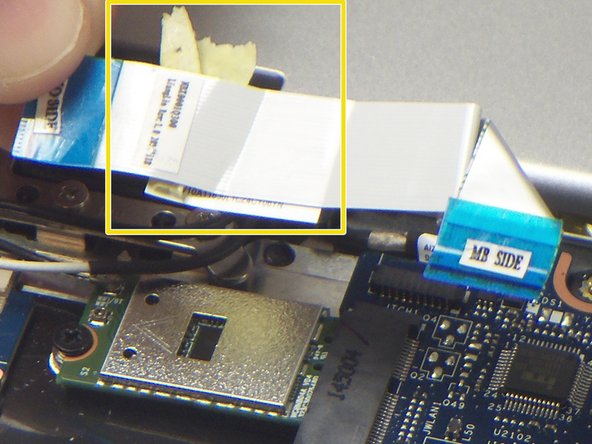
    • Use a pair of tweezers to disconnect the "MB Side" of the ribbon cable connecting the audio jack/USB port assembly to the motherboard. Gently lift up the black tab, and the ribbon cable should come free from the ZIF connector.

    • Remove the ribbon cable from the device.

  12. Lenovo Yoga 3 11 Wireless Card Replacement: 12 단계, 이미지 1/2 Lenovo Yoga 3 11 Wireless Card Replacement: 12 단계, 이미지 2/2
    • Remove the single 2 mm Phillips #00 screws securing the wireless card.

    • Use a pair of tweezers to disconnect the black and white antenna cables that are connected to the wireless card.

    • Gently lift the wireless card up and out of the device.

결론

To reassemble your device, follow these instructions in reverse order.

다른 3명이 해당 안내서를 완성하였습니다.

Geoff Wacker

회원 가입일: 09/30/13

89,895 평판

안내서 89개 작성하였습니다

댓글 2개

Thanks for the useful views and explanations about what’s there, however I don’t see why the battery has to be removed at all for this procedure?

(The network card appears to be accessible without)

Pete R

Pete Reimann - 답글

Are there any H*ckintosh compatible wireless cards that can be installed in this Lenovo Yoga 3 11 laptop? Asking for a friend. ;)

Jaime Hancock - 답글

댓글 쓰기

조회 통계:

24 시간 전: 0

7일 전: 3

30일 전: 8

전체 시간: 2,619