주요 콘텐츠로 건너뛰기

Lenovo Yoga 710-14IKB Motherboard Replacement

필요한 것

  1. Lenovo Yoga 710-14IKB Motherboard Replacement, Back Cover: 1 단계, 이미지 1/1
    • Ensure your device is completely OFF before starting this guide.

    • Use a Torx T4 screwdriver to unscrew the nine 5 mm screws holding the cover in place.

    • Use a Torx T4 screwdriver to unscrew the 8 mm screw in the center.

    • When, reassembling, make sure not to tighten the screws too much or you may risk cracking the plastic cover.

  2. Lenovo Yoga 710-14IKB Motherboard Replacement: 2 단계, 이미지 1/3 Lenovo Yoga 710-14IKB Motherboard Replacement: 2 단계, 이미지 2/3 Lenovo Yoga 710-14IKB Motherboard Replacement: 2 단계, 이미지 3/3
    • Use the plastic opening tool to pry the cover up and away from the laptop, starting at one end and working your way around the cover.

    • The cover is large and flat and made of thin plastic. It cracks easily, so make sure not to pry too hard.

  3. Lenovo Yoga 710-14IKB Motherboard Replacement, Battery: 3 단계, 이미지 1/2 Lenovo Yoga 710-14IKB Motherboard Replacement, Battery: 3 단계, 이미지 2/2
    • Use a Phillips #00 screwdriver to remove the four 3 mm screws holding the battery in place.

    • Be careful not to cross-thread the screws. Also, don't let the screws fall down into the laptop case.

  4. Lenovo Yoga 710-14IKB Motherboard Replacement: 4 단계, 이미지 1/2 Lenovo Yoga 710-14IKB Motherboard Replacement: 4 단계, 이미지 2/2
    • Use your fingers or an opening tool to slide the battery connector out of its motherboard socket.

  5. Lenovo Yoga 710-14IKB Motherboard Replacement: 5 단계, 이미지 1/1
    • Remove the battery.

  6. Lenovo Yoga 710-14IKB Motherboard Replacement, SSD: 6 단계, 이미지 1/2 Lenovo Yoga 710-14IKB Motherboard Replacement, SSD: 6 단계, 이미지 2/2
    • Use a Phillips #00 screwdriver to remove the 3mm screw on the SSD.

  7. Lenovo Yoga 710-14IKB Motherboard Replacement: 7 단계, 이미지 1/2 Lenovo Yoga 710-14IKB Motherboard Replacement: 7 단계, 이미지 2/2
    • Use your fingers to lift up the SSD and pull away from the socket removing it from the laptop.

  8. Lenovo Yoga 710-14IKB Motherboard Replacement, Motherboard: 8 단계, 이미지 1/1
    • Use a PH00 screwdriver to remove the nine 3mm screws.

  9. Lenovo Yoga 710-14IKB Motherboard Replacement: 9 단계, 이미지 1/2 Lenovo Yoga 710-14IKB Motherboard Replacement: 9 단계, 이미지 2/2
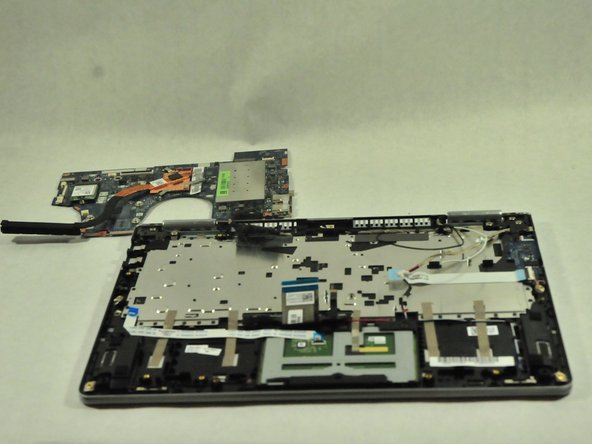
    • Disconnect the indicated cables from the motherboard.

    • Be careful when removing cables. Do not pull or yank cables from their slots.

    • Remove the motherboard.

    • If you want to fully remove the motherboard, you must desolder the display cable.

결론

To reassemble your device, follow these instructions in reverse order.

다른 3명이 해당 안내서를 완성하였습니다.

Evan Cruzen

회원 가입일: 11/01/18

253 평판

안내서 2개 작성하였습니다

UMass Dartmouth, Team S5-G8, Gulbrandsen Fall 2018 UMass Dartmouth, Team S5-G8, Gulbrandsen Fall 2018 회원

UMASSD-GULBRANDSEN-F18S5G8

3 회원들

안내서 9개 작성하였습니다

댓글 0개

댓글 쓰기

조회 통계:

24 시간 전: 0

7일 전: 1

30일 전: 6

전체 시간: 2,832