주요 콘텐츠로 건너뛰기

Lenovo Yoga 710-15ISK Motherboard Replacement

필요한 것

  1. Lenovo Yoga 710-15ISK Motherboard Replacement, Back Cover: 1 단계, 이미지 1/2 Lenovo Yoga 710-15ISK Motherboard Replacement, Back Cover: 1 단계, 이미지 2/2
    • Flip your laptop over so the bottom is facing upwards.

    • Remove ten 2 mm screws securing the back cover to the laptop using a Phillips #0 screwdriver.

  2. Lenovo Yoga 710-15ISK Motherboard Replacement: 2 단계, 이미지 1/1
    • Pry the back cover off of the laptop with your fingers.

  3. Lenovo Yoga 710-15ISK Motherboard Replacement, Battery: 3 단계, 이미지 1/2 Lenovo Yoga 710-15ISK Motherboard Replacement, Battery: 3 단계, 이미지 2/2
    • Remove the four 2 mm screws from the battery using a Phillips #0 screwdriver.

  4. Lenovo Yoga 710-15ISK Motherboard Replacement: 4 단계, 이미지 1/1
    • Remove the connector between the battery and the motherboard by gently pulling the black plastic-coated part of the wires.

  5. Lenovo Yoga 710-15ISK Motherboard Replacement: 5 단계, 이미지 1/1
    • Remove the battery from the laptop.

  6. Lenovo Yoga 710-15ISK Motherboard Replacement, Fans: 6 단계, 이미지 1/1
    • Remove the four 1.5 mm screws from the fans with a Phillips #00 screwdriver.

  7. Lenovo Yoga 710-15ISK Motherboard Replacement: 7 단계, 이미지 1/1
    • Unplug the wire connecting the fan to the motherboard by gently pulling the white head from the port.

  8. Lenovo Yoga 710-15ISK Motherboard Replacement: 8 단계, 이미지 1/2 Lenovo Yoga 710-15ISK Motherboard Replacement: 8 단계, 이미지 2/2
    • Lift both fans to remove them from the laptop.

  9. Lenovo Yoga 710-15ISK Motherboard Replacement, SSD: 9 단계, 이미지 1/1
    • Remove the sticker from the SSD to gain access to the screw underneath.

  10. Lenovo Yoga 710-15ISK Motherboard Replacement: 10 단계, 이미지 1/2 Lenovo Yoga 710-15ISK Motherboard Replacement: 10 단계, 이미지 2/2
    • Remove the screw holding the SSD in place using a Phillips #0 screwdriver.

    • Gently pull on the plastic clip next to the screw until the stick is freed and bounces up.

  11. Lenovo Yoga 710-15ISK Motherboard Replacement: 11 단계, 이미지 1/1
    • Slide the SSD out of the laptop.

  12. Lenovo Yoga 710-15ISK Motherboard Replacement, Motherboard: 12 단계, 이미지 1/1
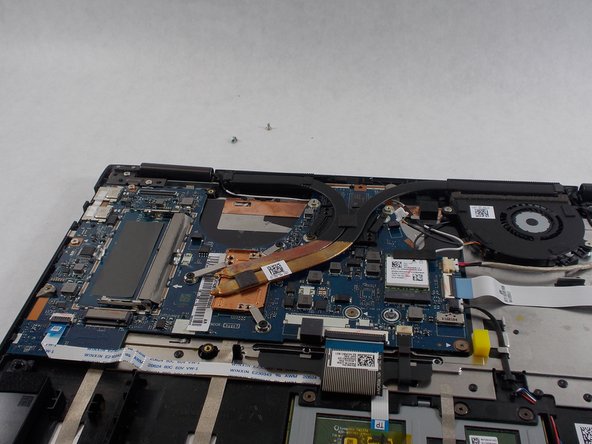
    • Remove seven 2 mm screws from the motherboard using a Phillips #0 screwdriver.

  13. Lenovo Yoga 710-15ISK Motherboard Replacement: 13 단계, 이미지 1/3 Lenovo Yoga 710-15ISK Motherboard Replacement: 13 단계, 이미지 2/3 Lenovo Yoga 710-15ISK Motherboard Replacement: 13 단계, 이미지 3/3
    • Unplug four cables attached to the motherboard.

    • For the flat ribbon wires, lift the black tabs holding them in place before removing them.

  14. Lenovo Yoga 710-15ISK Motherboard Replacement: 14 단계, 이미지 1/1
    • Carefully lift out the motherboard to remove it from the laptop.

결론

To reassemble your device, follow these instructions in reverse order.

Annette Limoges

회원 가입일: 10/25/21

181 평판

안내서 2개 작성하였습니다

UMass Dartmouth, Team 7-1, Sinclaire Spring 2022 UMass Dartmouth, Team 7-1, Sinclaire Spring 2022 회원

UMASSD-SINCLAIRE-S22S7G1

5 회원들

안내서 8개 작성하였습니다

댓글 0개

댓글 쓰기

조회 통계:

24 시간 전: 0

7일 전: 0

30일 전: 5

전체 시간: 254