주요 콘텐츠로 건너뛰기

Lenovo Yoga Book X90F Speakers Replacement

필요한 것

  1. Lenovo Yoga Book X90F Speakers Replacement, Bottom Screen/Keyboard: 1 단계, 이미지 1/1
    • Turn off and power down the device before beginning this process. A heat gun or hair dryer will be suitable to heat the adhesive that holds down the screen. Apply heat to the entire surface area of the bottom screen.

    • New adhesive will be required when completing the steps in reverse order.

  2. Lenovo Yoga Book X90F Speakers Replacement: 2 단계, 이미지 1/2 Lenovo Yoga Book X90F Speakers Replacement: 2 단계, 이미지 2/2
    • Once the adhesive has been heated up, take the iFixIt suction cup and lift in a corner. The screen should be separating from the adhesive here.

    • While the screen is lifted, insert the ifixit opening pick to help pry off the screen.

    • The screen may crack easily as it is thin and fragile.

  3. Lenovo Yoga Book X90F Speakers Replacement: 3 단계, 이미지 1/1
    • While the screen has been lifted, insert the plastic opening picks. Heat the adhesive and follow with the screen removal tool to ensure that you are not prying it apart with excessive force.

  4. Lenovo Yoga Book X90F Speakers Replacement: 4 단계, 이미지 1/3 Lenovo Yoga Book X90F Speakers Replacement: 4 단계, 이미지 2/3 Lenovo Yoga Book X90F Speakers Replacement: 4 단계, 이미지 3/3
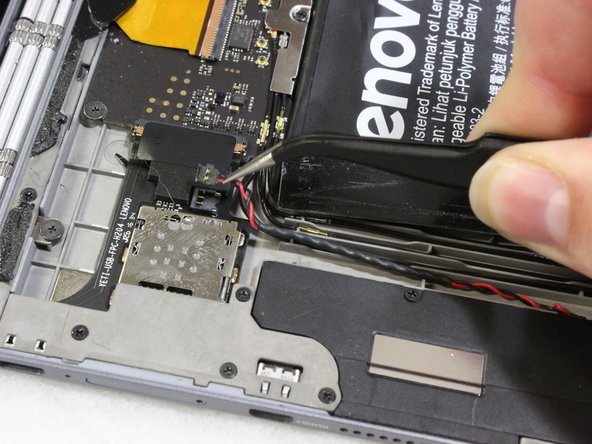
    • After the screen has been opened, disconnect the ribbon connecting the bottom screen to the motherboard by gently pulling the ribbon with tweezers.

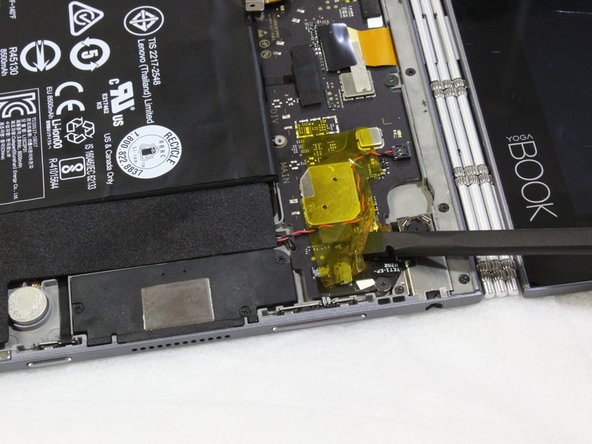
    • If there are black coverings on the tabs as shown in the second image, carefully remove them using a pair of tweezers.

    • You can find more information on Zero Insertion Force (ZIF) connectors on this guide.

  5. Lenovo Yoga Book X90F Speakers Replacement: 5 단계, 이미지 1/1
    • Separate and remove the bottom screen from the device.

  6. Lenovo Yoga Book X90F Speakers Replacement, Right and Left Speakers: 6 단계, 이미지 1/3 Lenovo Yoga Book X90F Speakers Replacement, Right and Left Speakers: 6 단계, 이미지 2/3 Lenovo Yoga Book X90F Speakers Replacement, Right and Left Speakers: 6 단계, 이미지 3/3
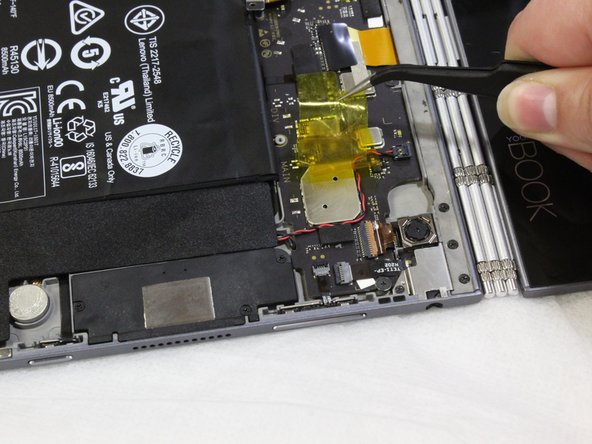
    • Peel the yellowish covering off, using the flat end of the spudger to pry it up and the tweezers to pull it off gently.

  7. Lenovo Yoga Book X90F Speakers Replacement: 7 단계, 이미지 1/2 Lenovo Yoga Book X90F Speakers Replacement: 7 단계, 이미지 2/2
    • Remove black covering from device.

  8. Lenovo Yoga Book X90F Speakers Replacement: 8 단계, 이미지 1/2 Lenovo Yoga Book X90F Speakers Replacement: 8 단계, 이미지 2/2
    • Use tweezers to unplug the intertwined black and red wires.

  9. Lenovo Yoga Book X90F Speakers Replacement: 9 단계, 이미지 1/1
    • Using the JIS #00 screwdriver, remove the three 8 mm screws that are holding the right speaker down.

  10. Lenovo Yoga Book X90F Speakers Replacement: 10 단계, 이미지 1/1
    • Using the tweezers, remove the right speaker from the device.

    • The speaker is snugly fit under the lip of the device.

  11. Lenovo Yoga Book X90F Speakers Replacement: 11 단계, 이미지 1/2 Lenovo Yoga Book X90F Speakers Replacement: 11 단계, 이미지 2/2
    • Use tweezers to unplug the intertwined red and black wires.

  12. Lenovo Yoga Book X90F Speakers Replacement: 12 단계, 이미지 1/2 Lenovo Yoga Book X90F Speakers Replacement: 12 단계, 이미지 2/2
    • Using the JIS #00 screwdriver, remove the two 8 mm screws that are holding the left speaker down.

  13. Lenovo Yoga Book X90F Speakers Replacement: 13 단계, 이미지 1/2 Lenovo Yoga Book X90F Speakers Replacement: 13 단계, 이미지 2/2
    • Use the spudger to gently pry the left speaker up.

    • The speaker is snugly fit under the lip of the device

    • Use the tweezers to pull the left speaker out.

결론

To reassemble your device, follow these instructions in reverse order.

McKenzy Butler

회원 가입일: 09/28/21

157 평판

안내서 1개 작성함

Clemson, Team 5-2, Hunter Fall 2021 Clemson, Team 5-2, Hunter Fall 2021 회원

CLEM-HUNTER-F21S5G2

5 회원들

안내서 6개 작성하였습니다

댓글 0개

댓글 쓰기

조회 통계:

24 시간 전: 0

7일 전: 1

30일 전: 3

전체 시간: 192