주요 콘텐츠로 건너뛰기

Little Beaver Augers MDL5HD 2017 Clutch Assembly Replacement

필요한 것

  1. Little Beaver Augers MDL5HD 2017 Clutch Assembly Replacement, Disconnect the spark plug: 1 단계, 이미지 1/2 Little Beaver Augers MDL5HD 2017 Clutch Assembly Replacement, Disconnect the spark plug: 1 단계, 이미지 2/2
    • Before you begin, make sure the engine is switched off and cool to the touch.

    • Pull the spark plug connector straight off of the spark plug.

  2. Little Beaver Augers MDL5HD 2017 Clutch Assembly Replacement, Remove the clutch bracket clamp: 2 단계, 이미지 1/1
    • Use a 5/16 inch socket to remove the two nuts securing the clutch bracket clamp.

    • You may need another 5/16 inch wrench to hold the bolt from underneath while you loosen the nut.

  3. Little Beaver Augers MDL5HD 2017 Clutch Assembly Replacement: 3 단계, 이미지 1/1
    • Remove the clutch bracket clamp.

  4. Little Beaver Augers MDL5HD 2017 Clutch Assembly Replacement, Remove the clutch drum: 4 단계, 이미지 1/1
    • Use a 5/32 inch hex wrench to loosen the two set screws on the clutch drum.

  5. Little Beaver Augers MDL5HD 2017 Clutch Assembly Replacement: 5 단계, 이미지 1/2 Little Beaver Augers MDL5HD 2017 Clutch Assembly Replacement: 5 단계, 이미지 2/2
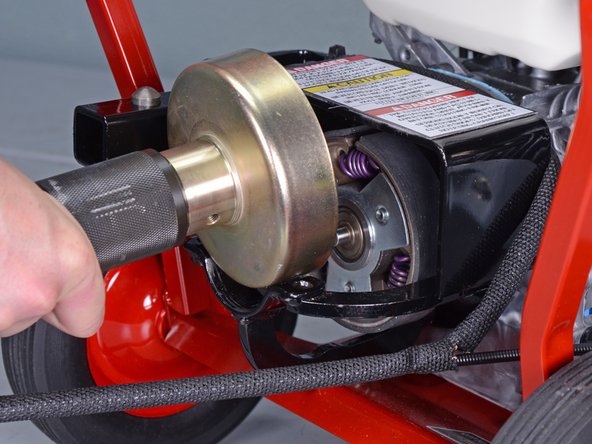
    • Slide the clutch drum straight off of the clutch rotor assembly.

  6. Little Beaver Augers MDL5HD 2017 Clutch Assembly Replacement: 6 단계, 이미지 1/3 Little Beaver Augers MDL5HD 2017 Clutch Assembly Replacement: 6 단계, 이미지 2/3 Little Beaver Augers MDL5HD 2017 Clutch Assembly Replacement: 6 단계, 이미지 3/3
    • Use a flathead screwdriver or small pry bar to pry the clutch drum off of the flexible shaft.

    • Slide the clutch drum off of the flexible shaft and remove it.

    • During reassembly, apply anti-seize lubricant to the interface between the clutch drum and flexible shaft.

    • The clutch drum can be replaced as part of the clutch assembly replacement.

    • The replacement clutch drum should come with a new pilot bearing installed. If it doesn't, you may need to install a new pilot bearing.

  7. Little Beaver Augers MDL5HD 2017 Clutch Assembly Replacement, Remove the clutch rotor assembly: 7 단계, 이미지 1/2 Little Beaver Augers MDL5HD 2017 Clutch Assembly Replacement, Remove the clutch rotor assembly: 7 단계, 이미지 2/2
    • Use a long-handle 5/32 inch hex wrench to loosen the two set screws on the clutch rotor assembly.

    • The first photo shows the set screws on the replacement part for reference. Loosen the screws on the installed part, not the replacement part.

    • The screws are positioned behind the clutch rotor and won't be easy to access. Use a long-handle hex wrench as shown in the second photo.

  8. Little Beaver Augers MDL5HD 2017 Clutch Assembly Replacement: 8 단계, 이미지 1/2 Little Beaver Augers MDL5HD 2017 Clutch Assembly Replacement: 8 단계, 이미지 2/2
    • Slide the clutch rotor assembly off of the engine drive shaft.

    • The clutch rotor assembly can be replaced as part of the clutch assembly replacement.

    • During reassembly, make sure the clutch rotor assembly key is inserted correctly into its slot before reassembly.

    • During reassembly, apply anti-seize lubricant to the interface between the clutch rotor and engine drive shaft.

결론

To reassemble your device, follow these instructions in reverse order.

다른 2명이 해당 안내서를 완성하였습니다.

Adam O'Camb

회원 가입일: 04/11/15

196,770 평판

안내서 416개 작성하였습니다

댓글 0개

댓글 쓰기

조회 통계:

24 시간 전: 0

7일 전: 7

30일 전: 13

전체 시간: 717