주요 콘텐츠로 건너뛰기

Logitech G27 C-Clamp Replacement

필요한 것

  1. Logitech G27 C-Clamp  Replacement, Steering Wheel: 1 단계, 이미지 1/1
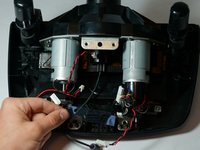
    • Remove the six gray 25mm hex screws with a 4mm allen wrench.

    • Watch out when you lift the wheel up, as there are fragile wires connected to the bottom side.

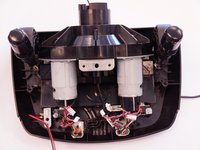
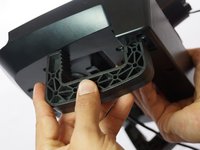
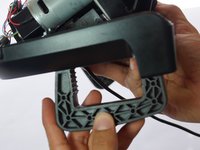
    • Carefully lift up the wheel, but do not disconnect it from the rest of the device.

  2. Logitech G27 C-Clamp  Replacement: 2 단계, 이미지 1/1
    • Carefully lift the wheel off of the hub, exposing the 2 shifter paddle wires and PCB board.

  3. Logitech G27 C-Clamp  Replacement: 3 단계, 이미지 1/1
    • Remove the two 7.5 mm silver screws holding the green PCB board in the wheel with a Phillips #1 screwdriver.

  4. Logitech G27 C-Clamp  Replacement: 4 단계, 이미지 1/1
    • Carefully remove the PCB board from the wheel hub.

  5. Logitech G27 C-Clamp  Replacement: 5 단계, 이미지 1/1
    • Carefully pinch and unplug the large 7-pin connector under the PCB board.

    • Be careful when unplugging this adapter, try not to pull on the wires to avoid damaging them. Instead, wiggle around the plastic connector while pulling on it to loosen it.

  6. Logitech G27 C-Clamp  Replacement: 6 단계, 이미지 1/1
    • You can now fully remove the wheel from the hub. Set it aside until you put the wheel back together.

    • Remove the innermost three 37.5mm silver screws with a Phillips #2 screwdriver.

    • Remove the wheel hub and push the connector through the center of the hub.

  7. Logitech G27 C-Clamp  Replacement: 7 단계, 이미지 1/1
    • The wheel hub can now be set aside and flip over the steering wheel housing to reveal the under side.

    • Remove the eight 15.9mm silver surrounding screws underneath the wheel housing with a Phillips #1 screwdriver.

  8. Logitech G27 C-Clamp  Replacement: 8 단계, 이미지 1/1
    • Rotate the housing back over and remove the top half of the housing revealing the majority of the components of the wheel.

    • The housing cover can be set aside until you put the wheel back together.

  9. Logitech G27 C-Clamp  Replacement: 9 단계, 이미지 1/1
    • Remove the four 7.3mm silver screws attaching the green PCB board to the motor housing with a Phillips #2 screwdriver.

  10. Logitech G27 C-Clamp  Replacement: 10 단계, 이미지 1/1
    • Unplug the three plastic connectors on the left side of the PCB board.

    • Unplug the two plastic connectors on the top of the PCB board.

    • Unplug the three plastic connectors on the right side of the PCB board.

    • Pulling the plastic connectors requires a lot of force, but be careful and don't pull directly on the wires. Try to wedge or push the male side of the connector out.

    • If you need some extra leverage when removing these connectors, try using a plastic opening tool to pry off the connectors.

    • Removing these connectors allows easier access to the four screws attaching the PCB board mount to the motor housing.

  11. Logitech G27 C-Clamp  Replacement: 11 단계, 이미지 1/1
    • Remove the PCB board after all of the plastic connectors are disconnected.

    • You can now set it aside.

  12. Logitech G27 C-Clamp  Replacement: 12 단계, 이미지 1/1
    • Remove the two 12.3mm upper black screws with a Phillips #2 screwdriver.

    • Remove the two 15.5mm bottom silver screws with a Phillips #1 screwdriver.

  13. Logitech G27 C-Clamp  Replacement: 13 단계, 이미지 1/2 Logitech G27 C-Clamp  Replacement: 13 단계, 이미지 2/2
    • Remove the PCB board mount and remove the clear plastic piece underneath.

    • Set them aside until you reassemble the wheel.

  14. Logitech G27 C-Clamp  Replacement, C-Clamp: 14 단계, 이미지 1/1
    • Unscrew the piece holding the C-Clamp in place with your hand.

  15. Logitech G27 C-Clamp  Replacement: 15 단계, 이미지 1/2 Logitech G27 C-Clamp  Replacement: 15 단계, 이미지 2/2
    • Push the remaining nob forward and then inward through the slot.

  16. Logitech G27 C-Clamp  Replacement: 16 단계, 이미지 1/2 Logitech G27 C-Clamp  Replacement: 16 단계, 이미지 2/2
    • The C-Clamp can now be easily pulled out of the bottom of the device.

결론

To reassemble your device, follow these instructions in reverse order.

다른 23명이 해당 안내서를 완성하였습니다.

Daniel Louis

회원 가입일: 04/28/15

718 평판

안내서 1개 작성함

Cal Poly, Team 15-4, Amido Spring 2015 Cal Poly, Team 15-4, Amido Spring 2015 회원

CPSU-AMIDO-S15S15G4

4 회원들

안내서 25개 작성하였습니다

댓글 14개

Where would I buy the replacement C-Clamps from because one of mine are broken and I need to install a new one.

Mumin Mazhar - 답글

Look for it at eBay.

Eduardo -

I also need to find a place to buy replacement C-clamps from

hockeyjockone - 답글

Can you tell me where I can buy these clamps?

kholiwen - 답글

step 9 to 13 not needed ... please confirm

Matt Na - 답글

댓글 쓰기

조회 통계:

24 시간 전: 6

7일 전: 25

30일 전: 212

전체 시간: 45,154