소개
I've noticed that I started having issues dragging windows. At first I thought it was a software issue since I recently switched from Windows to Linux OS. But the issue persisted on both OSes so it was clear that it was a hardware problem.
So that is how the saga of trackball mouse disassembling started. The rest is history!!!
This guide will help you to disassemble your very own Logitech M570 and guide you through switch replacement. Note that you will require soldering skills to replace switches. You might get by without soldering skills if you are after replacing the ball sensor.
필요한 것
-
-
Remove tracking ball
-
Turn power switch to the off position
-
Open battery door
-
Remove AA battery
-
-
-
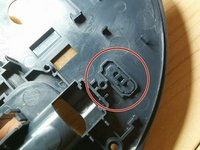
Remove 3 pads as shown in the picture
-
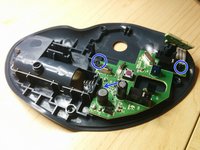
Unscrew the 5 bolts using Phillips #1 screwdriver
-
The last screw is hidden under the battery label. You will have to poke a hole to get to it.
-
-
-
-
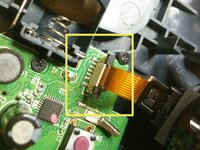
Lift the latch up and pull flex circuit out of connector. Detach tracking ball sensor.
-
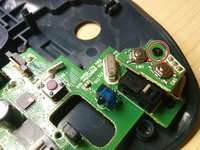
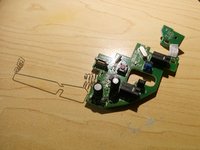
Unscrew first screw and detach little PCB
-
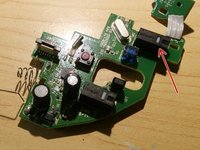
Take the other 3 screws out. The last screw is hidden behind a capacitor in the picture
-
-
-
As you may see one of the switches is completely busted. It has to be replaced!
-
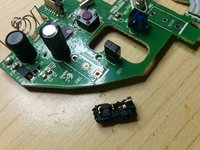
There are few replacements out there. I've used this one. But you might want to use original one. Or the rival one.
-
It really does not matter much. The difference is operating force. The original one comes with 75 gf which gives lighter clicking action. But I went with 150 gf for the replacement since those should last longer...
-
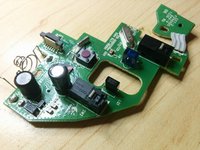
Take old switches out. Might be a little tricky! You might want to use multiple soldering irons to heat all 3 pins at once. Or heat gun. The choice is yours. Just be careful not to burn yourself! FYI, this is probably not the best project for the first soldering experience!
-
Solder new switches on.
-


To reassemble your device, follow these instructions in the reverse order.
다른 40명이 해당 안내서를 완성하였습니다.

24가이드 댓글
Instructions are very clear and accurate. The most difficult part of this repair is de-soldering the switch, additional information is needed for this step.
Hugo Castro - 답글 공유
Folks, use a solder sucker and a solder wick. There should be many articles out there on using solder (extractor) sucker and wick. But basically you melt solder , solder sucker sucks up the most of it (Put the tip right over the end of the metal leg RIGHT after melting) All has to happenen very quickly.
Then the solder wick, you rub over the metal pins using the solder iron to push it along the PCB around the pins and the switch will just drop out.
No offence to any one but the article author did say not advised for your first solder experience, and using solder wick etc would be a veteran solder master trick.
john sloan - 답글 공유
Fine multi-strand wire from an old phone extension cable is good as a wick to remove solder - use a tiny amount of flux to help.
An aside to replacing the switches: if you’re having problems with click bounce and a regular contact cleaner isn’t working you could try an oil for electric model train motor commutators: Peco Electrics Power-Lube PL-64 - I picked up a little in a model shop but you can buy it online in the UK for around £6 to £7 for a couple of mL - the key bounce problems have largely disappeared after one or two applications both for my M570s and for an older cordless trackman wheel that I had given up on. If you have one of these it is worth noting that they will run perfectly well on NiMH rechargeable cells whereas the M570 will not. The latter may win out on simple battery life but on the environmental side: using a rechargeable cell should be better in the longer term especially as the grid gets a higher proportion of renewables.
Christopher - 답글 공유