주요 콘텐츠로 건너뛰기

Logitech Pure-Fi Anywhere 2 Inner Speaker Cones Replacement

필요한 것

  1. Logitech Pure-Fi Anywhere 2 Inner Speaker Cones Replacement, Inner Speaker Cones: 1 단계, 이미지 1/3 Logitech Pure-Fi Anywhere 2 Inner Speaker Cones Replacement, Inner Speaker Cones: 1 단계, 이미지 2/3 Logitech Pure-Fi Anywhere 2 Inner Speaker Cones Replacement, Inner Speaker Cones: 1 단계, 이미지 3/3
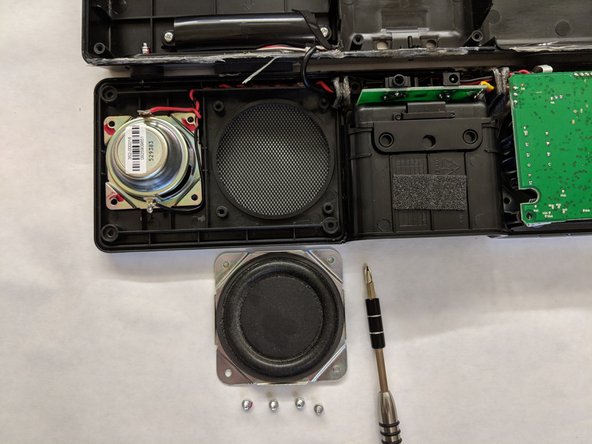
    • To remove the plastic cover. You want to use the plastic opener and starting with corners.

    • Then insert the metal spudger in the opening and slowly move the metal spudger along all sides of the cover.

    • Caution: Metal spudger can damage the internal components of the device such as the motherboard. Make sure to use it carefully in order to avoid any unnecessary damages.

    • Make sure the metal supdger is inserted deep enough as the cover is glued to the device.

    • Carefully remove the cover as it can be very fragile

  2. Logitech Pure-Fi Anywhere 2 Inner Speaker Cones Replacement: 2 단계, 이미지 1/3 Logitech Pure-Fi Anywhere 2 Inner Speaker Cones Replacement: 2 단계, 이미지 2/3 Logitech Pure-Fi Anywhere 2 Inner Speaker Cones Replacement: 2 단계, 이미지 3/3
    • Remove eight 10.5 mm Phillips #1 screws from the cover.

    • Insert a metal spurger at the corner to help loosen the cover.

    • There is still glue sticking the front cover and the back cover together.

    • Starting with corners, lift up the cover slowly and carefully.

    • Do not pull too hard when removing the cover. There are wires connecting between the battery and the circuit board.

  3. Logitech Pure-Fi Anywhere 2 Inner Speaker Cones Replacement: 3 단계, 이미지 1/2 Logitech Pure-Fi Anywhere 2 Inner Speaker Cones Replacement: 3 단계, 이미지 2/2
    • Identity the speaker cover, and remove four 4.5 mm Phillips #1 screws.

    • Lift up the cone. It should be removed very easily by hand.

  4. Logitech Pure-Fi Anywhere 2 Inner Speaker Cones Replacement: 4 단계, 이미지 1/2 Logitech Pure-Fi Anywhere 2 Inner Speaker Cones Replacement: 4 단계, 이미지 2/2
    • Remove four 5.2mm Phillips #1 screws that are securing the circuit board.

    • Unplug the connecting wire from the circuit board. Carefully lift up the circuit board.

    • Same as step 3, remove four 4.5 mm Phillips #1 screws from the speaker cone.

결론

To reassemble your device, follow these instructions in reverse order.

junyi yang

회원 가입일: 07/11/18

109 평판

안내서 1개 작성함

IUPUI, Team S4-G4, Wilson Summer 2018 IUPUI, Team S4-G4, Wilson Summer 2018 회원

IUPUI-WILSON-SU18S4G4

4 회원들

안내서 2개 작성하였습니다

댓글 0개

댓글 쓰기

조회 통계:

24 시간 전: 0

7일 전: 3

30일 전: 10

전체 시간: 1,199