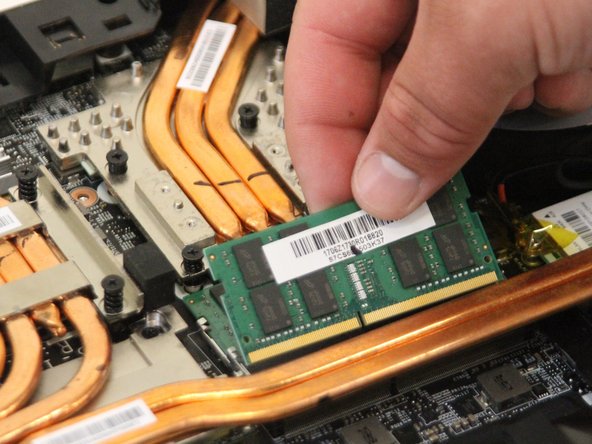
주요 콘텐츠로 건너뛰기

MSI GT75VR 7RF Titan Pro RAM Card Replacement

필요한 것

  1. MSI GT75VR 7RF Titan Pro RAM Card Replacement, RAM Card: 1 단계, 이미지 1/1
    • Unscrew each of the four screws using the Phillips #0 head on the back of the laptop case. The screws are 0.5 inches in length.

  2. MSI GT75VR 7RF Titan Pro RAM Card Replacement: 2 단계, 이미지 1/2 MSI GT75VR 7RF Titan Pro RAM Card Replacement: 2 단계, 이미지 2/2
    • Pop the back cover off of the laptop using the black nylon spudger.

  3. MSI GT75VR 7RF Titan Pro RAM Card Replacement: 3 단계, 이미지 1/1
    • Disconnect the battery cable.

  4. MSI GT75VR 7RF Titan Pro RAM Card Replacement: 4 단계, 이미지 1/2 MSI GT75VR 7RF Titan Pro RAM Card Replacement: 4 단계, 이미지 2/2
    • Pry the battery pack up with the black nylon spudger.

  5. MSI GT75VR 7RF Titan Pro RAM Card Replacement: 5 단계, 이미지 1/1
    • Pop the metal tabs on each side of the RAM using the black nylon spudger.

  6. MSI GT75VR 7RF Titan Pro RAM Card Replacement: 6 단계, 이미지 1/1
    • Lift and remove RAM card by hand. Replace each RAM card and test them individually. If your computer encounters a RAM error with only one card inserted, you can confirm that card is corrupted.

결론

To reassemble your device, follow these instructions in reverse order.

Jack Crumpton

회원 가입일: 08/31/18

241 평판

안내서 2개 작성하였습니다

댓글 0개

댓글 쓰기

조회 통계:

24 시간 전: 0

7일 전: 0

30일 전: 4

전체 시간: 641