주요 콘텐츠로 건너뛰기

MSI MS-1782 Speaker Assembly Replacement

필요한 것

  1. MSI MS-1782 Speaker Assembly Replacement, Back Cover: 1 단계, 이미지 1/1
    • Remove five 6.6 mm screws from the edges of the bottom cover using a JIS #1 screwdriver.

    • Remove one 5.6 mm screw from the center of the bottom cover using a JIS #1 screwdriver.

  2. MSI MS-1782 Speaker Assembly Replacement: 2 단계, 이미지 1/3 MSI MS-1782 Speaker Assembly Replacement: 2 단계, 이미지 2/3 MSI MS-1782 Speaker Assembly Replacement: 2 단계, 이미지 3/3
    • Use an iFixit opening pick to unclip the bottom cover.

    • It is ok to run the picks along the edges since there is nothing connected to the bottom cover. It is easier to start from the sides and then work your way forward.

    • After unclipping the bottom case, pull from the back of the laptop upwards using the lip of the bottom case as a handle.

  3. MSI MS-1782 Speaker Assembly Replacement, Cooling Assembly: 3 단계, 이미지 1/3 MSI MS-1782 Speaker Assembly Replacement, Cooling Assembly: 3 단계, 이미지 2/3 MSI MS-1782 Speaker Assembly Replacement, Cooling Assembly: 3 단계, 이미지 3/3
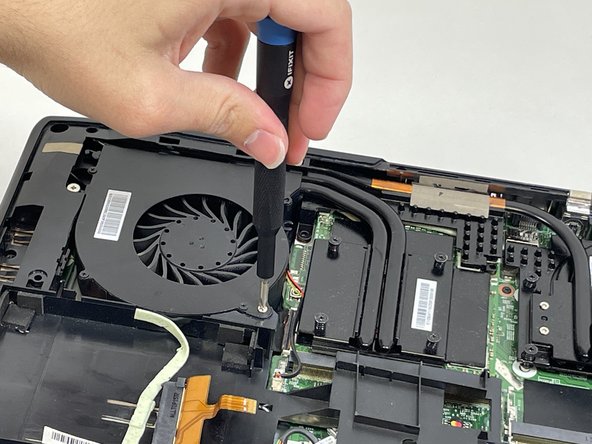
    • Loosen the captive screw on the left side of the left fan using a JIS #2 screwdriver.

    • Remove the 5.1 mm screw on the right side of the left fan using a JIS #2 screwdriver.

  4. MSI MS-1782 Speaker Assembly Replacement: 4 단계, 이미지 1/3 MSI MS-1782 Speaker Assembly Replacement: 4 단계, 이미지 2/3 MSI MS-1782 Speaker Assembly Replacement: 4 단계, 이미지 3/3
    • Gently detach the fan connector.

    • Remove the fan by lifting it out of its housing.

    • Be sure to handle the wire delicately; if not it will break.

  5. MSI MS-1782 Speaker Assembly Replacement: 5 단계, 이미지 1/3 MSI MS-1782 Speaker Assembly Replacement: 5 단계, 이미지 2/3 MSI MS-1782 Speaker Assembly Replacement: 5 단계, 이미지 3/3
    • Loosen the captive screw on the top of the right fan using a JIS #2 screwdriver.

    • Remove the 3.6 mm screw on the bottom of the right fan using a JIS #2 screwdriver.

  6. MSI MS-1782 Speaker Assembly Replacement: 6 단계, 이미지 1/3 MSI MS-1782 Speaker Assembly Replacement: 6 단계, 이미지 2/3 MSI MS-1782 Speaker Assembly Replacement: 6 단계, 이미지 3/3
    • Gently detach the fan connector.

    • Remove the fan by lifting it out of its housing.

    • Be sure to handle the wire delicately; if not it will break.

  7. MSI MS-1782 Speaker Assembly Replacement: 7 단계, 이미지 1/3 MSI MS-1782 Speaker Assembly Replacement: 7 단계, 이미지 2/3 MSI MS-1782 Speaker Assembly Replacement: 7 단계, 이미지 3/3
    • Loosen the eight captive screws holding the heat sink in place using a JIS #2 screwdriver.

    • Be sure to follow the numbers that are next to the screws on the heatsink. This evenly removes pressure on the components when removing the heatsink.

  8. MSI MS-1782 Speaker Assembly Replacement: 8 단계, 이미지 1/3 MSI MS-1782 Speaker Assembly Replacement: 8 단계, 이미지 2/3 MSI MS-1782 Speaker Assembly Replacement: 8 단계, 이미지 3/3
    • Gently lift the heat sink and then pull forwards towards you.

  9. MSI MS-1782 Speaker Assembly Replacement, Battery: 9 단계, 이미지 1/3 MSI MS-1782 Speaker Assembly Replacement, Battery: 9 단계, 이미지 2/3 MSI MS-1782 Speaker Assembly Replacement, Battery: 9 단계, 이미지 3/3
    • Remove the four 5.5 mm screws holding the battery frame in place using a JIS #1 screwdriver.

    • Gently disconnect the cable connecting the M.2 caddy to the motherboard.

  10. MSI MS-1782 Speaker Assembly Replacement: 10 단계, 이미지 1/3 MSI MS-1782 Speaker Assembly Replacement: 10 단계, 이미지 2/3 MSI MS-1782 Speaker Assembly Replacement: 10 단계, 이미지 3/3
    • Remove the 3.6 mm screw holding the M.2 caddy in place using a JIS #1 screwdriver.

  11. MSI MS-1782 Speaker Assembly Replacement: 11 단계, 이미지 1/3 MSI MS-1782 Speaker Assembly Replacement: 11 단계, 이미지 2/3 MSI MS-1782 Speaker Assembly Replacement: 11 단계, 이미지 3/3
    • Gently disconnect the two blue ribbons.

  12. MSI MS-1782 Speaker Assembly Replacement: 12 단계, 이미지 1/3 MSI MS-1782 Speaker Assembly Replacement: 12 단계, 이미지 2/3 MSI MS-1782 Speaker Assembly Replacement: 12 단계, 이미지 3/3
    • Remove the 5.1 mm screw holding in the disk reader using a JIS #1 screwdriver.

    • Use an iFixit opening tool to push the back of the disk reader to push it out of the laptop's chassis.

  13. MSI MS-1782 Speaker Assembly Replacement: 13 단계, 이미지 1/3 MSI MS-1782 Speaker Assembly Replacement: 13 단계, 이미지 2/3 MSI MS-1782 Speaker Assembly Replacement: 13 단계, 이미지 3/3
    • Gently pull the disc reader out of the laptop.

    • Lift the plastic cover and disconnect the cable connected next to the speaker.

  14. MSI MS-1782 Speaker Assembly Replacement: 14 단계, 이미지 1/1
    • Remove the five 5 mm screws holding the frame in place using a JIS #1 screwdriver.

  15. MSI MS-1782 Speaker Assembly Replacement: 15 단계, 이미지 1/3 MSI MS-1782 Speaker Assembly Replacement: 15 단계, 이미지 2/3 MSI MS-1782 Speaker Assembly Replacement: 15 단계, 이미지 3/3
    • Pry up on the battery frame with an opening tool and unclip from the main chassis, working your way around the laptop.

    • To remove the battery, pry up on it to unstick the adhesive.

    • A little Isopropyl alcohol under the battery can help unstick it from the frame.

  16. MSI MS-1782 Speaker Assembly Replacement, Speaker Assembly: 16 단계, 이미지 1/2 MSI MS-1782 Speaker Assembly Replacement, Speaker Assembly: 16 단계, 이미지 2/2
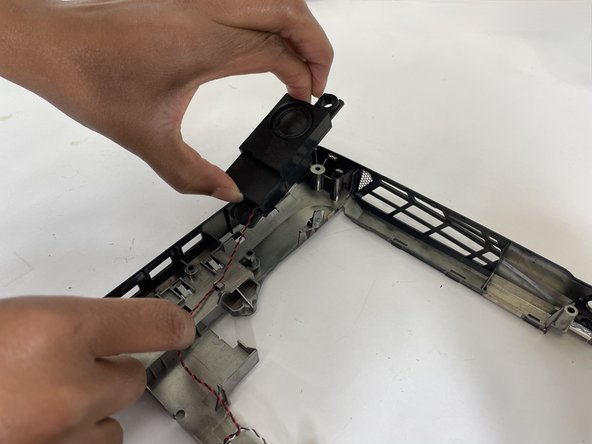
    • Pull the left speaker out, following the wire, unclipping it as you go to the next.

  17. MSI MS-1782 Speaker Assembly Replacement: 17 단계, 이미지 1/2 MSI MS-1782 Speaker Assembly Replacement: 17 단계, 이미지 2/2
    • Pull the right speaker out. Unclip the wire as you go, now completely removing both speakers.

  18. MSI MS-1782 Speaker Assembly Replacement: 18 단계, 이미지 1/3 MSI MS-1782 Speaker Assembly Replacement: 18 단계, 이미지 2/3 MSI MS-1782 Speaker Assembly Replacement: 18 단계, 이미지 3/3
    • Unplug the subwoofer and lift vertically to remove.

결론

To reassemble your device, follow these instructions in reverse order.

A'kia

회원 가입일: 03/08/23

193 평판

안내서 2개 작성하였습니다

댓글 0개

댓글 쓰기

조회 통계:

24 시간 전: 0

7일 전: 0

30일 전: 5

전체 시간: 54