주요 콘텐츠로 건너뛰기

Mac Pro Late 2013 CMOS 배터리 교체하기

필요한 것

  1. Mac Pro Late 2013 CMOS 배터리 교체하기, 외부 케이스: 1 단계, 이미지 1/2 Mac Pro Late 2013 CMOS 배터리 교체하기, 외부 케이스: 1 단계, 이미지 2/2
    • 잠금 스위치를 오른쪽으로 밀어 잠금 해제 위치로 이동하세요.

  2. Mac Pro Late 2013 CMOS 배터리 교체하기: 2 단계, 이미지 1/3 Mac Pro Late 2013 CMOS 배터리 교체하기: 2 단계, 이미지 2/3 Mac Pro Late 2013 CMOS 배터리 교체하기: 2 단계, 이미지 3/3
    • 외부 케이스를 Mac Pro에서 똑바로 들어 올리 세요.

    • 케이스를 들어 올릴 때 팬의 중앙을 누르면 도움이 될 수 있습니다.

  3. Mac Pro Late 2013 CMOS 배터리 교체하기, 팬 어셈블리: 3 단계, 이미지 1/3 Mac Pro Late 2013 CMOS 배터리 교체하기, 팬 어셈블리: 3 단계, 이미지 2/3 Mac Pro Late 2013 CMOS 배터리 교체하기, 팬 어셈블리: 3 단계, 이미지 3/3
    • 팬 어셈블리의 바깥 둘레에 있는 5.1mm T10 Torx 나사 다섯 개를 풀어주세요.

    You don't have to remove the fan assy to get to the wifi board & card. It can be done with the fan assy still attached.

    Fat Mango - 답글

    Fat Mango is correct. That said. If you do pull the fan assembly note that the screws are all held in with blue Permatex and breaking them free takes a fair amount of effort. Getting a good set of Torx screwdrivers is a must.

    Jim WIlson - 답글

    Hey guys, what would happen if you only replace one card.. I have a D300 but the plan is to upgrade to D500 or D600. So If I can afford and install one instead of the pair would it increase something? or will it cause any conflict? I guess I don’t understand if I the Mac Pro has 2 D300 graphic cards that means each has 1GB? Same as If I would Install 1 D600 that would increase 3GB only? Thanks.

    marcotamayo - 답글

    D300 = 2GB each card. Very few apps uses two cards at the same time.

    Gio Cas -

    The (5) Screws are Apple part number 923-0713

    Steven Gier - 답글

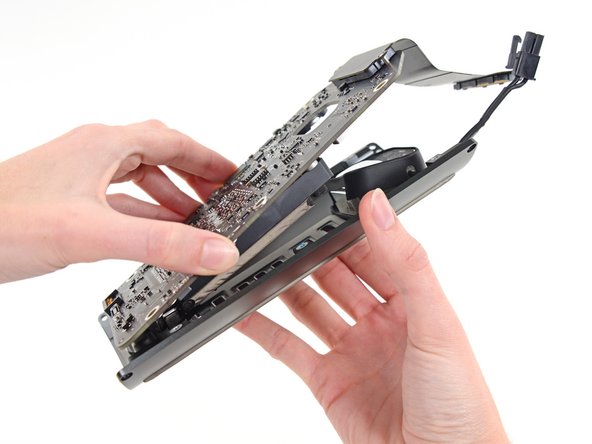
  4. Mac Pro Late 2013 CMOS 배터리 교체하기: 4 단계, 이미지 1/2 Mac Pro Late 2013 CMOS 배터리 교체하기: 4 단계, 이미지 2/2
    • 팬 어셈블리는 IO 보드에 두 개의 케이블로 컴퓨터에 연결되어 있습니다.

    • 팬 어셈블리를 IO 보드에서 멀리 기울이세요.

    • 팬 어셈블리는 여전히 두 개의 케이블로 연결되어 있으므로 아직 완전히 분리하지 마세요.

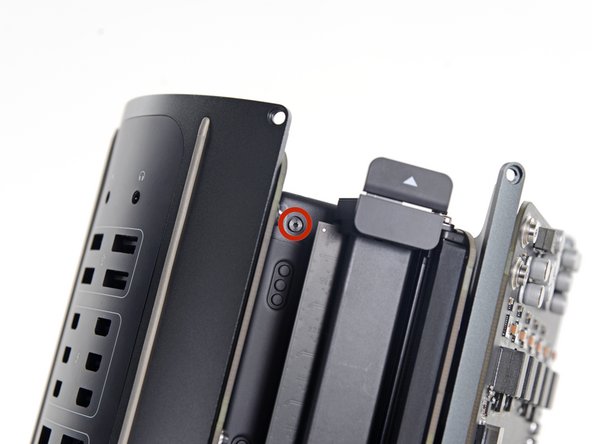
  5. Mac Pro Late 2013 CMOS 배터리 교체하기: 5 단계, 이미지 1/1
    • 한 손으로 팬 어셈블리를 받치면서 팬 케이블 브래킷에서 T8 고정 나사 두 개를 풀어주세요.

    • 이 나사들은 Mac Pro에 고정되어 있습니다. Mac Pro에서 이 나사들을 분리하려고 시도하지 마세요.

    On my Mac Pro (assembled mid-2017) these are T8 screws. In fact, there were no T7 screws anywhere in my machine.

    mark33 - 답글

    There was no bracket on top of the cable at all, so I got a bit confused, so I had to skip step 5 and 6.

    Rakesh - 답글

    On my machine, a TR7 worked to remove them due to the weird angle.

    Wilson Gaberino - 답글

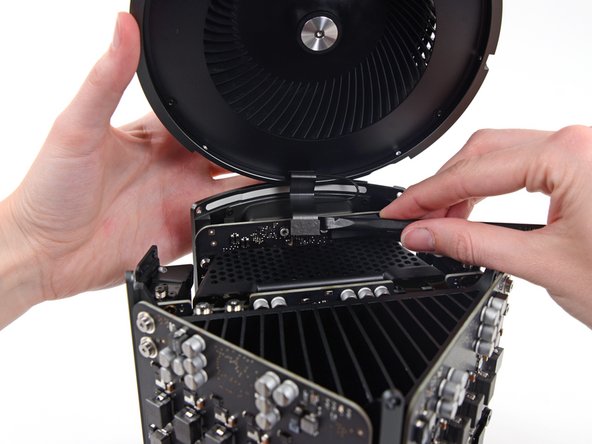
  6. Mac Pro Late 2013 CMOS 배터리 교체하기: 6 단계, 이미지 1/1
    • 핀셋을 사용하여 팬 케이블 브래킷을 팬 어셈블리에서 분리하세요.

  7. Mac Pro Late 2013 CMOS 배터리 교체하기: 7 단계, 이미지 1/2 Mac Pro Late 2013 CMOS 배터리 교체하기: 7 단계, 이미지 2/2
    • 스퍼저의 평평한 끝을 사용하여 팬 어셈블리 리본 케이블을 IO 보드에서 연결 해제하세요.

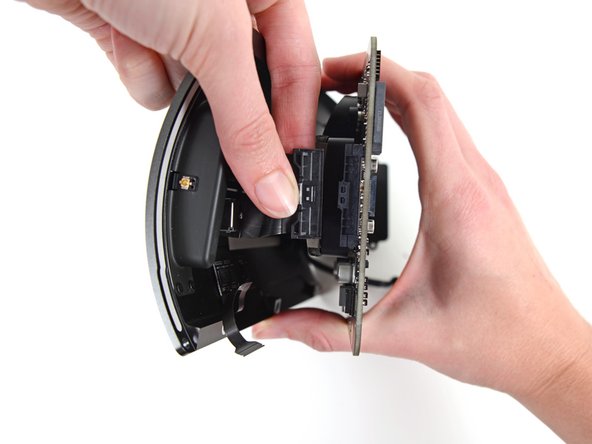
  8. Mac Pro Late 2013 CMOS 배터리 교체하기: 8 단계, 이미지 1/1
    • 팬 어셈블리의 안테나 케이블을 IO 보드에서 연결 해제하세요.

    • 팬 어셈블리를 Mac Pro에서 분리하세요.

    You don't have to remove the fan assy to do the steps below. They can be done with the fan assy still attached.

    Fat Mango - 답글

  9. Mac Pro Late 2013 CMOS 배터리 교체하기, 하단 케이스: 9 단계, 이미지 1/3 Mac Pro Late 2013 CMOS 배터리 교체하기, 하단 케이스: 9 단계, 이미지 2/3 Mac Pro Late 2013 CMOS 배터리 교체하기, 하단 케이스: 9 단계, 이미지 3/3
    • Mac Pro를 180도 거꾸로 뒤집으세요.

    • 하부 케이스 외부 둘레에서 5.1mm T10 나사 다섯 개를 풀어주세요.

  10. Mac Pro Late 2013 CMOS 배터리 교체하기: 10 단계, 이미지 1/2 Mac Pro Late 2013 CMOS 배터리 교체하기: 10 단계, 이미지 2/2
    • Mac Pro에서 하단 케이스를 조심히 들어올려 분리하세요.

  11. Mac Pro Late 2013 CMOS 배터리 교체하기, 상호 연결 보드: 11 단계, 이미지 1/2 Mac Pro Late 2013 CMOS 배터리 교체하기, 상호 연결 보드: 11 단계, 이미지 2/2
    • 스퍼저의 평평한 끝으로 비틀어서 그래픽 카드 데이터 연결을 해제 하세요.

  12. Mac Pro Late 2013 CMOS 배터리 교체하기: 12 단계, 이미지 1/3 Mac Pro Late 2013 CMOS 배터리 교체하기: 12 단계, 이미지 2/3 Mac Pro Late 2013 CMOS 배터리 교체하기: 12 단계, 이미지 3/3
    • 다른 쪽도 조심히 분리하세요.

    • 커텍터를 위로 뒤집어 그래픽 카드에 방해가 되지 않게 하세요.

    • 이 절차를 다른 그래픽 카드에도 반복하세요.

  13. Mac Pro Late 2013 CMOS 배터리 교체하기: 13 단계, 이미지 1/1
    • 상호 연결 보드를 방열판에 고정하는 6.0mm T8 Torx 나사 두 개를 풀어주세요.

    These are actually 6.0mm T8 Torx Screws. 12/07/2016.

    Todd - 답글

    Ended up being T9 screws for me.

    Nathaniel Wilson - 답글

    On my Mac Pro (assembled mid-2017) these are T8 screws. In fact, there were no T7 screws anywhere in my machine.

    mark33 - 답글

    These are T8 screws in my 2013 Mac Pro.

    Sangers - 답글

    T8 screws for me, i did and edit to this step

    Steve McGinn - 답글

    Ended up being T15 screws on my machine

    Spencer Curtis - 답글

  14. Mac Pro Late 2013 CMOS 배터리 교체하기: 14 단계, 이미지 1/3 Mac Pro Late 2013 CMOS 배터리 교체하기: 14 단계, 이미지 2/3 Mac Pro Late 2013 CMOS 배터리 교체하기: 14 단계, 이미지 3/3
    • 로직 보드의 슬롯 연결에서 상호 연결 보드를 똑바로 위로 조심히 들어 올리 세요.

    • 한쪽을 들어 올린 후 다른 쪽을 들어 올리는 것이 좋습니다.

    • 상호 연결 보드는 여전히 IO 보드에 연결되어 있으므로, 아직 Mac Pro에서 분리하려 하지 마세요.

  15. Mac Pro Late 2013 CMOS 배터리 교체하기: 15 단계, 이미지 1/2 Mac Pro Late 2013 CMOS 배터리 교체하기: 15 단계, 이미지 2/2
    • 상호 연결 보드를 위로 젖히고 뒤집어서 IO 보드 데이터 케이블을 드러내세요.

    • 스퍼저의 평평한 끝으로 비틀고 벌려서 IO 보드 데이터 케이블 한 쪽을 분리하세요.

  16. Mac Pro Late 2013 CMOS 배터리 교체하기: 16 단계, 이미지 1/2 Mac Pro Late 2013 CMOS 배터리 교체하기: 16 단계, 이미지 2/2
    • 스퍼저의 평평한 끝으로 IO 보드 데이터 케이블의 다른 쪽을 분리하세요.

    • 케이블을 구부려 Mac Pro에서 상호 연결 보드를 분리하세요.

  17. Mac Pro Late 2013 CMOS 배터리 교체하기, 전원 공급 장치 어셈블리: 17 단계, 이미지 1/1
    • Mac Pro를 다시 뒤집어 평평한 표면에 조심히 놓으세요.

    • 방열판 모서리와 상호 연결 보드에 부착되는 두 개의 standoff/스탠드오프 나사 기둥에 Mac Pro를 놓는 것이 좋습니다.

  18. Mac Pro Late 2013 CMOS 배터리 교체하기: 18 단계, 이미지 1/2 Mac Pro Late 2013 CMOS 배터리 교체하기: 18 단계, 이미지 2/2
    • 전원 공급 장치 케이지 측면에서 3.6mm T5 Torx 나사 두 개를 (각 측면에 하나씩) 풀어주세요.

    those are t4 screws in my mac

    Andrzej Kiryluk - 답글

    T4s on mine, as well

    rwcinmsp - 답글

  19. Mac Pro Late 2013 CMOS 배터리 교체하기: 19 단계, 이미지 1/1
    • 전원 공급 장치 상단에서 전원 공급 장치 케이지를 분리해주세요.

    • 이 케이지를 제거함으로써, 전원 공급 장치 내부의 부품이 노출됩니다. 전원 공급 장치 내부 부품 또는 회로를 만지지 않도록 주의하세요.

    • 전원 공급 장치 내부 부품이 망가질 수 있으니, 전원 공급 장치 내부로 나사나 도구를 떨어뜨리지 않도록 주의하세요.

  20. Mac Pro Late 2013 CMOS 배터리 교체하기: 20 단계, 이미지 1/1
    • Mac Pro에 전원 공급 장치 어셈블리를 고정하는 5.5mm T8 Torx 나사 네 개를 풀어주세요.

  21. Mac Pro Late 2013 CMOS 배터리 교체하기: 21 단계, 이미지 1/1
    • 전원 공급 장치 어셈블리를 Mac Pro에서 분리하세요.

  22. Mac Pro Late 2013 CMOS 배터리 교체하기, 전원 공급 장치: 22 단계, 이미지 1/3 Mac Pro Late 2013 CMOS 배터리 교체하기, 전원 공급 장치: 22 단계, 이미지 2/3 Mac Pro Late 2013 CMOS 배터리 교체하기, 전원 공급 장치: 22 단계, 이미지 3/3
    • 스퍼저의 평평한 끝으로 IO 보드의 소켓에서 전원 공급 장치의 DC 출력 커넥터를 연결 해제하세요.

    • 스퍼저의 뾰족한 끝으로 IO 보드의 소켓에서 전원 공급 장치 데이터 케이블을 연결 해제하세요.

    • 두 케이블 모두, 소켓이 아닌 커넥터를 똑바로 들어 올리세요.

    Need to add T9 Torx Screwdriver to list of tools at the beginning of this article.

    htiek nworb - 답글

    When I gently pried up on the power supply data cable, the entire socket came right off the board. Now what?

    rwcinmsp - 답글

    Bought a new I/O board and got it back together. This little socket is held in only by 4 tiny solder joints. Suggest pressing down on the socket with a finger while gently prying up on the plug that snaps into it. (When reassembling, it presses in vertically.)

    rwcinmsp - 답글

  23. Mac Pro Late 2013 CMOS 배터리 교체하기: 23 단계, 이미지 1/2 Mac Pro Late 2013 CMOS 배터리 교체하기: 23 단계, 이미지 2/2
    • 전원 공급 장치 측면에서 9.0mm 은색 T10 Torx 나사 네 개를 풀어주세요.

    • 전원 공급 장치는 이 나사보다 약간 돌출되어 있으므로, 고정 드라이버를 약간 기울여 사용해야 합니다.

    I managed to untie the screws at an angle using the T9 screwdriver (instead of the T10) works well.

    Rakesh - 답글

    awesome. thank you for the tip!!

    samuel culper - 답글

    A T-10 tip used with a 4mm or 5/32” open-end wrench to loosen helps, too. (These really should be hex bolts…)

    MotorMac - 답글

  24. Mac Pro Late 2013 CMOS 배터리 교체하기: 24 단계, 이미지 1/2 Mac Pro Late 2013 CMOS 배터리 교체하기: 24 단계, 이미지 2/2
    • 전원 공급 장치를 살살 움직여서 AC 전원 입력 케이블을 플라스틱 클립에서 분리하세요.

    • AC 전원 입력 케이블은 여전히 연결되어 있으므로, 아직 IO 보드 어셈블리에서 전원 공급 장치를 분리하려고 시도하지 마세요.

  25. Mac Pro Late 2013 CMOS 배터리 교체하기: 25 단계, 이미지 1/2 Mac Pro Late 2013 CMOS 배터리 교체하기: 25 단계, 이미지 2/2
    • 전원 공급 장치를 뒤집어 AC 전원 입력 케이블이 드러나도록 하세요.

  26. Mac Pro Late 2013 CMOS 배터리 교체하기: 26 단계, 이미지 1/2 Mac Pro Late 2013 CMOS 배터리 교체하기: 26 단계, 이미지 2/2
    • AC 전원 입력 케이블 커넥터를 꽉 쥐고 전원 공급 장치의 소켓에서 똑바로 잡아당겨 빼내세요.

  27. Mac Pro Late 2013 CMOS 배터리 교체하기, IO 보드: 27 단계, 이미지 1/1
    • IO 보드를 IO 쉴드에 고정하는 9mm T10 Torx 나사 두 개를 풀어주세요.

    On reassembly, before tightening these 2 9.0mm T10s, make sure the other 4 holes line up. Otherwise you might be setting yourself up for cross threading the 4 remaining 9.0 mm T10 that are already in a bad spot for torquing.

    Might not be a bad idea to put the other 4 halfway in to be sure no resistance, then tighten the 2 in this step, then remove the other 4.

    is - 답글

  28. Mac Pro Late 2013 CMOS 배터리 교체하기: 28 단계, 이미지 1/2 Mac Pro Late 2013 CMOS 배터리 교체하기: 28 단계, 이미지 2/2
    • AC 플러그가 있는 끝에서 IO 실드에서 IO 보드를 들어올리세요.

    • 두 부품을 연결하는 두 개의 케이블이 아직 연결되어 있으므로 IO 보드를 IO 쉴드에서 완전히 분리하려고 시도하지 마세요.

  29. Mac Pro Late 2013 CMOS 배터리 교체하기: 29 단계, 이미지 1/3 Mac Pro Late 2013 CMOS 배터리 교체하기: 29 단계, 이미지 2/3 Mac Pro Late 2013 CMOS 배터리 교체하기: 29 단계, 이미지 3/3
    • IO 보드의 커넥터에 접근하기 위하여 어셈블리를 평평한 표면에 내려놓으세요.

    • 스퍼저의 뾰족한 끝으로 IO 실드 리본 케이블 ZIF 커넥터의 고정 플랩을 젖혀주세요.

    • IO 실드 리본 케이블을 연결 해제하세요.

    This step is unnecessary as you can access the battery already.

    Gary Sheppard - 답글

  30. Mac Pro Late 2013 CMOS 배터리 교체하기: 30 단계, 이미지 1/2 Mac Pro Late 2013 CMOS 배터리 교체하기: 30 단계, 이미지 2/2
    • IO 보드에서 오디오 잭 리본 케이블 커넥터를 꽉 쥐고 당겨 빼내세요.

    This step is unnecessary as you can access the battery already.

    Gary Sheppard - 답글

  31. Mac Pro Late 2013 CMOS 배터리 교체하기, CMOS 배터리: 31 단계, 이미지 1/2 Mac Pro Late 2013 CMOS 배터리 교체하기, CMOS 배터리: 31 단계, 이미지 2/2
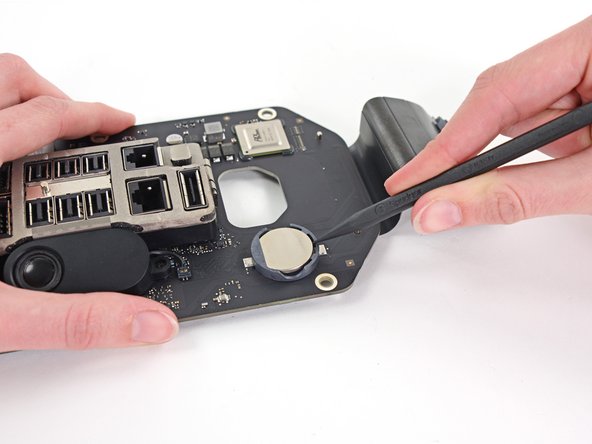
    • 스퍼저의 뾰족한 끝으로 CMOS 배터리를 소켓에서 들어 올리세요.

결론

기기를 재조립하려면, 이 지침들을 역순으로 수행해주세요.

다른 26명이 해당 안내서를 완성하였습니다.

다음 번역가들에게 특별히 감사 드립니다:

en ko

100%

이 번역자 분들은 저희가 세상을 수리하는데 동참해 주시는 분입니다! 기여하시겠습니까?
번역 시작하기 ›

Andrew Optimus Goldheart

회원 가입일: 10/17/09

502,810 평판

안내서 407개 작성하였습니다

iFixit iFixit 회원

Staff

135 회원들

안내서 16,817개 작성하였습니다

댓글 11개

A very good guide. I have a few notes from my experience replacing my battery.

In step 13 the torx screws securing the interconnect board to the heat sink were T-8 on my Mac but T-7 worked.

In step 23 a short arm Torx key would be helpful. Getting them out tore up the heads of the screws and getting back in was difficult without cross threading some of them. Bondhus (model no. 31832) sells a set that might help.

In step 29 if you don't reconnect the power supply data cable completely your Mac fan will run full speed and the processors will max out.

Don Hayashi - 답글

Seems like I need to replace the CMOS battery.

Which battery do I need to buy to replace the CMOS battery?

Jan - 답글

Yeah, could somebody please post the specifications for the replacement battery and maybe a source for it?

Doctor Macintosh - 답글

From the tear down, it's a Long-life BR-2032... I got mine at: https://www.amazon.com/PANASONIC-BATTERI.... Good luck! Great machine!

Wagon Fixin - 답글

Yes, the BR2032.

The difference between it and the CR2032 medical battery is the wider heat tolerance range, both extreme heat and cold of the BR. As these are known to get quite hot, get the BR2032.

The batteries in most Macs are easy to replace so substituting the common CR2032 works fine. Electrically, they are identical. The Mac Pro and the late 2009-2010 iMac are a bit time consuming (2009–10 iMacs have the battery on the back of the motherboard) so use the same one that Apple uses.

MikeHalloran - 답글

The best price on the BR2032 is this 3-pack.

<url>https://www.amazon.com/Panasonic-Battery...</url>

MikeHalloran - 답글

Could anyone explain what issues they are seeing with a dead CMOS battery?

I’ve had a problem booting for a while, having to reset pram and smc every time and try multiple reboots, uugh, I changed CMOS battery thinking it was that and tested the old one which was lo and behold dead. I thought this would fix the issue but it hasn’t. Just FYI I have the same problem with or without a battery in there.

ed9905832 - 답글

Hi there. The same for me here, how did you solve this problem ?

Changed for new battery although it is not turning on yet.

Ebd -

Thank You for very good detailed guide but I have problem after reassembly, fan running on maximum speed. I have try SMC reset (1)Shut down Mac, 2) Unplug power cord, 3) Wait 15 sec., 4) Plug in power cord, 5) Wait 5 sec., 6)Turn On Mac) and not worked for me, all is without changes. Mac very lagging and is very slow. I disassembled the mac again, checked all the flex cables and dont’t find any problem with this. Please, is any way how can I fix this? I have searching and testing guides 2 days and now I'm absolutely frustrated, nothing worked. :-( Thank You very much.

David Erben - 답글

Ugh! Evil step #23!

I found the short end of a 5/64" Allen wrench worked quite well.

Thorgrim - 답글

Thank you for an excellent guide to a tricky enough operation. Phew! Good job that coin cell lasts a few years! As someone else has said, I highly recommend chasing down the BR2032 version that Apple install as OEM, rather than using the more common CR2032. There are good reasons for this - the BR2032 has increased temperature stability and holds voltage better over lifetime. UK folk can get a supply at RS Components here: https://uk.rs-online.com/web/p/button-ba...

One other comment - in the reverse of Stage 23 when re-assembling, please take care aligning those 4 x 9mm T10 screws bolting down the PSU to the IO board. They came out fairly easily, but picking up the thread again properly when putting them back I found very tricky, mainly due to the overhang, and there is a risk of stripping if they don’t go in vertically.

David Gordon - 답글

댓글 쓰기

조회 통계:

24 시간 전: 10

7일 전: 79

30일 전: 365

전체 시간: 28,682