소개
Step by Step Illustrated Guide
These are easy to follow instructions for replacing the plastic stays on the northbridge heatsink in a Mac Pro 4,1 & 5,1 computer with single CPU. These instructions show best practices.
The northbridge heatsink is held in place with spring-loaded plastic stays. The stays are subjected to high temperatures, and after a few years they become brittle and break off. Even machines 4 and 5 years old showed brittle and broken stays. Since these machines are now approaching 10 years old, you can safely assume that they plastic stays are either already broken or are about to break. If these break off and the heatsink moves away from the surface of the chip, the chip will overheat, fail and take your processor tray with it. This is a strongly recommended replacement for all Mac Pro 4,1 and 5,1 machines.
필요한 것
-
-
Many people service their computers without using an anti-static mat. Usually this doesn't cause a problem. However, it takes only one spark of static electricity to destroy an entire computer. It is wiser to take precautions against this possibility.
-
The green & yellow cable (right) will be clipped to the central heating radiator, which is well grounded through the plumbing. Components that have been removed from the computer and are being handled should be grounded with the black clip. The blue stretchy cable goes to the wrist connector.
-
-
-
The computer is placed on the anti-static pad and is grounded. It is not necessary to attache the black clip to the computer. Place the lid on the edge of the anti-static pad. This will give you additional grounded area for putting things aside while you work.
-
I clear my table before starting work on any computer, to avoid the possibility of accidentally exchanging components or losing small items like screws.
-
-
-
The wrist cable is attached to my wrist. I am right handed, but had to do most of this left handed so that I could take the photographs with my right hand. When connecting the wrist cable, wet your wrist (lick it) at the contact point to ensure good grounding.
-
If your ground is good, you do not need to worry about getting a shock. However, do not handle mains powered equipment while grounded like this. Battery powered drills and screwdrivers cannot give you a dangerous shock.
-
-
-
Use a 3 mm hexagonal wrench to release the heatsink. The wrench must be at least 15 cm long.
-
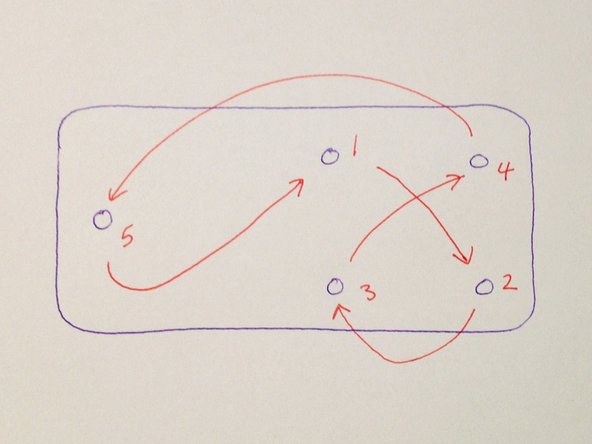
Release the holding bolts ONE TURN at a time, following an X pattern (top left, bottom right, top right, bottom left, far left) and continue until you hear a release click. Note: do not completely undo one bolt and then move to the next. Instead, repeat this patter,n making one turn at a time, until the heatsink is released from the PCB.
-
When you replace the heatsink use the same pattern to tighten the bolts. Do not tighten more than finger tight. Make sure that the same tension is applied to each of the bolts. Uneven pressure can result in the CPU contacts failing. Symptoms range from boot-failure to missing or malfunctioning memory cards.
-
-
-
Dust acts like a blanket that keeps the PCB warm, contributing to the possibility of overheating. The PCB and heatsinks, fans, case interior and so on should be cleaned regularly. Take this opportunity to clean the board.
-
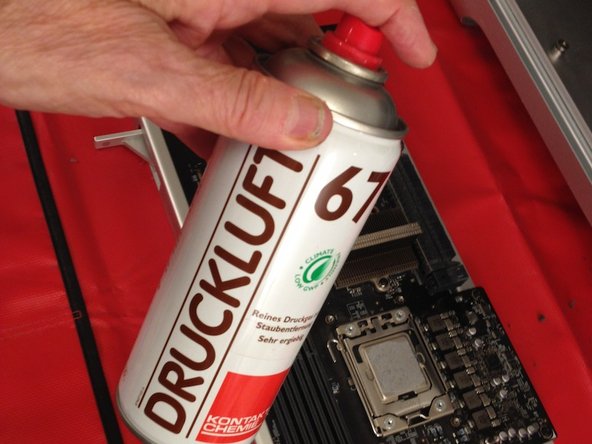
Use an anti-static brush. Do not use any brush, for most brushes will cause static charge to build up and can damage the electronic components. Compressed air is also useful, especially for cleaning out the CPU heatsink.
-
-
-
-
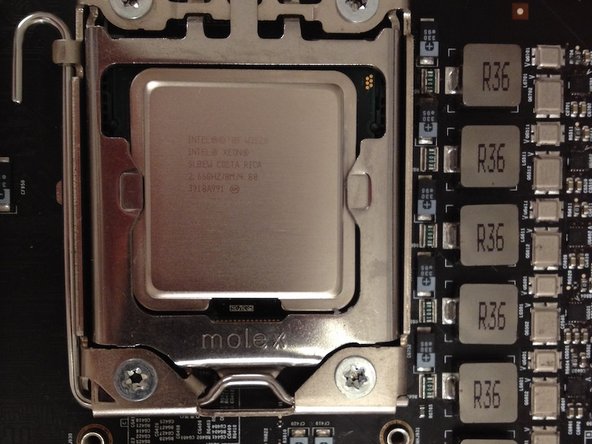
You will find lots of dust, and quite probably sticky gooey residue around this part of the PCB. This is heat-sealant for the thermal pads that lie on the row of R35 regulators. The heat sealant often leaks from the heatsink and drips onto the PCB. The gooey residue captures dust and should be cleaned away. Use cotton buds and isopropyl alcohol.
-
Clean both sides of the whole PCB between the components with a cotton bud dipped in isopropanol. Take care that cotton threads are not caught up on electronic components and remain behind.
-
In this photograph the tops of the black plastic stays holding the northbridge heatsink in place are visible.
-
-
-
Turn the PCB over and pinch the latches on the plastic stays with a pair of needle-nose pliers so that the stays fall out. They should pop out from the force of the springs on the other side. If they do not pop out, give them a gentle push from this side of the PCB.
-
Make sure not to lose the springs. You can throw away the plastic stays.
-
-
-
Turn the board over and unclip the temperature sensor wire and remove the northbridge heatsink.
-
You will find more dust under the heatsink, to be cleaned away.
-
Don't be tempted to take shortcuts with cleaning. The dust and gooey grime are functional threats to the health of your computer.
-
-
-
Use Thermal Material Remover to clean the chips and the heatsinks of the old thermal paste. Clean off both the CPU and northbridge chips. Wipe off the occluding surfaces with lint-free cloth.
-
Take care not to drop anything on the northbridge. It is not protected with a steel lid.
-
Open the latch on the processor cradle to clearn around the CPU chip. Don't remove the CPU chip. That would be an unnecessary risk and there is nothing to clean underneath.
-
-
-
Line up the parts and check again that you have everything clean and ready.
-
The northbridge heatsink is now shiny clean. Notice that the copper occluding surface of the CPU heatsink has also been cleaned of old paste. The PCB has been cleaned thoroughly on both sides.
-
At the lower right you can see a pair of tweezers. These are useful for picking up recalcitrant blobs of dust and occasional cotton threads that a cotton bud may leave behind. Take ultra-care when using metal tools on the board, to avoid scratching components.
-
-
-
Use 16 mm long 3M stainless steel bolts, stainless steel washers and nylon washers. Re-use the springs from the plastic stays. The items will be assembled in the order shown from top to bottom:
-
(1) bolt; (2) metal washer; (3) spring; (4) heatsink; (5) PCB; (6) nylon washer; (7) metal washer; (8) nut.
-
If for some reason the springs have been lost, you can use a spring from a ball point pen. Cut out a section about 1.5 cm long.
-
-
-
Before re-pasting the northbridge heatsink clean the surface of the chip and the heatsink with Thermal Surface Purifier. Isopropanol will also do.
-
Use the same Thermal Surface Purifier when cleaning the CPU and main heatsink before applying new paste. Take this opportuity to clean the these surfaces.
-
-
-
Bolt the northbridge heatsink into place. Do not tighten until the springs are fully compressed, but make sure that the heatsink is held firmly in place. Pressure on the two sides of the heatsink should be the same.
-
Here you can see the clean surface of the CPU ready for pasting. The paste should be laid down in an horizontal line as viewed in this photograph, covering two-thirds of the distance from side to side of the CPU lid.
-
-
-
One of the new steel bolts will penetrate the tray.
-
After bolting the heatsink to the northbridge chip, fit the PCB over the tray, and push gently down on the metal bolt that makes contact with the tray. It will leave a mark on the tray. Drill a 5 mm hole at that point.
-
From here on the reassembly process is the reverse of the disassembly. I have not photographed each step of the reassembly, which is pretty straightforward. Before returning the CPU tray, clean out the interior of the Mac Pro case. Use compressed air to blow out dust in the fans.
-


To reassemble your device, follow the disassembly instructions in reverse order.
To reassemble your device, follow the disassembly instructions in reverse order.
다른 12명이 해당 안내서를 완성하였습니다.
첨부 문서

댓글 11개
I used these instead: https://www.amazon.ca/gp/product/B0784RX...
(Spring Rivet Fastener Push Pin Mounting Screws for PC Heatsink Cooling)
Instead of drilling in through the aluminum tray, I drilled a hole in the bottom of fan A and it works. You don’t notice the hole in the fan because it’s on the bottom side and hidden once the housing is mounted. Only one piece of hardware required instead of several. Thank you for the post. Learned a lot.
Very helpful indeed! I was mid- processor swap when the plastic thing broke. not wanting to leave off half way through for too long I dashed off to Home Depot and MicroCenter near me. I could not find M3 bolts. I wound up with #6 imperial bolts ins stainless and neoprene washers. Those were just a bit too big for the spring s (threads engaged the coils of the spring) so I used a dremel tool to shave off the threads where the spring would sit and then used the dremel to cut off the bolts’ excess length so I didn’t need to drill either the heat sink or the tray. Point to note - the #6 bolts are large enough that the threads do engage the circuit board mounting hole. I used a small drill bit in my fingers (not in a drill) to just ‘shave’ the sides of the mounding hole ever so slightly. Wish I could have come up with the 16mm M3’s