이 버전에는 잘못된 편집 사항이 있을 수 있습니다. 최신 확인된 스냅샷으로 전환하십시오.
필요한 것
-
-
P5 펜타로브 드라이버를 사용하여 하난 케이스를 고정하는 다음 길이의 나사 10개를 풀어주세요:
-
9mm 나사 두 개
-
2.6mm 나사 여덟 개
-
-
이 단계는 번역되지 않았습니다. 번역을 도와주십시오
-
Use the flat end of a spudger to pry the I/O board cable connector up out of its socket on the I/O board.
-
-
이 단계는 번역되지 않았습니다. 번역을 도와주십시오
-
Carefully peel the I/O board cable from the adhesive securing it to the top of the fan.
-
-
이 단계는 번역되지 않았습니다. 번역을 도와주십시오
-
While gently pulling the I/O board cable upward near its connection to the logic board, use the flat end of a spudger to pry up on alternating sides of the connector to help "walk" it out of its socket.
-
Remove the I/O board cable.
-
-
-
이 단계는 번역되지 않았습니다. 번역을 도와주십시오
-
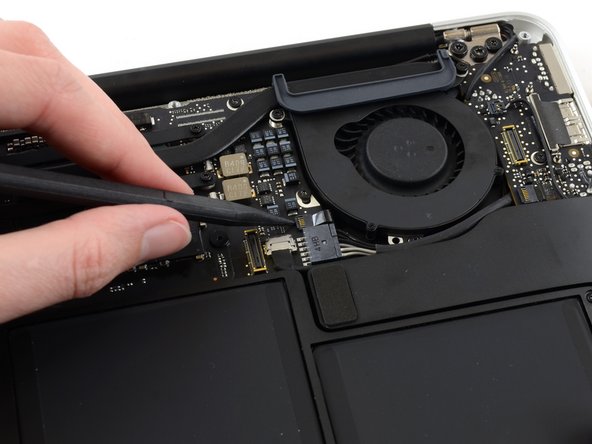
Use the tip of a spudger to carefully flip up the retaining flap on the fan cable ZIF socket.
-
-
이 단계는 번역되지 않았습니다. 번역을 도와주십시오
-
Remove the following three screws securing the fan to the upper case:
-
One 5.2 mm T5 Torx screw
-
One 3.3 mm T5 Torx screw
-
One 4.4 mm T5 Torx screw with a short head
-
-
이 단계는 번역되지 않았습니다. 번역을 도와주십시오
-
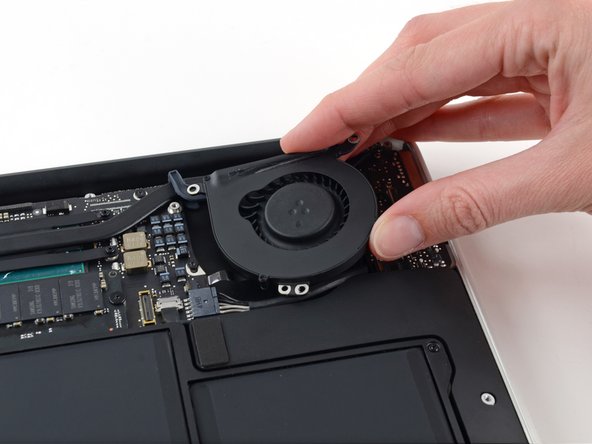
Lift the fan from the I/O board side and pull it free from the upper case.
-
Removing the fan will also disconnect the fan ribbon cable. Be careful not to snag it.
-
-
이 단계는 번역되지 않았습니다. 번역을 도와주십시오
-
Disconnect the I/O board by pulling its power cable away from its socket on the logic board.
-
-
이 단계는 번역되지 않았습니다. 번역을 도와주십시오
-
Use the flat end of a spudger to pry the left speaker cable connector up and out of its socket on the I/O board.
-
-
이 단계는 번역되지 않았습니다. 번역을 도와주십시오
-
Use the tip of a spudger to carefully flip up the retaining flap on the microphone ribbon cable ZIF socket.
-
-
이 단계는 번역되지 않았습니다. 번역을 도와주십시오
-
Remove the single 4.1 mm T5 Torx screw securing the I/O board to the upper case.
-
-
이 단계는 번역되지 않았습니다. 번역을 도와주십시오
-
Gently de-route the camera cable from its notch on the I/O board and push it out of the way with the tip of a spudger.
-
-
이 단계는 번역되지 않았습니다. 번역을 도와주십시오
-
Lift the I/O board from the logic board side and pull it free from the upper case.
-
Removing the I/O board will also disconnect the microphone ribbon cable. Be careful not to snag it.
-


다른 45명이 해당 안내서를 완성하였습니다.

댓글 15개
Ich habe ein Macbook Air 2015 early. Das Ladekabel leuchtet nicht und die Batterie wird nicht geladen, ohne Batterie läuft das Macbook und auch solange die Batterie geladen ist läuft es einwandfrei auch ohne Ladekabel. Woher bekomme ich das I-O board und denkt ihr es liegt am I-O board oder eher irgendwo auf dem Mainboard das Problem?
Man kann das I/O-board bei ebay finden, kostet nicht viel, der Austausch ist ja oben beschrieben, man muss da sehr vorsichtig vorgehen, zB das dünne, kurze Flexkabel ganz am Schluss.
Jamba -
I successfully fixed my Macbook Air early 2015. Power cord LED indicator was dark and the battery was not charging. This was because my power supply blew up while stuck within the couch and went dangerously hot. Power supply died as the IO Board too.
Replacing the IO Board fixed my Macbook.
Hi . I replaced my IO board because the power socket was burned. With the new board the Macbook air mid 2011 was running very slow. Changed back to the old one and computer was running as normal. Any Ideas why the new IO board was slowing the computer down. The USB port in the new board was also not working.