소개
Use this guide to replace the fan in an Early 2020 MacBook Air.
필요한 것
-
-
If your MacBook is running Big Sur v11.1 or later, disabling Auto Boot may not work. You can proceed normally, but make sure to disconnect the battery as soon as you're inside.
-
Use a P5 driver to remove the following screws:
-
Two 7.9 mm screws
-
Two 7.1 mm screws
-
Six 2.6 mm screws
-
-
-
Wedge your fingers between the display and the lower case and pull upward to pop the lower case off the Air.
-
Remove the lower case.
-
Set it in place and press firmly to engage the two hidden clips underneath. You should feel and hear them snap into place.
When reassembling, the “snaps” are in the middle of the laptop (from top to bottom), and just to the left and right of center. I assumed it was near the hinge so it took a bit for me to hear the snaps.
Laurie, the two clips are outlined in the third photo of step two. Hope this helps—happy fixing!
-
-
-
Peel back the tape covering the battery connector enough to reveal the connector underneath.
This image is incorrect correct for the A2179 EMC 3302 model, also doesn’t match the next image in this guide
There is other guide for the model you reffer to, I was using that one until i realize it was different, this is the one you are looking for: MacBook Air 13" Retina Late 2020
I initially thought the image was incorrect, but I was just looking for the connector in the wrong place. This picture IS correct for the A2179 EMC 3302. Note that the connector is on the left side of the heat sink (the black thing with parallel ridges in the picture and on the computer), and the connector wires gather together towards the left the side of the computer, not the back. Note that "left side" assumes the Air is upside-down, with the hinge on the side farthest away from you (I'm not doing the "right speaker is on the left side because it's upside-down" thing that iFixit does in step 5).
-
-
-
Use a spudger to slide the battery connector parallel to the logic board and out of its socket on the logic board.
-
-
-
Slide the pointed end of a spudger underneath the speaker cable and pry straight up to disconnect it.
-
-
-
-
Use a T4 Torx driver to remove the three 1.4 mm screws securing the audio board connector cover.
-
Remove the audio board connector cover.
-
-
-
Use a T4 Torx driver to remove the three screws securing the audio board:
-
Two 4.3 mm screws
-
One 2.4 mm screw
-
-
-
Use a pair of tweezers to peel back the black tape covering the fan cable connector.
-
-
-
Use the pointed end of a spudger to lift up the small locking flap on the fan cable's ZIF connector.
-
Slide the fan cable out of its connector.
-
-
-
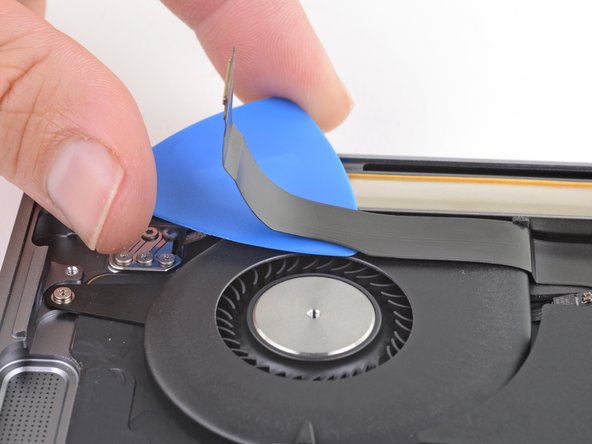
Slide an opening pick underneath the audio board cable to separate it from the fan.
-
-
-
Use a T4 Torx driver to remove the three 2.7 mm screws securing the fan.
-


Compare your new replacement part to the original part—you may need to transfer remaining components or remove adhesive backings from the new part before installing.
To reassemble your device, follow the above steps in reverse order.
Take your e-waste to an R2 or e-Stewards certified recycler.
Repair didn’t go as planned? Check out our Answers community for troubleshooting help.
다른 2명이 해당 안내서를 완성하였습니다.


댓글 한 개
Thank you very much. This helped me a lot when my fan started making buzzing noise an$ had the change it.
P5 is also a PL4 (so confusing) - i like the wiha 26764 thanks to @mayer for this post. P5 pentalobe and 1.2 pentalobe screwdriver
greg - 답글