주요 콘텐츠로 건너뛰기

이 버전에는 잘못된 편집 사항이 있을 수 있습니다. 최신 확인된 스냅샷으로 전환하십시오.

필요한 것

  1. , 하단 케이스: 1 단계, 이미지 1/1
    이 단계에 사용된 도구:
    P5 Pentalobe Screwdriver Retina MacBook Pro and Air
    $5.99
    구매
    • 계속하기 전에 기기의 전원을 끄고 커버를 닫은 다음 부드러운 표면 위에 뒤집어 놓으세요.

    • 다음 나사 열 개를 풀어주세요:

    • 9mm 5-점 펜타로브 나사 두 개

    • 2.6mm 5-점 펜타로브 나사 여덟 개

    • 5-점 펜타로브 나사 여덟 개를 풀기위해 필요한 특수 드라이버는 여기에서 찾을 수 있습니다.

  2. : 2 단계, 이미지 1/1
    • 디스플레이와 하단 케이스 사이에 손가락을 끼우고 위쪽으로 당겨서 하단 케이스를 Air에서 빠져나오게 하세요.

    • 하단 케이스를 분리하여 따로 놓으세요.

  3. 이 단계는 번역되지 않았습니다. 번역을 도와주십시오

    : 3 단계, 이미지 1/1
    • For precautionary purposes, we advise that you disconnect the battery connector from the logic board to avoid any electrical discharge. This step is optional and is not required.

    • Grab the clear plastic pull tab attached to the battery connector and pull it toward the front edge of the Air to disconnect the battery from the logic board.

    • Do not lift upward on the connector as you disconnect it.

  4. 이 단계는 번역되지 않았습니다. 번역을 도와주십시오

    : 4 단계, 이미지 1/1
    • Use the flat end of a spudger to pry the I/O board cable connector upward out of its socket on the I/O board.

  5. 이 단계는 번역되지 않았습니다. 번역을 도와주십시오

    : 5 단계, 이미지 1/2 : 5 단계, 이미지 2/2
    • The following connector has an especially deep socket. Use care when disconnecting it.

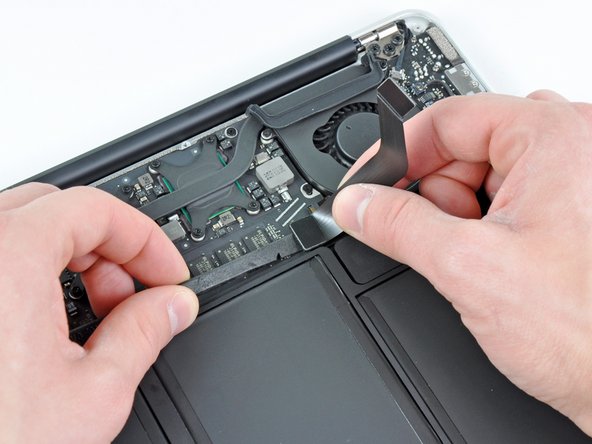
    • Carefully peel the I/O board cable from the top of the fan.

    • While gently pulling the I/O board cable upward near its connection to the logic board, use the tip of a spudger to pry upward on alternating sides of the connector to help "walk" it out of its socket.

    • Remove the I/O board cable.

결승점

다른 3명이 해당 안내서를 완성하였습니다.

Andrew Bookholt

586,444 평판

안내서 619개 작성하였습니다

댓글 0개

댓글 쓰기

조회 통계:

24 시간 전: 4

7일 전: 10

30일 전: 19

전체 시간: 6,840