주요 콘텐츠로 건너뛰기

MacBook Air 13" Late 2010 Logic Board Replacement

단지 전제 조건
이 안내서는 다른 가이드의 선행 작업으로 사용하기 위한 것입니다. 그 자체로는 불완전합니다.

필요한 것

  1. MacBook Air 13" Late 2010 Logic Board Replacement, Logic Board: 1 단계, 이미지 1/2 MacBook Air 13" Late 2010 Logic Board Replacement, Logic Board: 1 단계, 이미지 2/2
    • Use the tip of a spudger or your fingernail to flip up the retaining flap on the trackpad ribbon cable ZIF socket.

    • Be sure you are prying up on the hinged retaining flap, not the socket itself.

    • Pull the trackpad ribbon cable straight out of its socket toward the front edge of the Air.

  2. MacBook Air 13" Late 2010 Logic Board Replacement: 2 단계, 이미지 1/1
    • Use the flat end of a spudger to pry the right speaker cable connector up and out of its socket on the logic board.

    • Pry up from beneath the cables.

  3. MacBook Air 13" Late 2010 Logic Board Replacement: 3 단계, 이미지 1/2 MacBook Air 13" Late 2010 Logic Board Replacement: 3 단계, 이미지 2/2
    • Gently push the tip of a spudger under the black plastic flap stuck to the display data cable lock to make the lock pop upward and away from the socket.

    • While holding the lock away from the socket, use the tip of a spudger and your fingers to gently remove the display data cable from its socket by sliding it toward the corner of the Air.

    • Do not pull upward on the display data cable as you disconnect it, as its socket may break off the logic board.

  4. MacBook Air 13" Late 2010 Logic Board Replacement: 4 단계, 이미지 1/2 MacBook Air 13" Late 2010 Logic Board Replacement: 4 단계, 이미지 2/2
    • Use the flat end of a spudger to pry both antenna cable connectors up and off their sockets on the AirPort/Bluetooth card.

    When you are assembleIng , you shoud this phase at settin mother board

    taizoy0725 - 답글

  5. MacBook Air 13" Late 2010 Logic Board Replacement: 5 단계, 이미지 1/1
    • Gently de-route the antenna cables from the slot cut into the logic board.

    Schritt 23 bis 25 kann man sich auch schenken.

    Volker - 답글

  6. MacBook Air 13" Late 2010 Logic Board Replacement: 6 단계, 이미지 1/1
    • Remove the single 2.85 mm T5 Torx screw securing the SSD to the logic board.

    2.85 and Large head screw

    taizoy0725 - 답글

  7. MacBook Air 13" Late 2010 Logic Board Replacement: 7 단계, 이미지 1/1
    • Do not lift the end of the SSD excessively.

    • Pull the drive straight out of its socket and remove it from the logic board.

    • When reinstalling the SSD, be sure it is properly seated before reinstalling its retaining screw.

  8. MacBook Air 13" Late 2010 Logic Board Replacement: 8 단계, 이미지 1/1
    • Remove the six 6.3 mm T5 Torx screws securing the logic board to the upper case.

    Actually the screws are 3.6mm (not 6.3mm).

    toliqdoi - 답글

  9. MacBook Air 13" Late 2010 Logic Board Replacement: 9 단계, 이미지 1/1
    • Remove the inner two 4.9 mm T8 Torx screws securing the antenna cable retainer and left clutch hinge to the upper case.

    Schritt 27 bis 29 sind nicht erforderlich.

    Volker - 답글

  10. MacBook Air 13" Late 2010 Logic Board Replacement: 10 단계, 이미지 1/1
    • Push the antenna cable retainer away slightly and remove the 3 mm T5 Torx screw securing the end of the heat sink to the upper case.

  11. MacBook Air 13" Late 2010 Logic Board Replacement: 11 단계, 이미지 1/1
    • Hold the antenna cables out of the way as you lift the heat sink end of the logic board out of the upper case.

  12. MacBook Air 13" Late 2010 Logic Board Replacement: 12 단계, 이미지 1/1
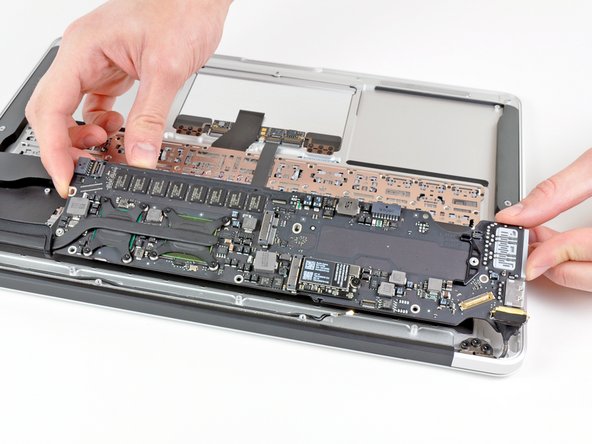
    • Carefully remove the logic board assembly from the upper case, minding any cables that may get caught.

    Really great guide!!!

    My only issue was the removal of the logic board was a bit nerve wracking.

    The speaker wire was stressed heavily as the board tilted up. Removing the speakers before the board would solve this.

    I did it in that order during reassembly, and it worked great.

    gifts1000 - 답글

    I also had an issue with the logic board installation as the above comment mentioned. I found easiest way is to just remove the speaker that you just re-installed. It's 1 screw - take that speaker out and now that wire that was bumping logic board is out of the way, and just then re-install the speaker.

    Rich Davies - 답글

    When replacing the logic board, make sure the two rf connectors are out of the way before you put the screws back.

    Andrew Burroughs - 답글

결론

To reassemble your device, follow these instructions in reverse order.

Andrew Bookholt

586,109 평판

안내서 619개 작성하였습니다

댓글 0개

댓글 쓰기

조회 통계:

24 시간 전: 0

7일 전: 0

30일 전: 0

전체 시간: 483