소개
Replace a warped optical drive bezel to allow your MacBook's optical drive to accept disks again.
필요한 것
-
-
Unscrew the three evenly-spaced Phillips screws from along the rear wall of the battery compartment.
-
-
-
Remove the following 3 screws:
-
One 11 mm Phillips#00 in the middle of the lower case. (Head: 5mm dia. x .75mm thick)
-
Two 14.5 mm Phillips #00 (Head: 5mm dia. x .75mm thick)
-
-
-
-
Grasp the white plastic tab attached to the hard drive and pull it to the left, removing the hard drive from the computer.
-
-
-
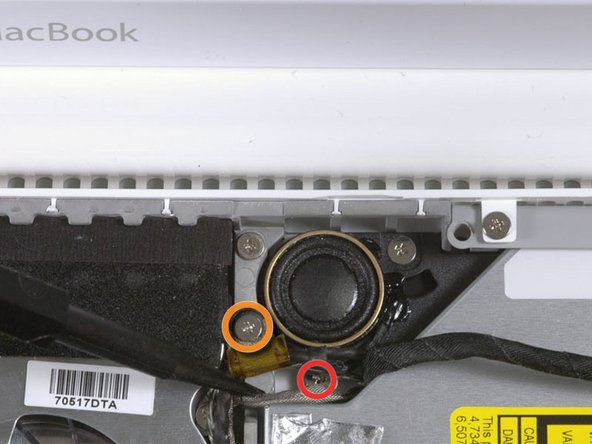
Remove the 2 mm Phillips #00 screw securing the rear corner of the optical drive.
-
The silver-jacketed Bluetooth cable may be covering the screw. If so, carefully push it aside. You may need to remove the screw holding the ground shield lugs for the two nearby cables before you can move the Bluetooth cable aside sufficiently. This screw is 7mm in earlier models, and may be 4.2mm in Santa Rosa/Penryn and 2009 models.
-
-
-
Lift the side of the optical drive closest to you, then slide the drive towards you, and up and out of the computer.
-
First, slide its side nearest to the rear of the Macbook under the edge of the rear frame to the left of the hinge, while also sliding the optical drive's mounting tab at its upper left corner under the cables at this location.
-
Lower the drive partially into the lower housing. Keep the hard drive cable away from the optical drive bay.
-
Before dropping the drive fully in place, use a spudger to push forward (towards the front of the drive) on the screw hole in the drive's mounting tab.
-
Push forward the slider, which runs along the far side of the drive, to insert the end of this slider into a small channel in the lower case's frame. This helps hold the drive in place.
-
-
-
To remove the clips, simply slide them out of the aluminum framework away from the side of the lower case.
-
-
-
Insert the flat end of a spudger between the optical drive bezel and the plastic lower case.
-
Gently pry the optical drive bezel away from the adhesive securing it to the lower case enough to lift the mounting ear near the hard drive connector above the metal framework.
-
Lift the optical drive bezel enough to clear the metal framework and continue separating it from the lower case with your spudger.
-


To reassemble your device, follow these instructions in reverse order.
To reassemble your device, follow these instructions in reverse order.
다른 19명이 해당 안내서를 완성하였습니다.
