주요 콘텐츠로 건너뛰기

MacBook Pro 13" Function Keys 2017 Screen Assembly Replacement

필요한 것

  1. MacBook Pro 13" Function Keys 2017 Screen Assembly Replacement, Screen Assembly: 1 단계, 이미지 1/1
    • The screen assembly I am using in this tutorial arrived encased in foam, bubble wrap and styrophome. Quite a pleasure to unpack.

  2. MacBook Pro 13" Function Keys 2017 Screen Assembly Replacement: 2 단계, 이미지 1/1
    • With the size of some of the screws I found it a bit of a challenge to determine the screw head size. I hope the pictures help. This pic shows that I use P2,P3,T3,T4 and T8 bits.

  3. MacBook Pro 13" Function Keys 2017 Screen Assembly Replacement: 3 단계, 이미지 1/3 MacBook Pro 13" Function Keys 2017 Screen Assembly Replacement: 3 단계, 이미지 2/3 MacBook Pro 13" Function Keys 2017 Screen Assembly Replacement: 3 단계, 이미지 3/3
    • Start with removing the 4 corner screws and the two center screws from around the bottom panel. **NOTE the screws next to the hinge are a different length (longer) than the two at the other two corners, and the two center screws are the shortest. so keep that in mind when putting your MacBook back together.

  4. MacBook Pro 13" Function Keys 2017 Screen Assembly Replacement: 4 단계, 이미지 1/1
    • There are a few clips holding the bottom in place so after removing the screws I used a suction cup and pulled the back off. This took a but more force than seems good but I found it safer than using a splugger around the edges.

  5. MacBook Pro 13" Function Keys 2017 Screen Assembly Replacement: 5 단계, 이미지 1/2 MacBook Pro 13" Function Keys 2017 Screen Assembly Replacement: 5 단계, 이미지 2/2
    • Now comes the hinge screws. Actually, for the next few steps it probably does not matter what order you remove the screws. But I did the hinges next. These require a T8 diver.

    • I forgot to get a picture of the hinge caps that will need to be removed first. These required a P3 driver, and the screws are very tiny. Once these screws were removed you can pry off the hinge caps and access the hinges.

  6. MacBook Pro 13" Function Keys 2017 Screen Assembly Replacement: 6 단계, 이미지 1/3 MacBook Pro 13" Function Keys 2017 Screen Assembly Replacement: 6 단계, 이미지 2/3 MacBook Pro 13" Function Keys 2017 Screen Assembly Replacement: 6 단계, 이미지 3/3
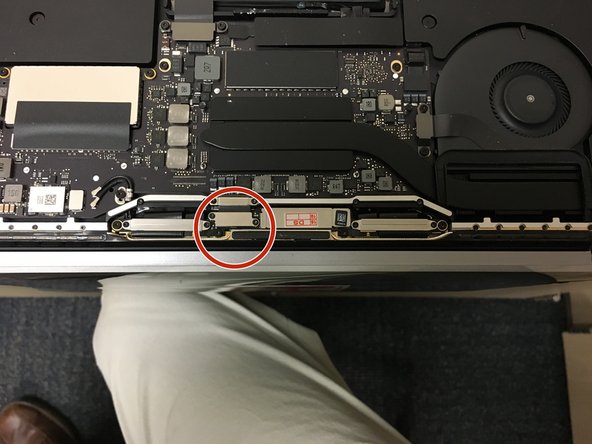
    • Remove the video cable cover. and using a plastic splugger disconnect the video cable.

  7. MacBook Pro 13" Function Keys 2017 Screen Assembly Replacement: 7 단계, 이미지 1/1
    • Insert wisdom here.

  8. MacBook Pro 13" Function Keys 2017 Screen Assembly Replacement: 8 단계, 이미지 1/3 MacBook Pro 13" Function Keys 2017 Screen Assembly Replacement: 8 단계, 이미지 2/3 MacBook Pro 13" Function Keys 2017 Screen Assembly Replacement: 8 단계, 이미지 3/3
    • OK doing good so far? Here is a fun step. Using the P2 remove all the little screws on both sides as highlighted in the picture.

  9. MacBook Pro 13" Function Keys 2017 Screen Assembly Replacement: 9 단계, 이미지 1/3 MacBook Pro 13" Function Keys 2017 Screen Assembly Replacement: 9 단계, 이미지 2/3 MacBook Pro 13" Function Keys 2017 Screen Assembly Replacement: 9 단계, 이미지 3/3
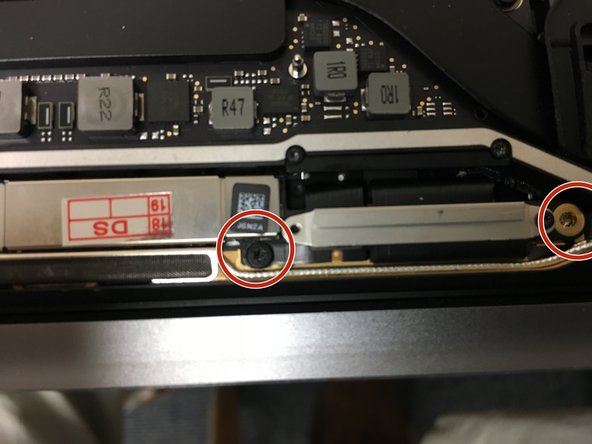
    • Remove these screws next and note the screws on the outside (right in this picture) are a little longer than the center screws. There are two sets of these on either side of center. Use a Torx 5 driver

  10. MacBook Pro 13" Function Keys 2017 Screen Assembly Replacement: 10 단계, 이미지 1/3 MacBook Pro 13" Function Keys 2017 Screen Assembly Replacement: 10 단계, 이미지 2/3 MacBook Pro 13" Function Keys 2017 Screen Assembly Replacement: 10 단계, 이미지 3/3
    • OK, under the wider cables we detached there are two cables (one left and one right) that have hinges on them. Those now also need to be detached.

  11. MacBook Pro 13" Function Keys 2017 Screen Assembly Replacement: 11 단계, 이미지 1/2 MacBook Pro 13" Function Keys 2017 Screen Assembly Replacement: 11 단계, 이미지 2/2
    • Time to wiggle all the cables out from under the vent bar we detached (the one with all the tiny screws).

    • Once this is done you can remove the screen assembly from the bottom kit.

  12. MacBook Pro 13" Function Keys 2017 Screen Assembly Replacement: 12 단계, 이미지 1/1
    • And there it is. Not too bad. Total repair time for me was about 10-15 minutes. But then I have a hard time with the tiny screws.

    • Just reverse the steps and you should be good to go.

결론

To reassemble your device, follow these instructions in reverse order.

다른 79명이 해당 안내서를 완성하였습니다.

bwatts

회원 가입일: 10/04/13

2,124 평판

안내서 2개 작성하였습니다

Cheney USD 268 Cheney USD 268 회원

Business

1 회원

안내서 2개 작성하였습니다

댓글 23개

This guide sucks really bad.. missed steps. so unclear about everything. crappy pictures, I suggest you re do this whole thing.

Eugene Baker - 답글

10-15 minutes is good plus reassembly, major steps are missed this can misguide someone

Mwango - 답글

Good guide for someone with experience. I would add a few extra steps with more details, including some additional warnings since having a beginner follow this guide could result in failure in repairing the device. PLEASE HAVE SOMEONE WITH EXPERIENCE PERFORM THIS REPAIR!

Genesis Soto - 답글

This worked perfectly and saved me a lot of money. Many thanks.

Andrew Brown - 답글

Maybe the guide was improved since the above comments were made, but I found this guide completely thorough and have used it on multiple machines without issue. Thanks!

brentp - 답글

댓글 쓰기

조회 통계:

24 시간 전: 39

7일 전: 289

30일 전: 1,196

전체 시간: 88,119