이 버전에는 잘못된 편집 사항이 있을 수 있습니다. 최신 확인된 스냅샷으로 전환하십시오.
필요한 것
-
-
다음 나사 열 개를 풀어주세요:
-
14.4mm Phillips/십자 #00 나사 세 개
-
3.5mm Phillips/십자 #00 나사 세 개
-
3.5mm shouldered Phillips/어깨 십자 #00 나사 네 개
-
-
이 단계는 번역되지 않았습니다. 번역을 도와주십시오
-
Use the edge of a spudger to gently pry the fan connector up and out of its socket on the logic board.
-
-
이 단계는 번역되지 않았습니다. 번역을 도와주십시오
-
Remove the following three screws securing the fan to the logic board:
-
One 7.2 mm T6 Torx screw
-
Two 5.3 mm T6 Torx screws
-
-
이 단계는 번역되지 않았습니다. 번역을 도와주십시오
-
Lift the fan out of its recess in the logic board, minding its cable that may get caught.
-
-
-
이 단계는 번역되지 않았습니다. 번역을 도와주십시오
-
Use the tip of a spudger to pull the right speaker/subwoofer cable out from under the retaining finger molded into the upper case.
-
Pull the right speaker/subwoofer cable upward to lift the connector out of its socket on the logic board.
-
-
이 단계는 번역되지 않았습니다. 번역을 도와주십시오
-
Disconnect the following four cables:
-
AirPort/Bluetooth cable
-
Optical drive cable
-
Hard drive cable
-
Trackpad cable
-
-
이 단계는 번역되지 않았습니다. 번역을 도와주십시오
-
Use your fingernail to flip up the retaining flap on the keyboard ribbon cable ZIF socket.
-
Use the tip of a spudger to pull the keyboard ribbon cable out of its socket.
-
-
이 단계는 번역되지 않았습니다. 번역을 도와주십시오
-
If present, remove the small strip of black tape covering the keyboard backlight cable socket.
-
-
이 단계는 번역되지 않았습니다. 번역을 도와주십시오
-
Use the tip of a spudger or your fingernail to flip up the retaining flap on the keyboard backlight ribbon cable ZIF socket.
-
Pull the keyboard backlight ribbon cable out of its socket.
-
-
이 단계는 번역되지 않았습니다. 번역을 도와주십시오
-
Use the flat end of a spudger to pry the sleep sensor/battery indicator connector up from its socket on the logic board.
-
-
이 단계는 번역되지 않았습니다. 번역을 도와주십시오
-
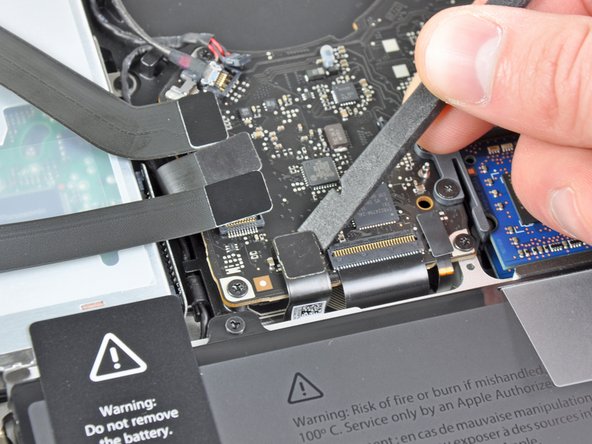
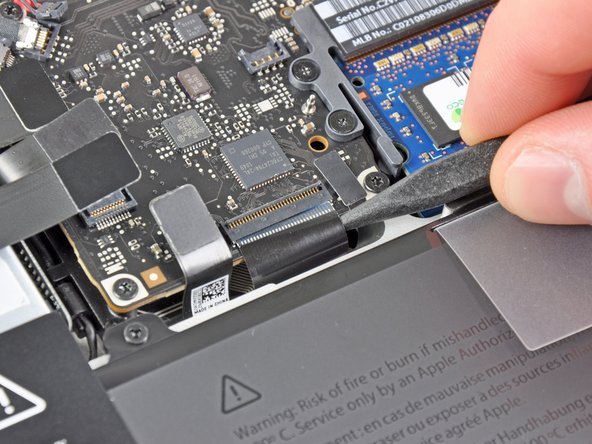
Grab the plastic pull tab secured to the display data cable lock and rotate it toward the DC-In side of the computer.
-
Pull the display data cable straight out of its socket on the logic board.
-
-
이 단계는 번역되지 않았습니다. 번역을 도와주십시오
-
Remove the following nine screws:
-
Five 3.6 mm T6 Torx screws
-
Two 4.3 mm T6 Torx screws
-
Two 7.2 mm T6 Torx screws
-
Five 3.0 mm T6 screws
-
Two 3.6 mm T6 screws
-
Two 6.7 mm T6 screws
-
-
이 단계는 번역되지 않았습니다. 번역을 도와주십시오
-
Remove the following two screws:
-
One 8.6 mm Phillips screw
-
One 5.5 mm Phillips screw
-
Remove the display data cable retainer from the upper case.
-
-
이 단계는 번역되지 않았습니다. 번역을 도와주십시오
-
Use the tip of a spudger to gently peel the microphone off the adhesive securing it to the upper case.
-
-
이 단계는 번역되지 않았습니다. 번역을 도와주십시오
-
Minding the many connectors near its edges, lift the logic board from the end nearest the optical drive.
-
Without flexing the board, maneuver it out of the upper case, minding the flexible connection to the DC-In board that may get caught in the upper case.
-
Remove the logic board.
-
-
이 단계는 번역되지 않았습니다. 번역을 도와주십시오
-
Pull the MagSafe DC-In board cable toward the heat sink to disconnect it from the logic board.
-
Remove the MagSafe DC-In board.
-
다른 125명이 해당 안내서를 완성하였습니다.
댓글 18개
It's worth noting that the two ribbon cables held in place by ZIF connectors are a real pain to put back in - it's very hard to get any force pushing them back into the ZIF connector. It took two small tweezers and a bit of luck on the keyboard cable.
To get back the keyboard ribbon I put the piece of Anti-Static Kapton Tape to enter it.
As stated the keyboard connector is a nightmare to get back in, how I finally did it is, I presented the cable to the socket and using a sticky label pressing down pulled the label towards the centre of the mainboard
The magsafe connector is not under the mainboard and it would be easy for apple to have designed it so that the socket was on the top not the underside of the mainboard
I was using my Laptop (literally in my lap), with the charger connected when it felt very warm on my pant leg. Felt the bottom of the case by the Mag Safe connector and it was very hot, almost burnt my hand. Surprisingly hot. Wouldn't charge right after that, kept getting hot, intermittent charging. Looked at the contacts with a jewelers loupe; the gold contacts were burnt and blistered, plastic melted so it wouldn't make full contact with the AC charger. Charger contacts OK. Replaced DC in board, works like new, saved a bundle of cash. Laid all the screws out in related groups on table top. e.g. All 10 cover screws in a square. MoBo Screws in MoBo pattern, or, you could use a small metric/millimeter ruler to tell which screw goes where.
This is a terrific guide. My project, a mid-2009 13" MacBook Pro 5,5, was a little different, and the biggest challenges I experienced were places where my computer's connections were different than the model illustrated. So I'll share how that computer differed for those who might come up against the same challenges. I'll add those notes and illustrations in the sections that apply.
I lucked out with the two keyboard ribbon cables. I simply nudged them into place with two different spudgers—one to pry gently upward from underneath, the other to redirect that force to press the cable directly into its slot. I was anticipating a struggle, but it was a nothing.
Thanks for the great work, Andrew Bookholt, and everyone else!


