소개
Use this guide to replace a broken AirPort/Bluetooth board.
필요한 것
-
-
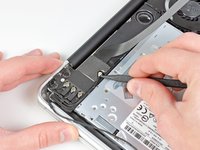
Remove the following ten screws:
-
Three 14.4 mm Phillips #00 screws
-
Three 3.5 mm Phillips #00 screws
-
Four 3.5 mm shouldered Phillips #00 screws
-
-
-
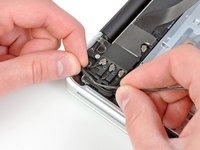
Use the edge of a spudger to pry the battery connector upwards from its socket on the logic board.
-
-
-
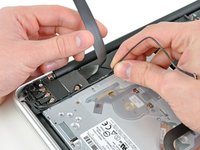
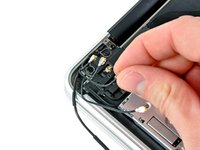
Use the flat end of a spudger to pry the AirPort/Bluetooth ribbon cable connector up from its socket on the logic board.
-
-
-
-
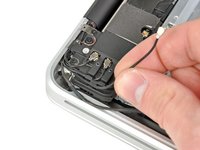
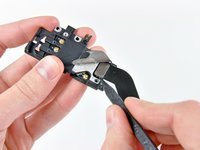
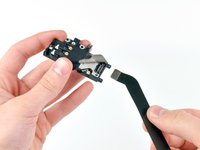
Peel back the piece of EMI tape covering the AirPort/Bluetooth cable connector.
-


To reassemble your device, follow these instructions in reverse order.
To reassemble your device, follow these instructions in reverse order.
다른 92명이 해당 안내서를 완성하였습니다.

댓글 14개
Just to say if you only need to replace the cable the from the main logic to the Airport card it is very simple after battery disconnect its just pry up logic board connector carefully then peel back tape at airport card and remove cable.
Thats all there is to the cable replacement and it fixed my No wifi hardware found and intermittent wifi which it would seem is a common fault As always a great guide thank you.
Thanks for the tip Keith. I did the cable replacement too based on your comment, and it worked for me. Worth trying before swapping teh whole assembly.
My macbook pro 13 2014 version wifi screen holder and the wifi card bluetooth cables are broken , so i went to repair it by my self and i bought the wrong full screen and the wifi card back to macbook pro 13 2010 version , it was shock so i would to know Can i change the wifi card cables and the screen adopted cable to the new cables of 2014 macbook pro 13 2014 version?
what's the difference between the normal "phillips screws" and the "shouldered phillips screws"?
If you look closely with the screws (my eyes needed a magnifying glass) you will see that some of them have heads that are "stepped". hard to describe in words.
perasso -