이 버전에는 잘못된 편집 사항이 있을 수 있습니다. 최신 확인된 스냅샷으로 전환하십시오.
필요한 것
-
-
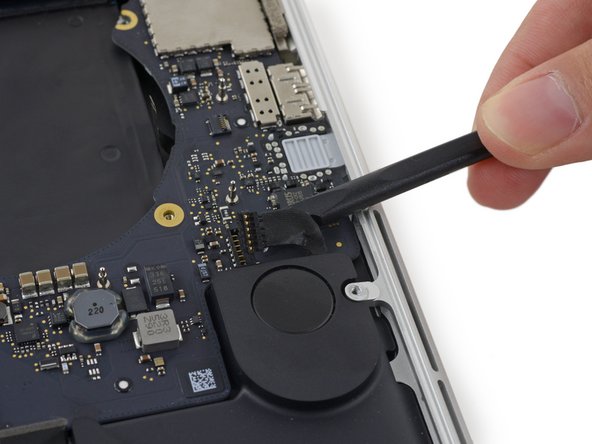
스퍼저 또는 핀셋을 사용하여 AirPort 안테나 케이블 세 개를 AirPort 보드의 소켓에서 똑바로 들어 올려 구부려서 방해가 되지 않도록 하세요.
-
-
이 단계는 번역되지 않았습니다. 번역을 도와주십시오
-
Remove the four 2.2 mm T5 Torx screws securing the I/O board cable connector covers.
-
-
이 단계는 번역되지 않았습니다. 번역을 도와주십시오
-
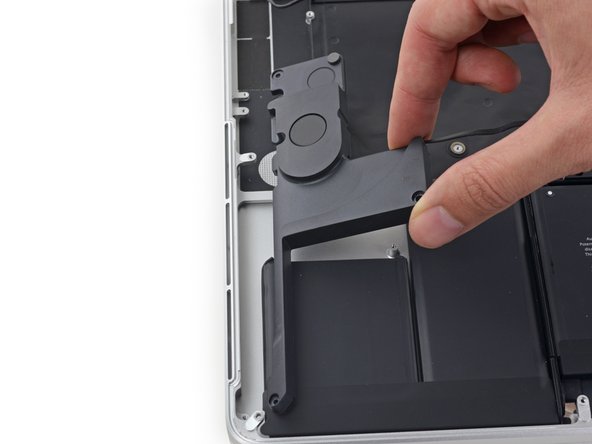
Remove the left connector cover.
-
Use the flat end of a spudger to pry the left end of the I/O board cable up from its socket on the logic board.
-
-
이 단계는 번역되지 않았습니다. 번역을 도와주십시오
-
Remove the right connector cover.
-
Use the flat end of a spudger to pry the right end of the I/O board cable up from its socket on the logic board.
-
-
이 단계는 번역되지 않았습니다. 번역을 도와주십시오
-
Peel the I/O board cable up from the adhesive securing it to the fan.
-
Remove the cable.
-
-
이 단계는 번역되지 않았습니다. 번역을 도와주십시오
-
Use a T5 Torx driver to remove the following three screws securing the right fan to the logic board:
-
One 5.0 mm screw with a 2.0 mm long shoulder
-
One 4.0 mm screw with a wide head
-
One 4.4 mm screw
-
-
이 단계는 번역되지 않았습니다. 번역을 도와주십시오
-
Use the tip of a spudger to flip up the retaining flap on the right fan ribbon cable ZIF socket.
-
-
이 단계는 번역되지 않았습니다. 번역을 도와주십시오
-
Lift the fan and push it gently towards the back edge of the MacBook to free the fan cable from its socket.
-
Remove the fan.
-
-
이 단계는 번역되지 않았습니다. 번역을 도와주십시오
-
Remove the following three screws securing the left fan to the logic board:
-
One 3.6 mm T5 Torx screw with a wide head
-
One 5.0 mm T5 Torx screw with a 2.0 mm long shoulder
-
One 4.4 mm T5 Torx screw
-
-
이 단계는 번역되지 않았습니다. 번역을 도와주십시오
-
Use the tip of a spudger to flip up the retaining flap on the left fan ribbon cable ZIF socket.
-
-
이 단계는 번역되지 않았습니다. 번역을 도와주십시오
-
Lift the fan and push it gently towards the back edge of the MacBook to free the fan cable from its socket.
-
Remove the fan.
-
-
이 단계는 번역되지 않았습니다. 번역을 도와주십시오
-
Remove the single 2.9 mm T5 Torx screw securing the SSD to the logic board.
-
-
이 단계는 번역되지 않았습니다. 번역을 도와주십시오
-
Lift the end of the SSD up enough to pass over the speaker directly behind it.
-
Pull the SSD straight out of its socket on the logic board.
-
-
이 단계는 번역되지 않았습니다. 번역을 도와주십시오
-
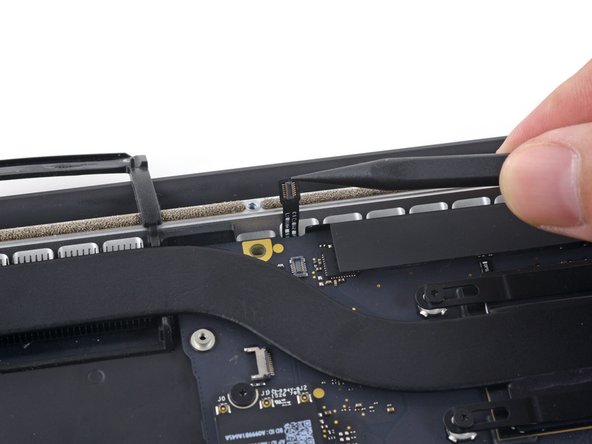
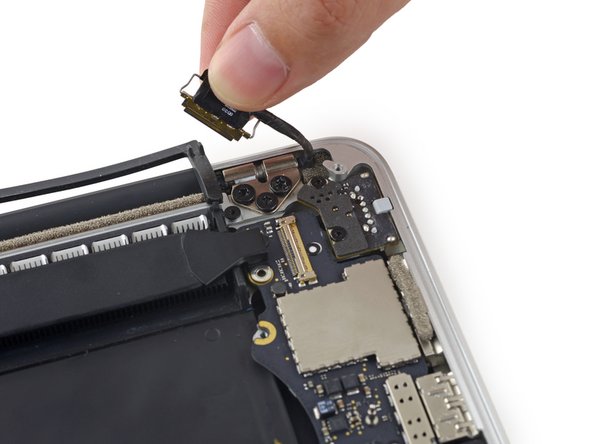
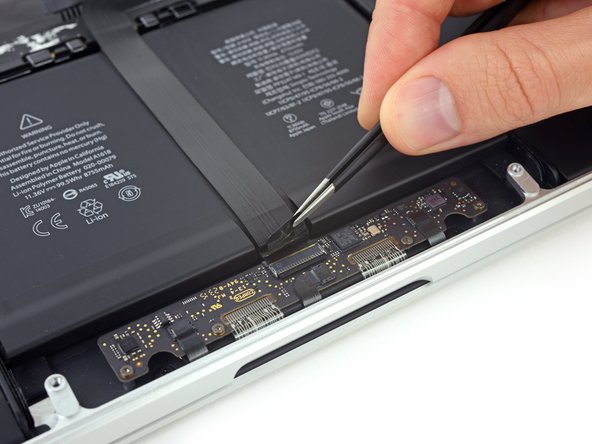
Use the point of a spudger to flip up the locking mechanism on the I/O board connector.
-
Flip the spudger around and use the flat end to slide the I/O cable out of the connector.
-
-
이 단계는 번역되지 않았습니다. 번역을 도와주십시오
-
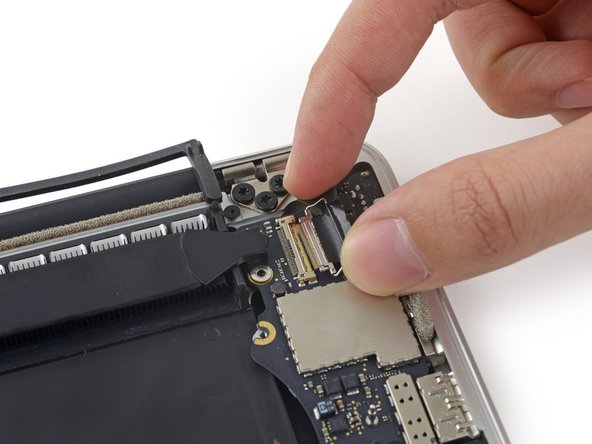
Slightly lift the interior edge of the I/O board and pull it toward the center of the MacBook, away from the side of the case.
-
Remove the I/O board.
-
-
-
이 단계는 번역되지 않았습니다. 번역을 도와주십시오
-
Remove the two 2.2 mm Torx T5 screws securing the touchpad cable connector cover to the logic board.
-
Remove the cover.
-
-
이 단계는 번역되지 않았습니다. 번역을 도와주십시오
-
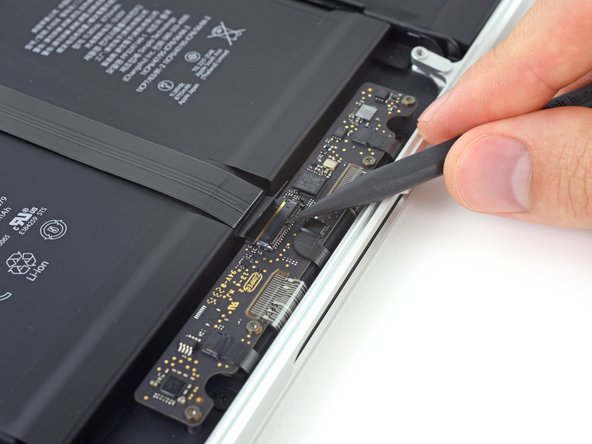
Use the flat end of a spudger to disconnect the touchpad cable connector from its socket in the logic board.
-
-
이 단계는 번역되지 않았습니다. 번역을 도와주십시오
-
Remove the following six screws securing the logic board assembly to the upper case.
-
One 3.8 mm T5 Torx screw
-
Two 5.7 mm T5 Torx screws
-
One 5.6 mm T5 Torx screw (this one is silver and has a taller head than the others)
-
One 2.6 mm T5 Torx screw
-
One 3.2 mm T5 Torx screw
-
-
이 단계는 번역되지 않았습니다. 번역을 도와주십시오
-
The following steps will detail disconnecting these six connectors. Be sure to read each step, as these connectors come in different styles that disconnect differently.
-
Microphone cable
-
Left speaker cable
-
Keyboard data cable
-
Right speaker cable
-
Keyboard backlight cable
-
Display data cable
-
-
이 단계는 번역되지 않았습니다. 번역을 도와주십시오
-
Use the tip of a spudger to flip up the retaining flap on the microphone ribbon cable ZIF socket.
-
Pull the microphone ribbon cable out of its socket, parallel to the logic board.
-
-
이 단계는 번역되지 않았습니다. 번역을 도와주십시오
-
Use the flat end of a spudger to pry the left speaker connector up and out of its socket on the logic board.
-
Gently fold the cable up and out of the way of the logic board.
-
-
이 단계는 번역되지 않았습니다. 번역을 도와주십시오
-
Peel back the tape covering the top of the keyboard data cable connector.
-
-
이 단계는 번역되지 않았습니다. 번역을 도와주십시오
-
Use the tip of a spudger to flip up the retaining flap on the keyboard data cable ZIF socket.
-
Pull the keyboard data cable out of its ZIF socket. Be sure to pull parallel to the logic board, and not straight up.
-
-
이 단계는 번역되지 않았습니다. 번역을 도와주십시오
-
Use the tip of a spudger to pry the right speaker connector up and out of its socket on the logic board.
-
Gently fold the cable up and out of the way of the logic board.
-
-
이 단계는 번역되지 않았습니다. 번역을 도와주십시오
-
Use the point of a spudger to pry the keyboard backlight connector up from its socket on the logic board.
-
-
이 단계는 번역되지 않았습니다. 번역을 도와주십시오
-
Use the tip of a spudger to flip up the display data cable lock and rotate it toward the MagSafe 2 power port side of the computer.
-
-
이 단계는 번역되지 않았습니다. 번역을 도와주십시오
-
Pull the display data cable straight out of its socket on the logic board.
-
Gently bend the display data cable toward the display hinge, to expose the screws on the MagSafe 2 board.
-
-
이 단계는 번역되지 않았습니다. 번역을 도와주십시오
-
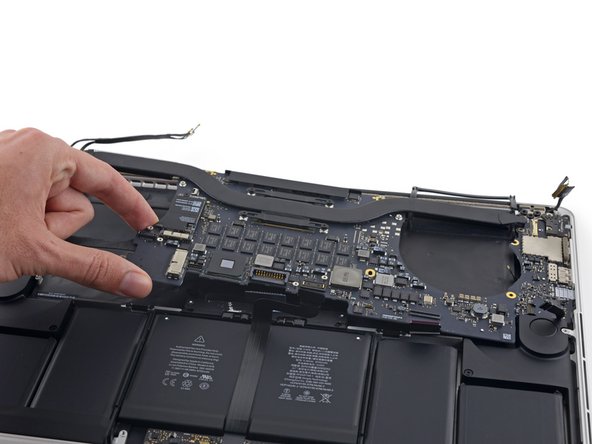
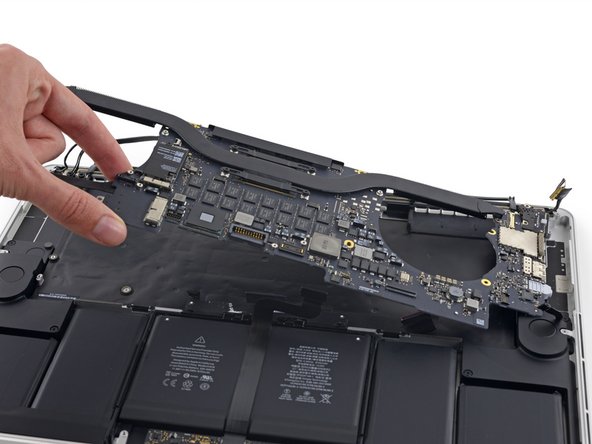
Lift and pull the entire logic board assembly away from the wall of the upper case.
-
-
이 단계는 번역되지 않았습니다. 번역을 도와주십시오
-
Remove the following screws securing the left speaker to the upper case:
-
2.7 mm T5 Torx screw
-
6.9 mm T5 Torx screw (with 4.5 mm shoulder)
-
5.6 mm T5 Torx screw
-
-
이 단계는 번역되지 않았습니다. 번역을 도와주십시오
-
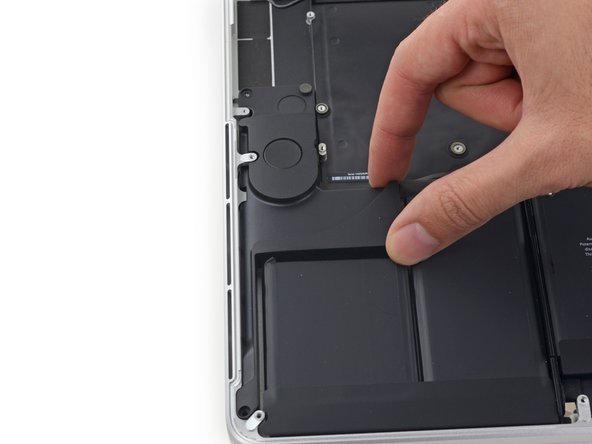
Remove the left speaker by pulling it slightly away from the side of the upper case, and out from under the aluminum tab blocking it in.
-
-
이 단계는 번역되지 않았습니다. 번역을 도와주십시오
-
Remove the following screws securing the right speaker to the upper case:
-
2.7 mm T5 Torx screw
-
6.9 mm T5 Torx screw (with 4.5 mm shoulder)
-
5.6 mm T5 Torx screw
-
-
이 단계는 번역되지 않았습니다. 번역을 도와주십시오
-
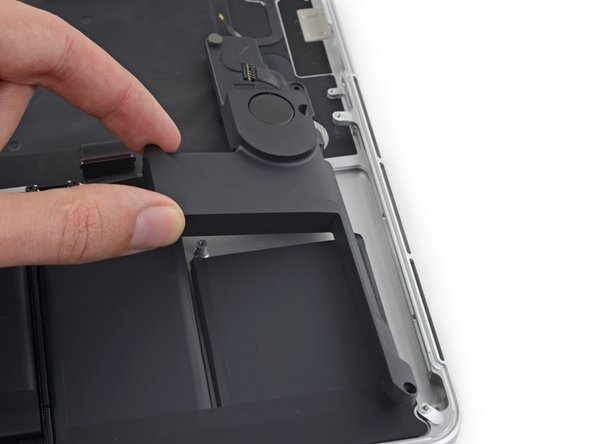
Remove the right speaker by pulling it slightly away from the side of the upper case, and out from under the aluminum tab blocking it in.
-
-
이 단계는 번역되지 않았습니다. 번역을 도와주십시오
-
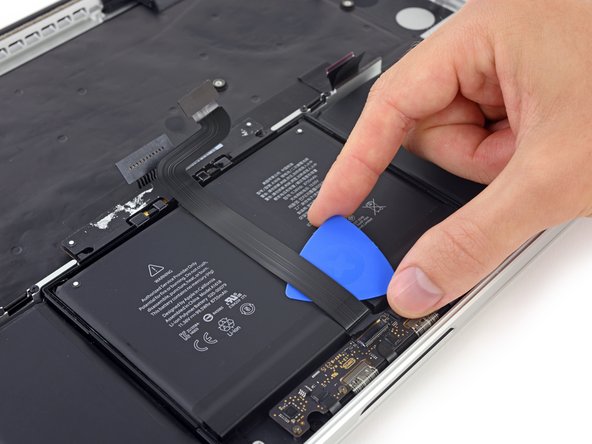
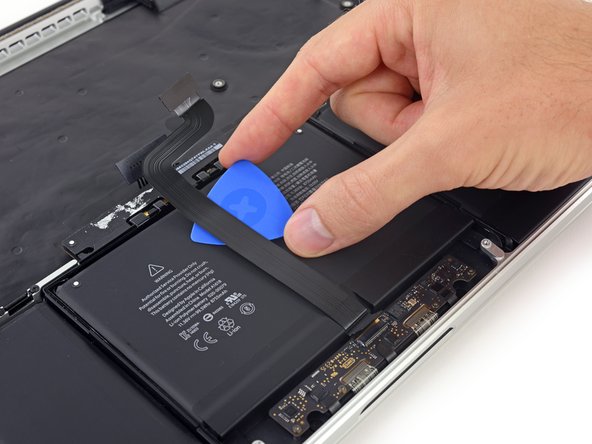
Peel back the tape covering the trackpad connector ribbon cable, near the front edge of the MacBook Pro.
-
-
이 단계는 번역되지 않았습니다. 번역을 도와주십시오
-
Use the tip of a spudger to flip up the black locking tab on the trackpad ribbon cable ZIF connector.
-
-
이 단계는 번역되지 않았습니다. 번역을 도와주십시오
-
Insert an opening pick between the trackpad ribbon cable and the battery.
-
Carefully slide your pick underneath the length of the ribbon cable to separate the adhesive securing it to the battery.
-
-
이 단계는 번역되지 않았습니다. 번역을 도와주십시오
-
To protect your display, place a sheet of aluminum foil between the display and keyboard and leave it there while you work.
-
-
이 단계는 번역되지 않았습니다. 번역을 도와주십시오
-
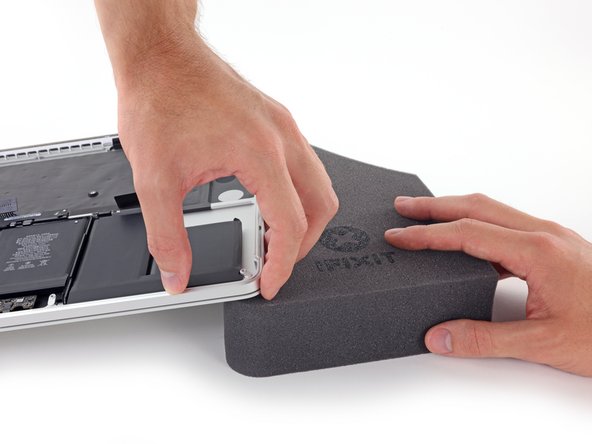
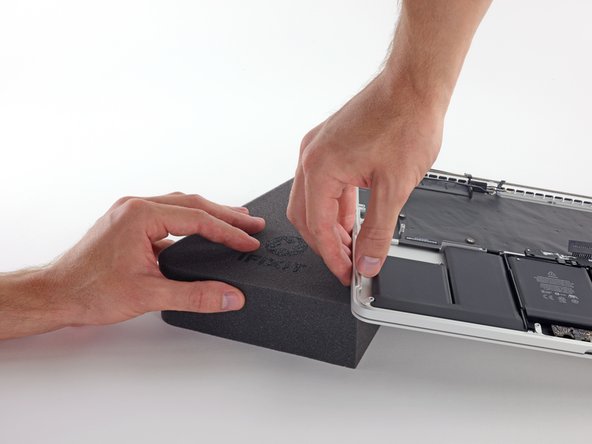
With the front edge of the MacBook Pro facing you, lift the right side and prop it up at a slight angle, using a sturdy foam block or book.
-
-
이 단계는 번역되지 않았습니다. 번역을 도와주십시오
-
Now that your MacBook Pro is fully prepped, it's time to prep yourself.
-
Wear eye protection when handling and applying the adhesive remover. (Eye protection is included in your kit.)
-
Do not wear contact lenses without eye protection.
-
Protective gloves are also included in your kit. If you are concerned about skin irritation, put your gloves on now.
-
-
이 단계는 번역되지 않았습니다. 번역을 도와주십시오
-
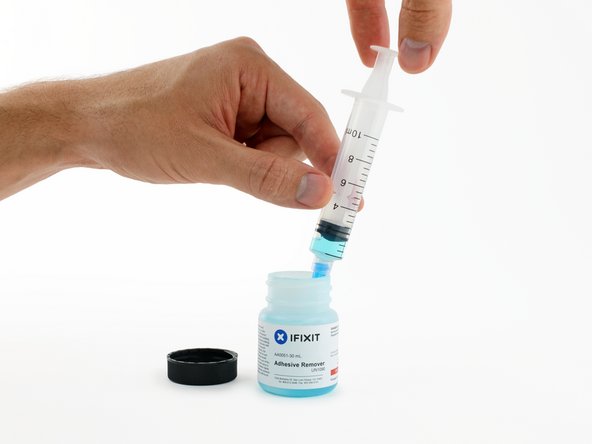
Open your container of adhesive remover.
-
Fill the syringe included in your kit with a small amount (approximately 1-2 milliliters) of adhesive remover.
-
-
이 단계는 번역되지 않았습니다. 번역을 도와주십시오
-
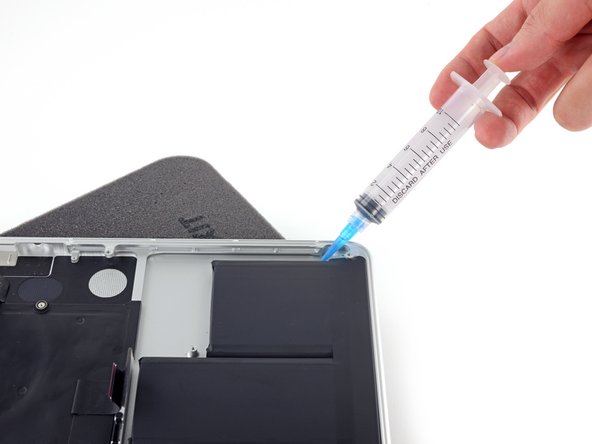
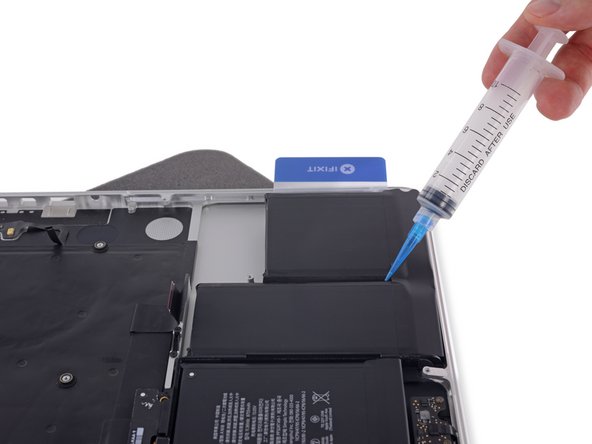
Apply a small amount of adhesive remover (approximately 1 ml) evenly along the elevated edge of the outer right battery cell.
-
Wait 2-3 minutes for the liquid adhesive remover to penetrate underneath the battery cell before you proceed to the next step.
-
-
이 단계는 번역되지 않았습니다. 번역을 도와주십시오
-
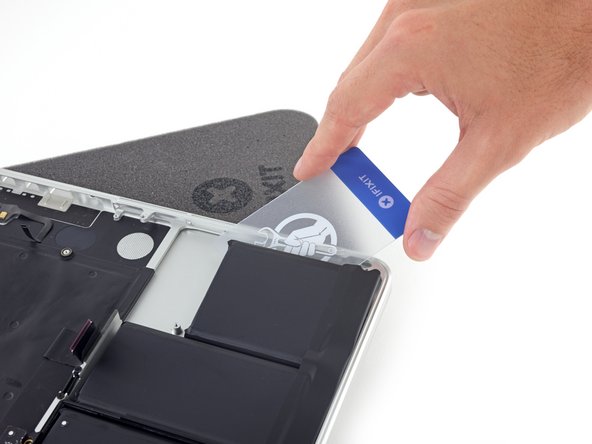
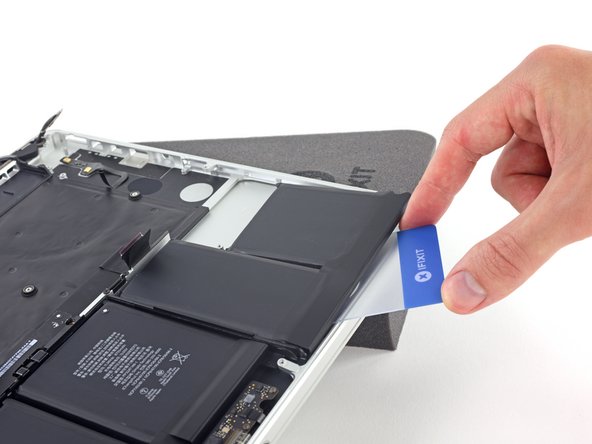
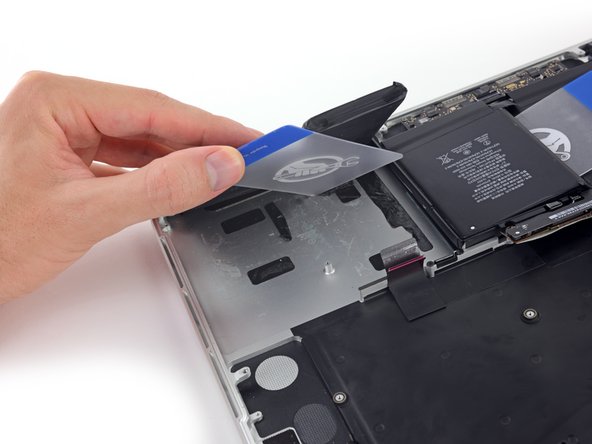
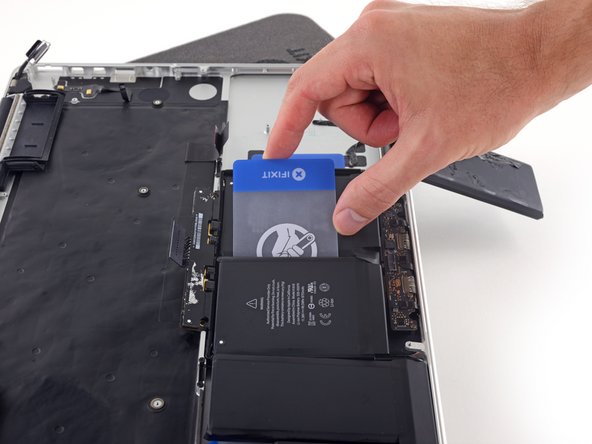
Slide one corner of a plastic card under the outer edge of the battery cell.
-
Slide the card farther underneath the battery cell to separate it from the adhesive securing it to the MacBook Pro's upper case.
-
-
이 단계는 번역되지 않았습니다. 번역을 도와주십시오
-
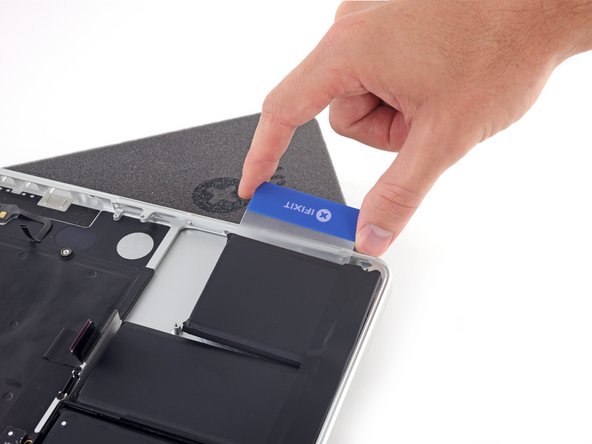
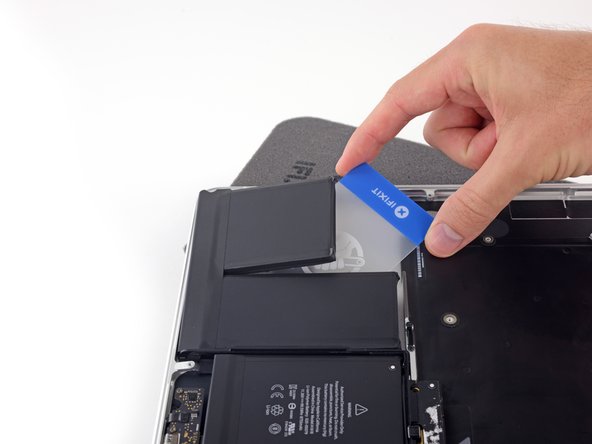
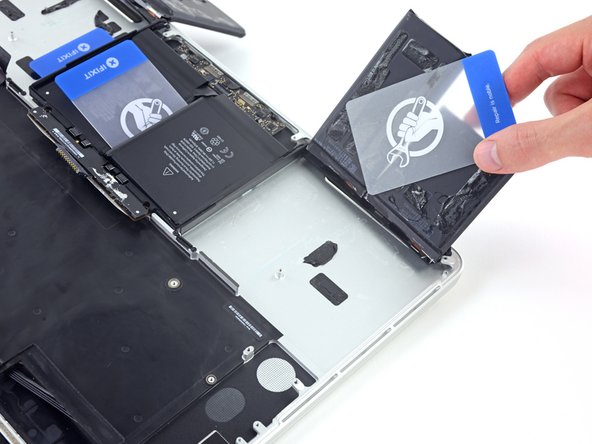
Lift the battery cell to separate it from the MacBook Pro's upper case, but don't try to remove it.
-
Leave the plastic card underneath the battery cell to prevent it from re-adhering as you proceed to the next step.
-
-
이 단계는 번역되지 않았습니다. 번역을 도와주십시오
-
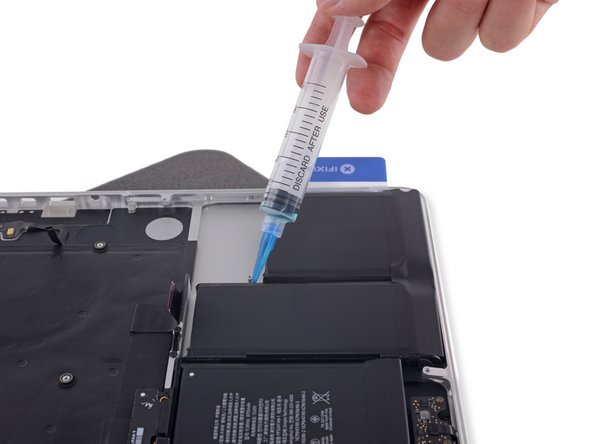
Apply a small amount of adhesive remover (approximately 1 ml) evenly along the elevated edge of the next battery cell.
-
Wait 2-3 minutes for the liquid adhesive remover to penetrate underneath the battery cell before you proceed to the next step.
-
-
이 단계는 번역되지 않았습니다. 번역을 도와주십시오
-
Slide one corner of your plastic card underneath the second battery cell.
-
Push the card underneath the second battery cell, and slide it side to side to separate the adhesive underneath.
-
Leave the plastic card underneath both battery cells (or flip them over) to prevent them from re-adhering as you proceed to the next step.
-
-
이 단계는 번역되지 않았습니다. 번역을 도와주십시오
-
It's time to switch sides. Remove your book or foam block and place it under the opposite side of your MacBook Pro.
-
-
이 단계는 번역되지 않았습니다. 번역을 도와주십시오
-
Repeat the procedure from the prior steps to separate the two battery cells on this side:
-
Apply your adhesive remover to the elevated edge of the outer left battery cell, and wait 2-3 minutes for it to penetrate.
-
Work one corner of a plastic card underneath the battery cell, and slide the card fully underneath the battery cell to separate it.
-
Do the same for the adjacent cell.
-
Leave your plastic card in place or flip the battery cells over to prevent them from re-adhering during the following steps.
-
-
이 단계는 번역되지 않았습니다. 번역을 도와주십시오
-
With the left edge of your MacBook Pro still propped up, apply a small amount (about 1 ml) of adhesive remover down the center line between the two middle battery cells.
-
Wait 2-3 minutes for the adhesive remover to penetrate before you continue.
-
-
이 단계는 번역되지 않았습니다. 번역을 도와주십시오
-
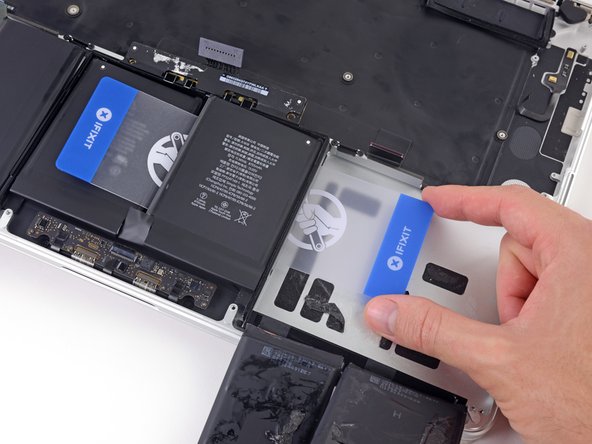
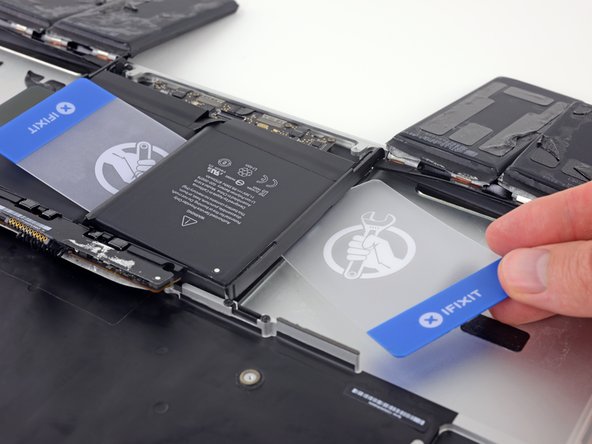
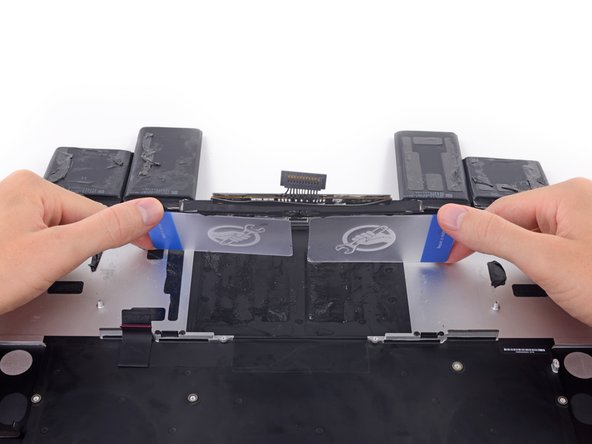
Slide one corner of a plastic card between the middle two cells, and under the elevated edge of the center-right battery cell.
-
Slide the card farther underneath the battery cell to slice through the adhesive securing it in place.
-
Don't try to fully separate this battery cell yet. Leave your plastic card in place to prevent it from re-adhering.
-
-
이 단계는 번역되지 않았습니다. 번역을 도와주십시오
-
Flip the two de-adhered right-hand battery cells over the front edge of the MacBook Pro, if you haven’t already. This will allow access to the outside edge of the center cell.
-
-
이 단계는 번역되지 않았습니다. 번역을 도와주십시오
-
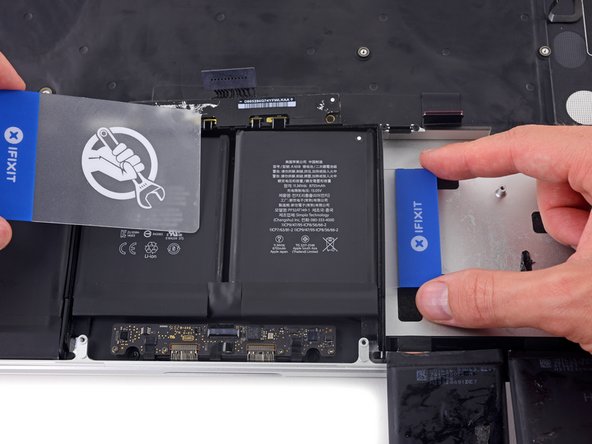
Push one corner of a plastic card below the plastic battery frame and underneath the remaining adhered edge of the lower center cell.
-
Slide your card all the way under the battery cell, and leave it to prevent the battery cell from re-adhering.
-
-
이 단계는 번역되지 않았습니다. 번역을 도와주십시오
-
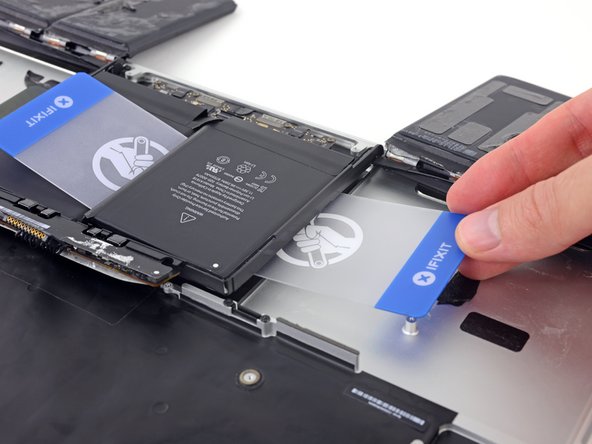
Remove the first plastic card that you inserted under the center-right battery cell.
-
Push the other card in a little further and leave it in place to prevent the battery cell from re-adhering as you continue.
-
-
이 단계는 번역되지 않았습니다. 번역을 도와주십시오
-
Remove your book or foam block.
-
With the front edge of the MacBook Pro facing you, lift the right side and prop it up once again.
-
-
이 단계는 번역되지 않았습니다. 번역을 도와주십시오
-
Apply a small amount (about 1 ml) of adhesive remover between the two center battery cells, so that it flows underneath the remaining battery cell.
-
Wait 2-3 minutes for the adhesive remover to penetrate before you continue.
-
-
이 단계는 번역되지 않았습니다. 번역을 도와주십시오
-
Slide one corner of a plastic card under the elevated edge of the final battery cell.
-
Push the card farther underneath the battery cell to slice through the adhesive securing it in place.
-
Don't try to fully separate this battery cell yet. Leave your plastic card in place to prevent it from re-adhering.
-
-
이 단계는 번역되지 않았습니다. 번역을 도와주십시오
-
If you haven't already done so, lift and flip the two outer left battery cells to clear access to the outside edge of the final battery cell.
-
-
이 단계는 번역되지 않았습니다. 번역을 도와주십시오
-
Repeat the process you used on the center-right battery cell to finish separating the adhesive on the center-left cell:
-
Push one corner of a plastic card below the plastic battery frame and underneath the remaining adhered edge of the final battery cell.
-
Slide your card all the way underneath the battery cell, and leave it to prevent the battery cell from re-adhering.
-
-
이 단계는 번역되지 않았습니다. 번역을 도와주십시오
-
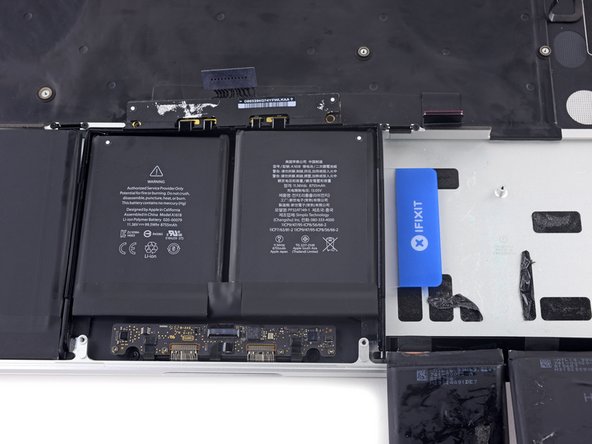
With one plastic card underneath each of the two center battery cells, twist and lift both cards to fully separate the battery cells, together with the plastic frame and battery board, from the MacBook Pro.
-
-
이 단계는 번역되지 않았습니다. 번역을 도와주십시오
-
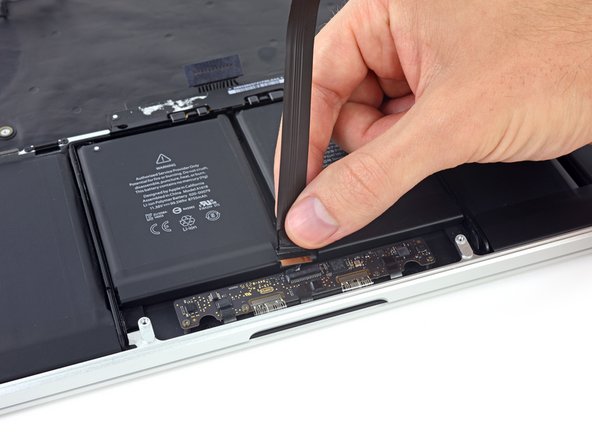
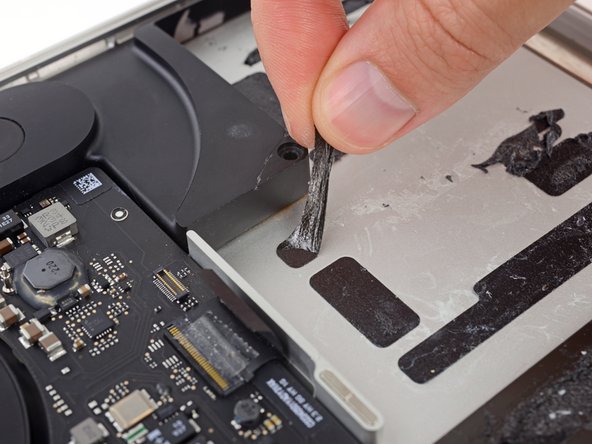
Lift and remove the battery.
-
With a little luck, you can slowly pull out each strip of adhesive with your fingers.
-
Otherwise, soak each strip of adhesive with a bit of adhesive remover for 2-3 minutes, and then scrape it out with a plastic tool. This can take quite a bit of work, so be patient.
-
Mop up any remaining adhesive remover and give your MacBook Pro a few minutes to air dry.
-
Calibrate your battery before using it: allow it to drain overnight, then charge it to 100% and drain it again until your MacBook Pro shuts down automatically. Charge it again and use it normally.
-


다른 4명이 해당 안내서를 완성하였습니다.

