주요 콘텐츠로 건너뛰기

이 버전에는 잘못된 편집 사항이 있을 수 있습니다. 최신 확인된 스냅샷으로 전환하십시오.

필요한 것

  1. , 하단 케이스: 1 단계, 이미지 1/1
    • 하단 케이스를 MacBook Pro에 고정하는 다음 P5 펜타로브 나사를 풀어주세요:

    • 3.1mm 나사 여덟 개

    • 2.3mm 나사 두 개

  2. : 2 단계, 이미지 1/2 : 2 단계, 이미지 2/2
    • 클러치 커버에 가장 가까운 가장자리부터 들어올려서 MacBook Pro에서 하단 케이스를 들어 올리세요.

  3. : 3 단계, 이미지 1/3 : 3 단계, 이미지 2/3 : 3 단계, 이미지 3/3
    • 하단 케이스에는 상단 케이스의 플라스틱 클립(주황색)에 맞는 플라스틱 페그(빨간색) 두 개가 있습니다.

    • 재조립할 때 하단 케이스의 중앙을 살짝 아래로 눌러 케이스를 두 개의 플라스틱 클립에 다시 부착하세요.

  4. , 배터리 커넥터: 4 단계, 이미지 1/1
    • 배터리 커넥터를 덮고 있는 스티커를 벗겨내세요.

  5. : 5 단계, 이미지 1/3 : 5 단계, 이미지 2/3 : 5 단계, 이미지 3/3
    • 배터리 커넥터의 양쪽을 조심히 들어 올려 로직 보드의 소켓에서 커넥터를 들어 올려 빼세요.

    • 커넥터를 배터리 쪽으로 다시 구부려 배터리 커넥터가 실수로 로직 보드에 닿지 않도록 주의하세요.

  6. , AirPort/카메라 케이블: 6 단계, 이미지 1/3 , AirPort/카메라 케이블: 6 단계, 이미지 2/3 , AirPort/카메라 케이블: 6 단계, 이미지 3/3
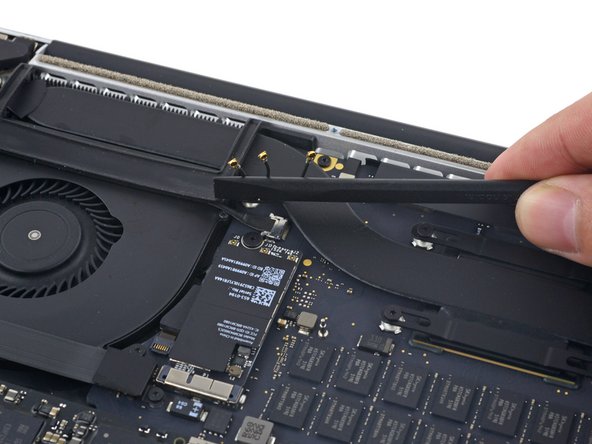
    • 스퍼저 또는 핀셋을 사용하여 AirPort 안테나 케이블 세 개를 AirPort 보드의 소켓에서 똑바로 들어 올려 구부려서 방해가 되지 않도록 하세요.

    • 케이블 연결 부위는 매우 약합니다. 소켓이나 케이블이 아닌 커넥터만 들어 올리도록 주의하세요.

    • 다시 연결하려면 커넥터를 소켓 위에 조심히 정렬한 다음 스퍼저의 납작한 부분으로 단단히 누르세요.

  7. : 7 단계, 이미지 1/2 : 7 단계, 이미지 2/2
    • 팬에서 오른쪽 고무 커버를 벗겨 접어서 방해되지 않게 하세요.

  8. : 8 단계, 이미지 1/2 : 8 단계, 이미지 2/2
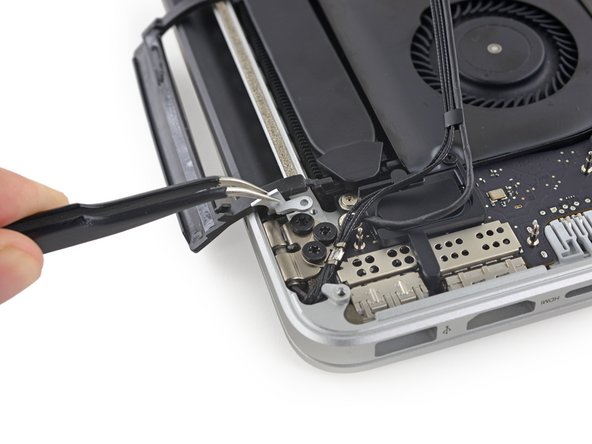
    • 스퍼저의 끝을 사용하여 카메라 케이블 커넥터를 로직 보드의 소켓에서 밀어 내세요.

    • 보드와 평행하게 밀면서 한쪽을 먼저 밀고 다른 쪽을 밀어서 커넥터를 소켓에서 "살살" 빼세요.

  9. : 9 단계, 이미지 1/3 : 9 단계, 이미지 2/3 : 9 단계, 이미지 3/3
    • 손가락을 사용하여 AirPort/카메라 케이블을 팬에서 위로 당겨 빼내세요.

    • 케이블은 팬에 부착되어 있으므로 케이블이 손상되지 않도록 조심히 벗겨내세요.

    • 플라스틱 케이블 가이드에서 케이블을 조심히 떼어내세요.

    • 재조립할 때, 팬에 다시 붙일 수 있도록 케이블에 접착제가 충분히 남아 있어야 합니다.

  10. 이 단계는 번역되지 않았습니다. 번역을 도와주십시오

    : 10 단계, 이미지 1/3 : 10 단계, 이미지 2/3 : 10 단계, 이미지 3/3
    • Use the tip of a spudger to flip up the display data cable lock and rotate it toward the MagSafe 2 power port side of the computer.

    • Pull the display data cable straight out of its socket on the logic board.

    • Do not lift up on the display data cable, as its socket is very fragile. Pull the cable parallel to the face of the logic board.

    • Do not touch the contacts on the data connector or its socket with your fingers or any tools, as you may deposit oils or damage the pins.

  11. 이 단계는 번역되지 않았습니다. 번역을 도와주십시오

    : 11 단계, 이미지 1/2 : 11 단계, 이미지 2/2
    • Remove the two rubber hinge covers.

  12. 이 단계는 번역되지 않았습니다. 번역을 도와주십시오

    : 12 단계, 이미지 1/2 : 12 단계, 이미지 2/2
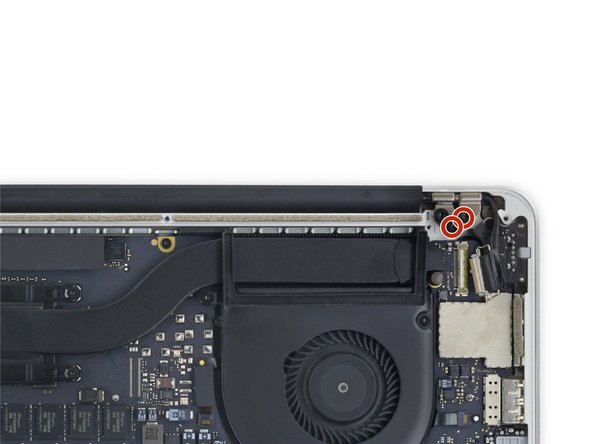
    • Remove the two 3.2 mm T5 Torx screws securing the aluminum hinge covers to the upper case.

  13. 이 단계는 번역되지 않았습니다. 번역을 도와주십시오

    : 13 단계, 이미지 1/3 : 13 단계, 이미지 2/3 : 13 단계, 이미지 3/3
    • Remove the two aluminum hinge covers from the MacBook Pro.

  14. 이 단계는 번역되지 않았습니다. 번역을 도와주십시오

    : 14 단계, 이미지 1/2 : 14 단계, 이미지 2/2
    • Remove four out of the six 5.3 mm T8 Torx screws securing the display to the upper case.

    • Leave the innermost screws (one from each hinge) in place.

    • When reassembling, be sure the two screws going back into the hinge on the left go back through the webcam/AirPort cable bracket.

  15. 이 단계는 번역되지 않았습니다. 번역을 도와주십시오

    : 15 단계, 이미지 1/1
    • Open the MacBook Pro approximately 110 degrees, and place it sideways on the table, as shown.

  16. 이 단계는 번역되지 않았습니다. 번역을 도와주십시오

    : 16 단계, 이미지 1/1
    • While holding the display and upper case together with your left hand, remove the remaining T8 Torx screw from the lower (closer to the table) display bracket.

  17. 이 단계는 번역되지 않았습니다. 번역을 도와주십시오

    : 17 단계, 이미지 1/1
    • Be sure to hold the display and upper case together with your left hand. Failure to do so may cause the freed display/upper case to fall, potentially damaging each component.

    • While holding the display and upper case together with your left hand, remove the remaining T8 Torx screw from the upper display bracket.

  18. 이 단계는 번역되지 않았습니다. 번역을 도와주십시오

    : 18 단계, 이미지 1/3 : 18 단계, 이미지 2/3 : 18 단계, 이미지 3/3
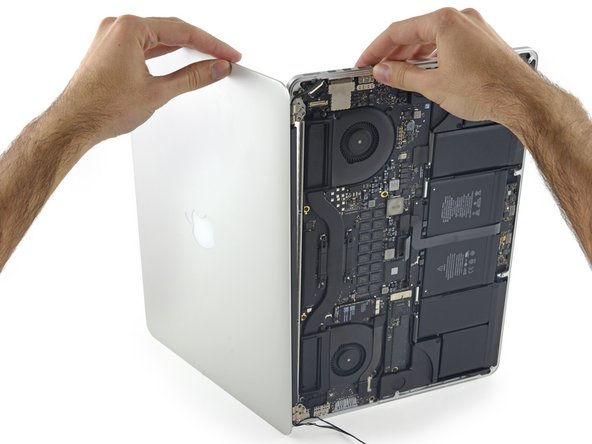
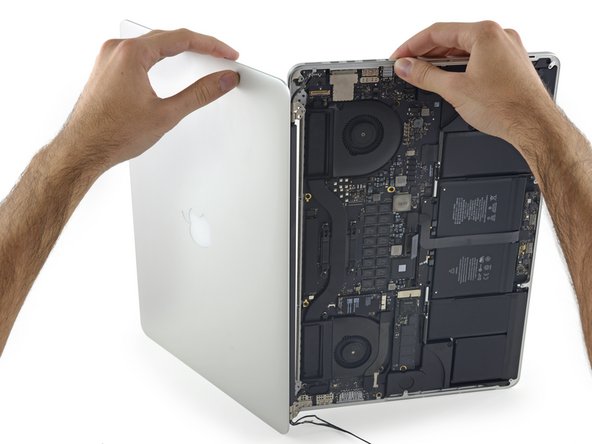
    • Grip both halves of the device, one in each hand.

    • Gently push forward on the bottom half of the device to detach it from the display assembly.

    • Carefully set each component aside, making sure to set down the bottom half keyboard-side down to avoid damaging internal components.

    • Replacement displays may not have their hinges adjusted to the correct angle. Use needle nose pliers to gently adjust them to match the hinges on the display being replaced.

결승점

다른 150명이 해당 안내서를 완성하였습니다.

Andrew Optimus Goldheart

회원 가입일: 10/17/09

503,000 평판

안내서 407개 작성하였습니다

iFixit iFixit 회원

Staff

135 회원들

안내서 17,198개 작성하였습니다

댓글 52개

Can the clutch be replaced in the 2015 15" Retina MacBook Pro?

Thomas Taggart - 답글

Successfully replaced screen and everything is working great. One mechanical exception - the black clutch cover is loose on one side (the left side looking at the keyboard). i can "lift it" towards myself. it wasn't obvious while i was in there that there was a step to "hook it" into anything. what has it let go from and how do i go about ensuring that it's secure when it's flipped? Anyone know?

Thnaks!

J Allard - 답글

It was a perfect job! Thanks!

Mike Mell - 답글

Thank you! These instructions couldn't be better.

Devin Fredericks - 답글

Do you have any intention of releasing a guide for the new A1707 2016 pro retina model with touch bar? Thanks for your help.

Michael Moore - 답글

댓글 쓰기

조회 통계:

24 시간 전: 35

7일 전: 244

30일 전: 1,143

전체 시간: 223,312