주요 콘텐츠로 건너뛰기

이 버전에는 잘못된 편집 사항이 있을 수 있습니다. 최신 확인된 스냅샷으로 전환하십시오.

필요한 것

  1. , 하단 케이스: 1 단계, 이미지 1/1
    • 하단 케이스를 MacBook Pro에 고정하는 다음 P5 펜타로브 나사를 풀어주세요:

    • 3.1mm 나사 여덟 개

    • 2.3mm 나사 두 개

  2. : 2 단계, 이미지 1/2 : 2 단계, 이미지 2/2
    • 클러치 커버에 가장 가까운 가장자리부터 들어올려서 MacBook Pro에서 하단 케이스를 들어 올리세요.

  3. : 3 단계, 이미지 1/3 : 3 단계, 이미지 2/3 : 3 단계, 이미지 3/3
    • 하단 케이스에는 상단 케이스의 플라스틱 클립(주황색)에 맞는 플라스틱 페그(빨간색) 두 개가 있습니다.

    • 재조립할 때 하단 케이스의 중앙을 살짝 아래로 눌러 케이스를 두 개의 플라스틱 클립에 다시 부착하세요.

  4. , 배터리 커넥터: 4 단계, 이미지 1/1
    • 배터리 커넥터를 덮고 있는 스티커를 벗겨내세요.

  5. : 5 단계, 이미지 1/3 : 5 단계, 이미지 2/3 : 5 단계, 이미지 3/3
    • 배터리 커넥터의 양쪽을 조심히 들어 올려 로직 보드의 소켓에서 커넥터를 들어 올려 빼세요.

    • 커넥터를 배터리 쪽으로 다시 구부려 배터리 커넥터가 실수로 로직 보드에 닿지 않도록 주의하세요.

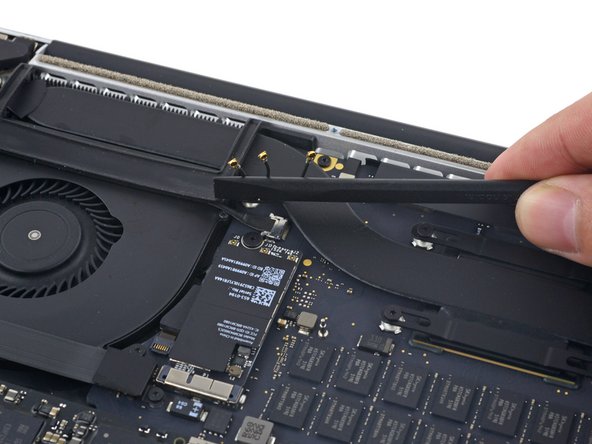
  6. , AirPort/카메라 케이블: 6 단계, 이미지 1/3 , AirPort/카메라 케이블: 6 단계, 이미지 2/3 , AirPort/카메라 케이블: 6 단계, 이미지 3/3
    • 스퍼저 또는 핀셋을 사용하여 AirPort 안테나 케이블 세 개를 AirPort 보드의 소켓에서 똑바로 들어 올려 구부려서 방해가 되지 않도록 하세요.

    • 케이블 연결 부위는 매우 약합니다. 소켓이나 케이블이 아닌 커넥터만 들어 올리도록 주의하세요.

    • 다시 연결하려면 커넥터를 소켓 위에 조심히 정렬한 다음 스퍼저의 납작한 부분으로 단단히 누르세요.

  7. : 7 단계, 이미지 1/2 : 7 단계, 이미지 2/2
    • 팬에서 오른쪽 고무 커버를 벗겨 접어서 방해되지 않게 하세요.

  8. : 8 단계, 이미지 1/2 : 8 단계, 이미지 2/2
    • 스퍼저의 끝을 사용하여 카메라 케이블 커넥터를 로직 보드의 소켓에서 밀어 내세요.

    • 보드와 평행하게 밀면서 한쪽을 먼저 밀고 다른 쪽을 밀어서 커넥터를 소켓에서 "살살" 빼세요.

  9. : 9 단계, 이미지 1/3 : 9 단계, 이미지 2/3 : 9 단계, 이미지 3/3
    • 손가락을 사용하여 AirPort/카메라 케이블을 팬에서 위로 당겨 빼내세요.

    • 케이블은 팬에 부착되어 있으므로 케이블이 손상되지 않도록 조심히 벗겨내세요.

    • 플라스틱 케이블 가이드에서 케이블을 조심히 떼어내세요.

    • 재조립할 때, 팬에 다시 붙일 수 있도록 케이블에 접착제가 충분히 남아 있어야 합니다.

  10. 이 단계는 번역되지 않았습니다. 번역을 도와주십시오

    : 10 단계, 이미지 1/1
    • Remove the four 2.2 mm T5 Torx screws securing the I/O board cable connector covers.

  11. 이 단계는 번역되지 않았습니다. 번역을 도와주십시오

    : 11 단계, 이미지 1/2 : 11 단계, 이미지 2/2
    • Remove the left connector cover.

    • Use the flat end of a spudger to pry the left end of the I/O board cable up from its socket on the logic board.

  12. 이 단계는 번역되지 않았습니다. 번역을 도와주십시오

    : 12 단계, 이미지 1/2 : 12 단계, 이미지 2/2
    • Remove the right connector cover.

    • Use the flat end of a spudger to pry the right end of the I/O board cable up from its socket on the logic board.

  13. 이 단계는 번역되지 않았습니다. 번역을 도와주십시오

    : 13 단계, 이미지 1/1
    • Peel the I/O board cable up from the adhesive securing it to the fan.

    • Remove the cable.

  14. 이 단계는 번역되지 않았습니다. 번역을 도와주십시오

    : 14 단계, 이미지 1/1
    • Use a T5 Torx driver to remove the following three screws securing the right fan to the logic board:

    • One 5.0 mm screw with a 2.0 mm long shoulder

    • One 4.0 mm screw with a wide head

    • One 4.4 mm screw

  15. 이 단계는 번역되지 않았습니다. 번역을 도와주십시오

    : 15 단계, 이미지 1/3 : 15 단계, 이미지 2/3 : 15 단계, 이미지 3/3
    • Use the tip of a spudger to flip up the retaining flap on the right fan ribbon cable ZIF socket.

    • Be sure you are prying up on the hinged retaining flap, not the socket itself.

  16. 이 단계는 번역되지 않았습니다. 번역을 도와주십시오

    : 16 단계, 이미지 1/2 : 16 단계, 이미지 2/2
    • Lift the fan and push it gently towards the back edge of the MacBook to free the fan cable from its socket.

    • The fan cable may be adhered to the logic board—to avoid tearing the cable, gently peel it up while lifting the fan.

    • Remove the fan.

  17. 이 단계는 번역되지 않았습니다. 번역을 도와주십시오

    : 17 단계, 이미지 1/1
    • Remove the single 2.9 mm T5 Torx screw securing the SSD to the logic board.

  18. 이 단계는 번역되지 않았습니다. 번역을 도와주십시오

    : 18 단계, 이미지 1/3 : 18 단계, 이미지 2/3 : 18 단계, 이미지 3/3
    • Lift the end of the SSD up enough to pass over the speaker directly behind it.

    • Do not lift the SSD too high, or you could damage the contacts or socket.

    • Pull the SSD straight out of its socket on the logic board.

  19. 이 단계는 번역되지 않았습니다. 번역을 도와주십시오

    : 19 단계, 이미지 1/3 : 19 단계, 이미지 2/3 : 19 단계, 이미지 3/3
    • Use the point of a spudger to flip up the locking mechanism on the I/O board connector.

    • Flip the spudger around and use the flat end to slide the I/O cable out of the connector.

    • Push on the opened locking mechanism for an easy way to slide the I/O cable out of the connector. This could help prevent accidental damage to the cable or connector contacts.

  20. 이 단계는 번역되지 않았습니다. 번역을 도와주십시오

    : 20 단계, 이미지 1/1
    • Remove the two 3.1 mm T5 Torx screws from the I/O board.

  21. 이 단계는 번역되지 않았습니다. 번역을 도와주십시오

    : 21 단계, 이미지 1/2 : 21 단계, 이미지 2/2
    • Slightly lift the interior edge of the I/O board and pull it toward the center of the MacBook, away from the side of the case.

    • Remove the I/O board.

결승점

다른 14명이 해당 안내서를 완성하였습니다.

Andrew Optimus Goldheart

회원 가입일: 10/17/09

502,849 평판

안내서 407개 작성하였습니다

iFixit iFixit 회원

Staff

135 회원들

안내서 16,817개 작성하였습니다

댓글 한 개

Be _VERY_ careful with the connector on the end of the I/O cable. Especially since it abuts to the speaker. It is easy to insert it diagonally but that could break the edge pins on the connector. Step 19 of this job (and the inverse) needs at least three hands.

Bryan Lunt - 답글

댓글 쓰기

조회 통계:

24 시간 전: 5

7일 전: 54

30일 전: 184

전체 시간: 23,824