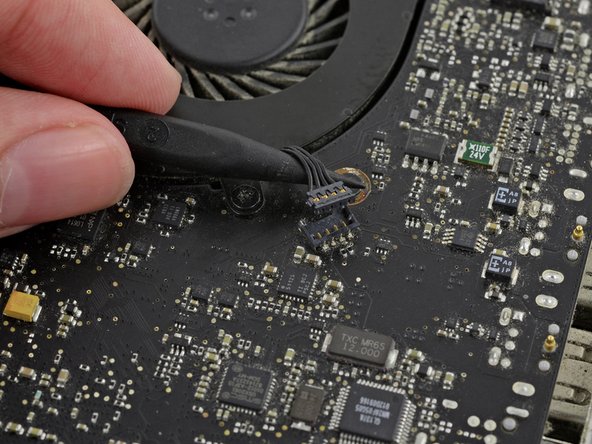
주요 콘텐츠로 건너뛰기

MacBook Pro 15" Unibody Late 2008 and Early 2009 Left Fan Replacement

필요한 것

  1. MacBook Pro 15" Unibody Late 2008 and Early 2009 Left Fan Replacement, Access Door: 1 단계, 이미지 1/2 MacBook Pro 15" Unibody Late 2008 and Early 2009 Left Fan Replacement, Access Door: 1 단계, 이미지 2/2
    • With the case closed, place the Unibody top-side down on a flat surface.

    • Depress the grooved side of the access door release latch enough to grab the free end. Lift the release latch until it is vertical.

  2. MacBook Pro 15" Unibody Late 2008 and Early 2009 Left Fan Replacement: 2 단계, 이미지 1/1
    • The access door should now be raised enough to lift it up and out of the Unibody.

  3. MacBook Pro 15" Unibody Late 2008 and Early 2009 Left Fan Replacement, Battery: 3 단계, 이미지 1/1
    • Be sure the access door release latch is vertical before proceeding.

    • Grab the translucent plastic tab and pull the battery up and out of the Unibody.

    • If the latch is depressed it will lock the battery in place.

  4. MacBook Pro 15" Unibody Late 2008 and Early 2009 Left Fan Replacement, Lower Case: 4 단계, 이미지 1/1
    • Remove the following eight screws securing the lower case to the chassis:

    • One 5.4 mm Phillips screw.

    • Three 14 mm Phillips screws.

    • Four 3.5 mm Phillips screws.

  5. MacBook Pro 15" Unibody Late 2008 and Early 2009 Left Fan Replacement: 5 단계, 이미지 1/1
    • Using both hands, lift and remove the lower case off the upper case.

  6. MacBook Pro 15" Unibody Late 2008 and Early 2009 Left Fan Replacement, Left Fan: 6 단계, 이미지 1/2 MacBook Pro 15" Unibody Late 2008 and Early 2009 Left Fan Replacement, Left Fan: 6 단계, 이미지 2/2
    • Use a spudger to pry the fan connector straight up off the logic board.

    • Be sure to only pry up on the connector itself not on the socket or you may damage the machine.

    • It is useful to twist the spudger axially from beneath the fan cable wires to release the connector.

  7. MacBook Pro 15" Unibody Late 2008 and Early 2009 Left Fan Replacement: 7 단계, 이미지 1/1
    • Remove three 3.5 mm Phillips screws securing the left fan to the upper case and logic board.

  8. MacBook Pro 15" Unibody Late 2008 and Early 2009 Left Fan Replacement: 8 단계, 이미지 1/1
    • Lift the fan out of the upper case.

결론

To reassemble your device, follow these instructions in reverse order.

다른 94명이 해당 안내서를 완성하였습니다.

Walter Galan

694,638 평판

안내서 1,203개 작성하였습니다

댓글 한 개

Very easy to do following the instructions, Thank you. A word of caution though, The fans screws are really tight so be careful and use a good fitting screw driver. The screw heads are easily damaged.

Poppy - 답글

댓글 쓰기

조회 통계:

24 시간 전: 1

7일 전: 8

30일 전: 16

전체 시간: 55,463