주요 콘텐츠로 건너뛰기

이 버전에는 잘못된 편집 사항이 있을 수 있습니다. 최신 확인된 스냅샷으로 전환하십시오.

필요한 것

  1. , 하단 케이스: 1 단계, 이미지 1/1
    • 하단 케이스를 상단 케이스에 고정하는 다음 나사 열 개를 풀어주세요:

    • 13.5mm (14.1mm) Phillips/십자 나사 세 개.

    • 3mm Phillips/십자 나사 일곱 개

    • 이 나사들을 풀때 나사들이 약간 기울어져 나오는 것에 주목하세요. 같은 방법으로 다시 조여야 합니다.

  2. : 2 단계, 이미지 1/1
    • 하단 케이스 벤트 근처를 두 손으로 들어올려 하단 케이스를 상단 케이스에 고정하는 클립 두 개를 분리하세요.

    • 하단 케이스를 분리하고 치워 놓으세요.

  3. , 배터리 커넥터: 3 단계, 이미지 1/2 , 배터리 커넥터: 3 단계, 이미지 2/2
    • 특정 수리는 (예. 하드 드라이브) 배터리를 분리할 필요가 없지만 배터리를 분리하면 전자 제품이 실수로 단락되는 것을 방지합니다. 배터리를 커넥터를 분리하지 않으면 마더보드 일부에 전기가 공급될 수 있으므로 주의하세요.

    • Spudger/스퍼저 가장자리를 사용하여 배터리 커넥터를 로직 보드 소켓에서 위로 들어 올리세요.

    • 커넥터의 짧은 양쪽을 위로 들어 올려 소켓에서 "조금씩 걸어 나오도록" 하세요.

  4. : 4 단계, 이미지 1/1
    • 배터리 케이블을 로직 보드 소켓에서 약간 구부려 멀리하여 작업 도중 실수로 연결하지 않도록 하세요.

  5. , 하드 드라이브: 5 단계, 이미지 1/1
    • 하드 드라이브 브래킷을 상단 케이스에 고정하는 Phillips/십자 나사 두 개를 분리하세요.

    • 이 나사들은 하드 드라이브 브래킷에서 빠지지 않습니다.

  6. : 6 단계, 이미지 1/1
    • 상단 케이스에서 고정 브래킷을 들어 올리세요

  7. : 7 단계, 이미지 1/1
    • 컴퓨터에 연결된 케이블을 염두하고 하드 드라이브를 당김 탭으로 들어 올려 섀시에서 빼세요.

  8. : 8 단계, 이미지 1/2 : 8 단계, 이미지 2/2
    • 하드 드라이브 커넥터를 하드 드라이브에서 똑바로 잡아 당겨 하드 드라이브 케이블을 분리하세요.

  9. 이 단계는 번역되지 않았습니다. 번역을 도와주십시오

    : 9 단계, 이미지 1/1
    • Use the flat end of a spudger to pry the hard drive cable connector up off the logic board.

  10. 이 단계는 번역되지 않았습니다. 번역을 도와주십시오

    : 10 단계, 이미지 1/1
    • Remove the following four screws securing the hard drive and IR sensor cable to the upper case:

    • Two 1.5 mm Phillips screws.

    • Two 4 mm Phillips screws.

  11. 이 단계는 번역되지 않았습니다. 번역을 도와주십시오

    : 11 단계, 이미지 1/3 : 11 단계, 이미지 2/3 : 11 단계, 이미지 3/3
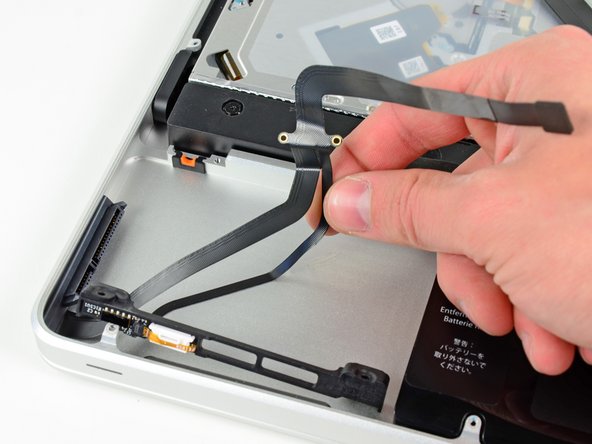
    • Slide the hard drive and IR sensor bracket away from the edge of the upper case.

    • Carefully peel the hard drive and IR sensor cable from the upper case.

    • Lift the hard drive and IR sensor assembly out of the upper case.

  12. 이 단계는 번역되지 않았습니다. 번역을 도와주십시오

    : 12 단계, 이미지 1/3 : 12 단계, 이미지 2/3 : 12 단계, 이미지 3/3
    • Your replacement part may or may not come with the front (sensor) bracket. If it does not, you'll need to transfer it to your new cable.

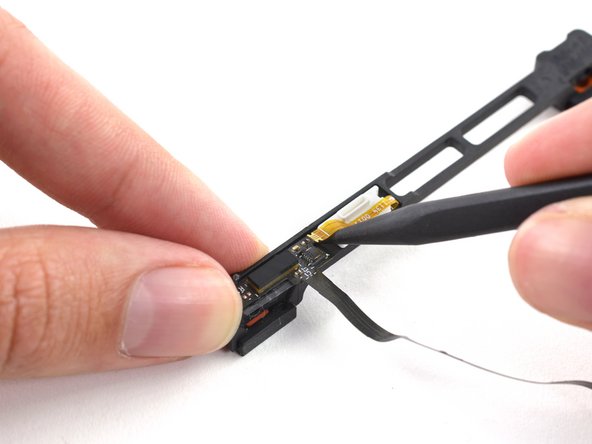
    • Use the tip of a spudger to flip the ZIF connector on the hard drive cable.

    • Gently pull the sensor bracket cable out of the ZIF connector.

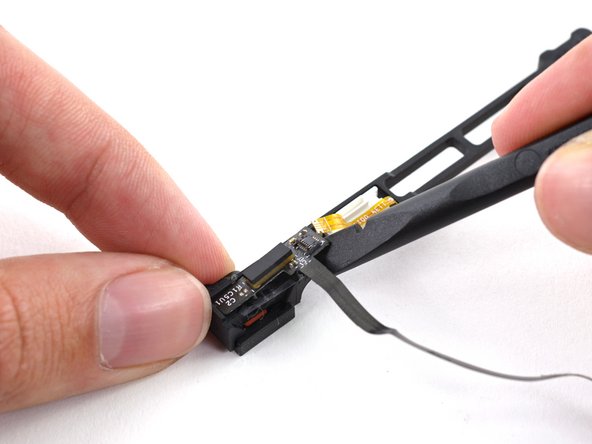
    • Use the flat end of a spudger to pry the hard drive cable up off the sensor bracket.

    • Remove the adhesive backing from your new hard drive cable, stick it onto the sensor bracket, and connect the sensor bracket cable.

결승점

다른 14명이 해당 안내서를 완성하였습니다.

Miroslav Djuric

158,313 평판

안내서 144개 작성하였습니다

댓글 3개

Great instructions - I am not an expert, and was able to change the hard drive cable in 25 minutes without issues. Thanks!

lerfamu - 답글

Followed these instructions and completed the changeover, probably took half hour. The final step with the ZIF connector I was unable to see exactly how it worked but managed with a bit of trial and error and things are now working. Perhaps a closer photo or perhaps a diagram as to how the connector works? But all in all things worked. Thanks

martin riley - 답글

Is there any way to fix failed graphics card on MacBook Pro 2011. At this stage it’s looking like I have to trash the thing?

Victor holmes - 답글

댓글 쓰기

조회 통계:

24 시간 전: 1

7일 전: 15

30일 전: 24

전체 시간: 10,692