이 버전에는 잘못된 편집 사항이 있을 수 있습니다. 최신 확인된 스냅샷으로 전환하십시오.
필요한 것
-
이 단계는 번역되지 않았습니다. 번역을 도와주십시오
-
With the case closed, place the Unibody top-side down on a flat surface.
-
Depress the grooved side of the access door release latch enough to grab the free end. Lift the release latch until it is vertical.
-
-
이 단계는 번역되지 않았습니다. 번역을 도와주십시오
-
The access door should now be raised enough to lift it up and out of the Unibody.
-
-
이 단계는 번역되지 않았습니다. 번역을 도와주십시오
-
Grab the white plastic tab and pull the battery up and out of the Unibody.
-
-
이 단계는 번역되지 않았습니다. 번역을 도와주십시오
-
Remove the following eight screws securing the lower case to the chassis:
-
One 3 mm Phillips screw.
-
Three 13.5 mm Phillips screws.
-
Four 3.5 mm Phillips screws.
-
-
이 단계는 번역되지 않았습니다. 번역을 도와주십시오
-
Using the flat end of a spudger, pry the subwoofer connector straight up off the logic board.
-
-
이 단계는 번역되지 않았습니다. 번역을 도와주십시오
-
Disconnect the camera cable by pulling the male end straight away from its socket.
-
-
이 단계는 번역되지 않았습니다. 번역을 도와주십시오
-
Use a spudger to pry the optical drive connector straight up off the logic board.
-
-
이 단계는 번역되지 않았습니다. 번역을 도와주십시오
-
Remove the two Phillips screws securing the subwoofer to the upper case.
-
-
-
이 단계는 번역되지 않았습니다. 번역을 도와주십시오
-
Lift the subwoofer off the optical drive, and set it above the computer.
-
-
이 단계는 번역되지 않았습니다. 번역을 도와주십시오
-
Remove the two Phillips screws securing the camera cable bracket to the upper case.
-
-
이 단계는 번역되지 않았습니다. 번역을 도와주십시오
-
Remove the three 2.5 mm Phillips screws securing the optical drive to the upper case.
-
-
이 단계는 번역되지 않았습니다. 번역을 도와주십시오
-
Lift the optical drive from its right edge and pull it out of the computer.
-
-
이 단계는 번역되지 않았습니다. 번역을 도와주십시오
-
Remove the single Phillips screw securing the hard drive bracket to the upper case.
-
-
이 단계는 번역되지 않았습니다. 번역을 도와주십시오
-
Lift the hard drive by its plastic pull tab and remove the freed hard drive bracket.
-
-
이 단계는 번역되지 않았습니다. 번역을 도와주십시오
-
Lift the hard drive out of its supports and disconnect the SATA cable by pulling the connector straight away from the hard drive.
-
-
이 단계는 번역되지 않았습니다. 번역을 도와주십시오
-
Remove the four 10.3 mm Phillips screws securing the mid wall to the upper case.
-
-
이 단계는 번역되지 않았습니다. 번역을 도와주십시오
-
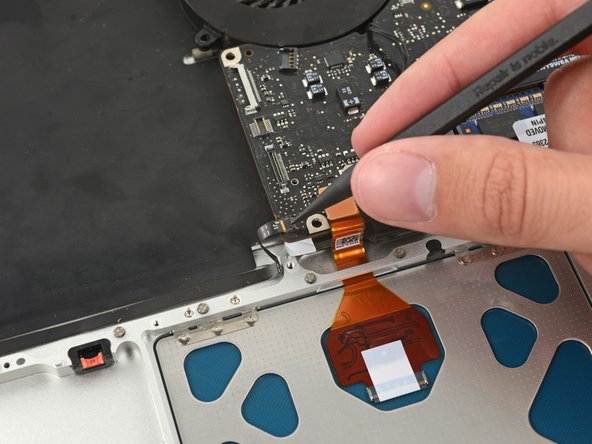
Use a spudger to pry the hard drive cable connector straight up off the logic board.
-
-
이 단계는 번역되지 않았습니다. 번역을 도와주십시오
-
Peel the hard drive cable from the adhesive securing it to the upper case, and maneuver the plastic retaining block out of the upper case.
-
-
이 단계는 번역되지 않았습니다. 번역을 도와주십시오
-
Use the pointed end of a spudger to flip the lock on the ZIF connector.
-
-
이 단계는 번역되지 않았습니다. 번역을 도와주십시오
-
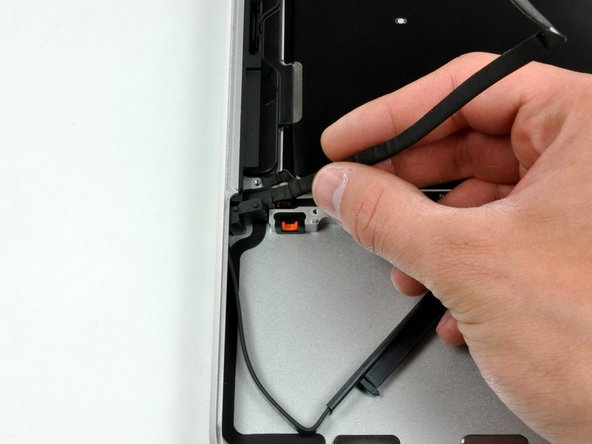
Peel the connector side of the sleep sensor cable up from the adhesive securing it to the upper case.
-
-
이 단계는 번역되지 않았습니다. 번역을 도와주십시오
-
Remove the two 5 mm Phillips #00 screws securing the hard drive bracket to the upper case.
-
-
이 단계는 번역되지 않았습니다. 번역을 도와주십시오
-
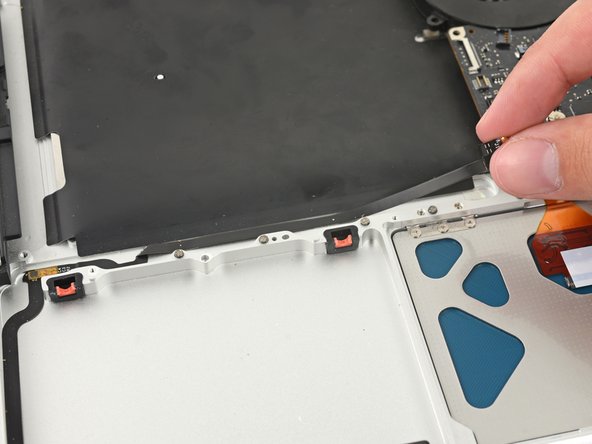
Insert the tip of a spudger between the hard drive bracket and the front edge of the upper case to free it from its recess.
-
-
이 단계는 번역되지 않았습니다. 번역을 도와주십시오
-
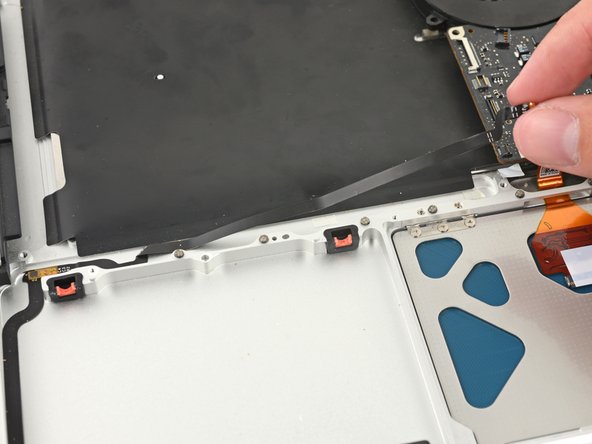
Pull the hard drive bracket and sleep sensor assembly out from the recess in the upper case.
-
-
이 단계는 번역되지 않았습니다. 번역을 도와주십시오
-
After ensuring the cable is freed of all adhesive, remove the hard drive bracket and sleep sensor assembly from the upper case.
-


다른 8명이 해당 안내서를 완성하였습니다.

