소개
This Macintosh IIsi was made in 1990. It was a part of Apples Three Tier strategy of low end macs in 1990. This included the Classic, LC, and the IIsi.
The IIsi is a cut down IIci with a slightly slower processor and a newer motherboard design with built in cache. It has a 250mb hard disk and 8mb of RAM, running System 7.1
-
-
Yes, it only has a floppy drive. Its also 20 years old!
-
Lets begin the repair guide!
-
-
-
It is now open! This Macintosh was designed for manufacturing, which meant it had few or no screws involved with building it. It is all held together by clips and latches. It is extremely easy to work in.
-
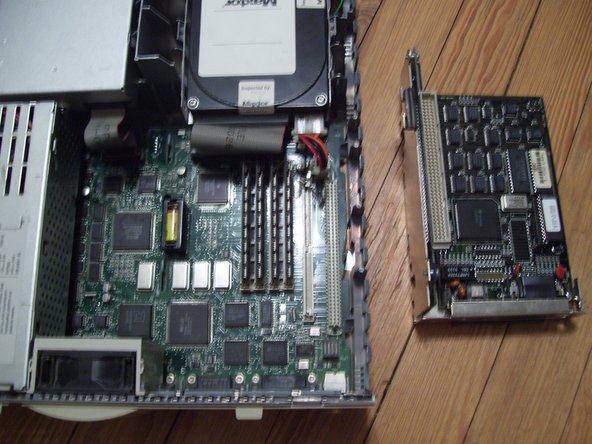
There is a 240mb Maxtor Hard Disk and the PDS-Nubus adapter installed. In order to work on the mac, we must remove these first. The Hard disk is an Apple ROM'ed SCSI drive.
-
The top right metal box is the power supply, rated at 100 watts and made by Sony. The bottom box is the Sony Superdrive floppy.
-
Notice the clean, easy to access design. You will never see this again from apple!
I don't think that is level 2 cache. I think it's the 1mb of on board ram. The only way you could have level 2 cache was on a pds card on the IIsi.
-
-
-
-
Remove these two thumbscrews if you have them. Then remove the PDS bracket by pulling straight up.
-
You should now have access to the RAM and PRAM battery.
-
To remove the hard disk, remove the SCSI cable, Power Cable, and pull on the outermost tab on the drive bracket. Lift the drive beyond this tab. Then do the other tab and the drive should come out.
-
-
-
To remove the PSU, pull out this clip and pull out on the power supply.
-
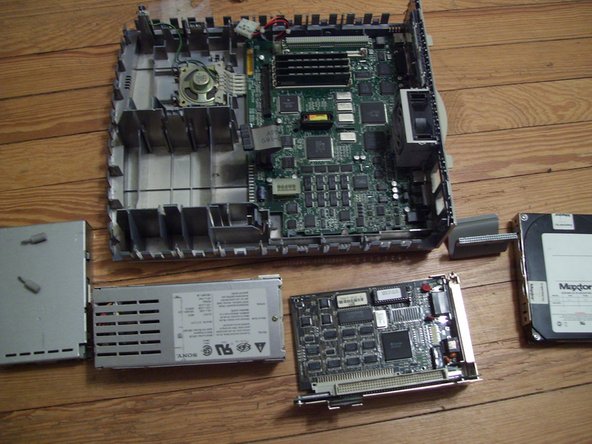
Finally, all the components have been removed! This gives you access to clean the motherboard, add RAM or replace the 1/2 Lithium AA PRAM Battery.
There was more to pulling out the PSU on mine. I had to remove the fan (which took a bit of tugging and finagling to get around the clips on the bottom,) as there are two clips on the side near the front which needed to be pushed in to clear the supports on the case.
-
-
-
The motherboard of the IIsi.
-
CPU is a Motorola 68030 at 20mhz. The CPU can easily be clocked at 25 or 30Mhz by replacing the tin can oscillator to the right of the CPU with ones of a higher value. The system can have a FPU via the PDS to Nubus Adapter.
-
System Chipset, designed by apple and made by VLSI. Condensed version of the IIci system logic.
-
Serial Controllers for the LocalTalk ports.
-
Apple Sound Chip (ASC), custom design by apple. It uses the same sound controller as the LC and Classic. These are the first computers with built in sound input!
-
AMD 53C80 SCSI Controller
-
SIWM (Super Integrated Wozniak Machine) controls floppy and power functions.
-
100 ns soldered on RAM
-


To reassemble your device, follow these instructions in reverse order.
To reassemble your device, follow these instructions in reverse order.
다른 2명이 해당 안내서를 완성하였습니다.

댓글 한 개
Who would have thought a 11si teardown would have been useful, until today! Thanks so much… one forgets how simple these machines were to work on; LC’s, Performas, PowerMacs, etc…