주요 콘텐츠로 건너뛰기

Makita DLM431 Lawn Mower Rear Axle Replacement

필요한 것

  1. Makita DLM431 Lawn Mower Rear Axle Replacement, Prepare for the replacement: 1 단계, 이미지 1/3 Makita DLM431 Lawn Mower Rear Axle Replacement, Prepare for the replacement: 1 단계, 이미지 2/3 Makita DLM431 Lawn Mower Rear Axle Replacement, Prepare for the replacement: 1 단계, 이미지 3/3
    • Charged batteries may be a risk of electrocution so it is best to discharge them or even better to remove them for the duration of the repair.

    • Remove lock key and the grass-catching basket.

    • Put the lawnmower on its head and store it safely.

  2. Makita DLM431 Lawn Mower Rear Axle Replacement, Wheel covers: 2 단계, 이미지 1/3 Makita DLM431 Lawn Mower Rear Axle Replacement, Wheel covers: 2 단계, 이미지 2/3 Makita DLM431 Lawn Mower Rear Axle Replacement, Wheel covers: 2 단계, 이미지 3/3
    • Grasp the wheel cover caps in the middle and pull them off.

  3. Makita DLM431 Lawn Mower Rear Axle Replacement, Unscrew wheels: 3 단계, 이미지 1/3 Makita DLM431 Lawn Mower Rear Axle Replacement, Unscrew wheels: 3 단계, 이미지 2/3 Makita DLM431 Lawn Mower Rear Axle Replacement, Unscrew wheels: 3 단계, 이미지 3/3
    • Loosen the nut of the wheels with a 13mm spanner.

    • Pull the wheel off the axle

  4. Makita DLM431 Lawn Mower Rear Axle Replacement, Loosen axle adjustment: 4 단계, 이미지 1/2 Makita DLM431 Lawn Mower Rear Axle Replacement, Loosen axle adjustment: 4 단계, 이미지 2/2
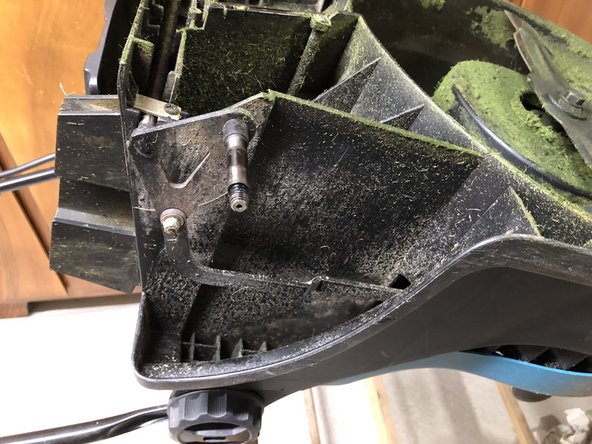
    • Loosen the nut of the connection between rear axle and axle adjustment with the 13mm nut.

    • Pull off the axle adjustment linkage.

  5. Makita DLM431 Lawn Mower Rear Axle Replacement, Loosening the axle bracket: 5 단계, 이미지 1/3 Makita DLM431 Lawn Mower Rear Axle Replacement, Loosening the axle bracket: 5 단계, 이미지 2/3 Makita DLM431 Lawn Mower Rear Axle Replacement, Loosening the axle bracket: 5 단계, 이미지 3/3
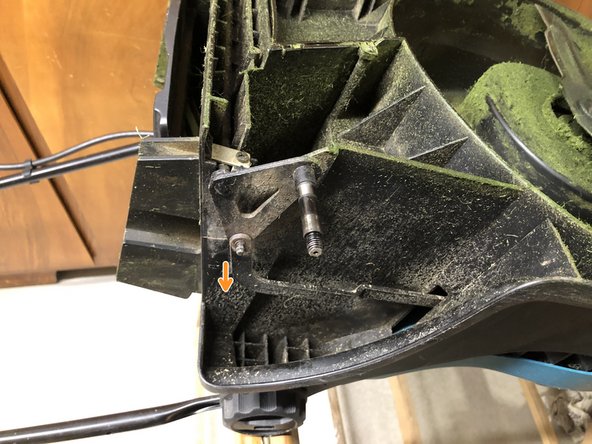
    • Remove screws with a Phillips screwdriver.

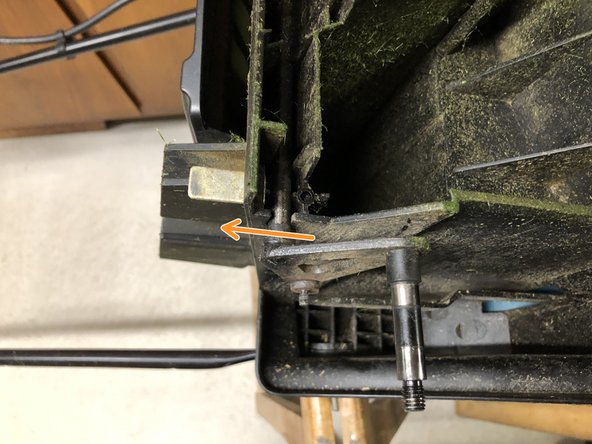
    • Push the axle holder backwards through the fairing to expose the axle.

  6. Makita DLM431 Lawn Mower Rear Axle Replacement, Replace rear axle: 6 단계, 이미지 1/1
    • Remove the old axle upwards.

    • Attach new axle.

결론

Congrats! Now follow the steps in reverse order to reassemble your unit.

다른 2명이 해당 안내서를 완성하였습니다.

다음 번역가들에게 특별히 감사 드립니다:

de en

100%

carlotremolada님은 저희가 세상을 수리하는데 동참하신 분입니다! 기여하시겠습니까?
번역 시작하기 ›

hainzy

회원 가입일: 03/23/23

5,496 평판

안내서 27개 작성하였습니다

German Translators German Translators 회원

Community

27 회원들

안내서 757개 작성하였습니다

댓글 0개

댓글 쓰기

조회 통계:

24 시간 전: 17

7일 전: 67

30일 전: 194

전체 시간: 567