주요 콘텐츠로 건너뛰기

Makita Jack Hammer HM1307CB Controller Replacement

필요한 것

  1. Makita Jack Hammer HM1307CB Controller Replacement, Remove six screws from the handle: 1 단계, 이미지 1/1
    • Remove the following screws:

    • Two Phillips screws

    • Four hex screws

    • These four hex screws are all held in place with threadlocker, and may take quite a bit of torque or even some heat to loosen.

    • During reassembly, clean the residual threadlocker from these screws, then reapply high-strength (red) threadlocker to each one before reinstalling.

    • If you aren't sure how to apply threadlocker, refer to the next step in this guide.

  2. Makita Jack Hammer HM1307CB Controller Replacement: 2 단계, 이미지 1/3 Makita Jack Hammer HM1307CB Controller Replacement: 2 단계, 이미지 2/3 Makita Jack Hammer HM1307CB Controller Replacement: 2 단계, 이미지 3/3
    • To reapply threadlocker:

    • First, clean the residual threadlocker from each of the screws with some cleaner/degreaser and a stiff brush.

    • Second, apply a couple drops of high-strength threadlocker to the screw sockets.

    • Finally, apply one or two drops of the same high-strength threadlocker to the tip of each screw and reinstall them.

  3. Makita Jack Hammer HM1307CB Controller Replacement, Remove the handle: 3 단계, 이미지 1/2 Makita Jack Hammer HM1307CB Controller Replacement, Remove the handle: 3 단계, 이미지 2/2
    • Grab the handle and remove it from the jack hammer.

  4. Makita Jack Hammer HM1307CB Controller Replacement, Release the power supply cord: 4 단계, 이미지 1/1
    • Remove the black Phillips screw from the strain relief plate.

    • Loosen the two silver Phillips screws that hold the stripped ends of the power cable in the green terminal on the controller. These screws do not need to be removed.

  5. Makita Jack Hammer HM1307CB Controller Replacement: 5 단계, 이미지 1/2 Makita Jack Hammer HM1307CB Controller Replacement: 5 단계, 이미지 2/2
    • Remove the strain relief plate.

    • During reassembly, hook the right edge of the strain relief plate under the lip to the right of the cord before pressing it into place and reinstalling the Phillips screw.

  6. Makita Jack Hammer HM1307CB Controller Replacement, Remove the power supply cord: 6 단계, 이미지 1/3 Makita Jack Hammer HM1307CB Controller Replacement, Remove the power supply cord: 6 단계, 이미지 2/3 Makita Jack Hammer HM1307CB Controller Replacement, Remove the power supply cord: 6 단계, 이미지 3/3
    • Remove the power supply cord from the jack hammer.

    • As you remove the cord, note the position of the cord guard. During reassembly, make sure the collar of the cord guard fits back into its slot in the handle.

    • When reinserting the two exposed wire ends into the green terminal:

    • First, compress the wire ends so they are relatively flat.

    • Then, insert each wire end into the green terminal, noting the polarity of the cables: the black cable should go into the upper slot, and the white cable should go into the lower slot (as shown in the third photo of this step).

    • Finally, gently tighten the screws until the wires are secured.

  7. Makita Jack Hammer HM1307CB Controller Replacement, Remove four screws from the controller cover: 7 단계, 이미지 1/1
    • Remove the following screws:

    • Two Phillips

    • Two 3 mm hex

    • These two hex screws are held in place with threadlocker and may require quite a bit of torque to remove.

    • During reassembly, clean the residual threadlocker from these screws, then reapply high-strength (red) threadlocker to each one before reinstalling.

  8. Makita Jack Hammer HM1307CB Controller Replacement, Remove the controller cover: 8 단계, 이미지 1/2 Makita Jack Hammer HM1307CB Controller Replacement, Remove the controller cover: 8 단계, 이미지 2/2
    • Remove the controller and its cover from the jack hammer.

  9. Makita Jack Hammer HM1307CB Controller Replacement, De-route the power switch: 9 단계, 이미지 1/2 Makita Jack Hammer HM1307CB Controller Replacement, De-route the power switch: 9 단계, 이미지 2/2
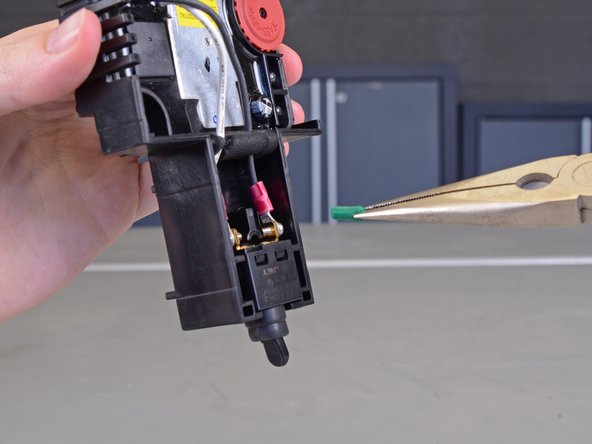
    • Use a pair of tweezers or pliers to remove the green rubber pin above the power switch at the bottom of the controller cover.

  10. Makita Jack Hammer HM1307CB Controller Replacement: 10 단계, 이미지 1/3 Makita Jack Hammer HM1307CB Controller Replacement: 10 단계, 이미지 2/3 Makita Jack Hammer HM1307CB Controller Replacement: 10 단계, 이미지 3/3
    • Lift the power switch out of the controller cover and de-route the cables from the guide

  11. Makita Jack Hammer HM1307CB Controller Replacement, Remove the controller from the controller cover: 11 단계, 이미지 1/2 Makita Jack Hammer HM1307CB Controller Replacement, Remove the controller from the controller cover: 11 단계, 이미지 2/2
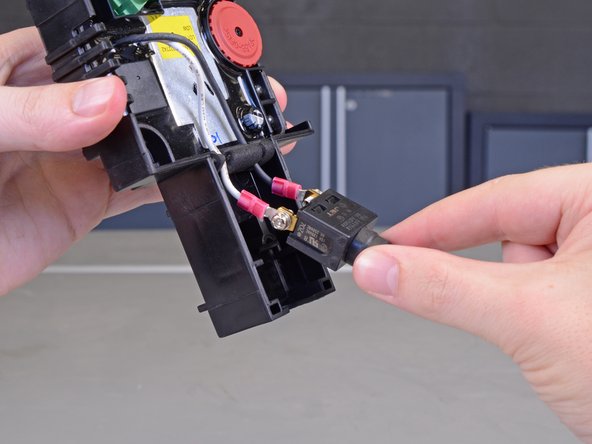
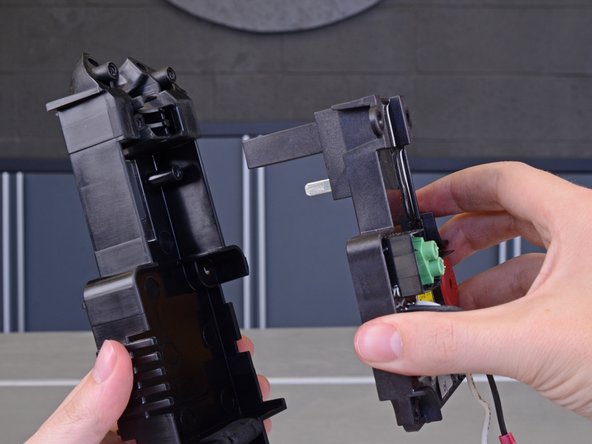
    • Pull the controller straight out of the controller cover.

  12. Makita Jack Hammer HM1307CB Controller Replacement, Transfer the power switch: 12 단계, 이미지 1/3 Makita Jack Hammer HM1307CB Controller Replacement, Transfer the power switch: 12 단계, 이미지 2/3 Makita Jack Hammer HM1307CB Controller Replacement, Transfer the power switch: 12 단계, 이미지 3/3
    • Your replacement controller may not come with a power switch. If so, transfer the power switch from the original controller to the new one:

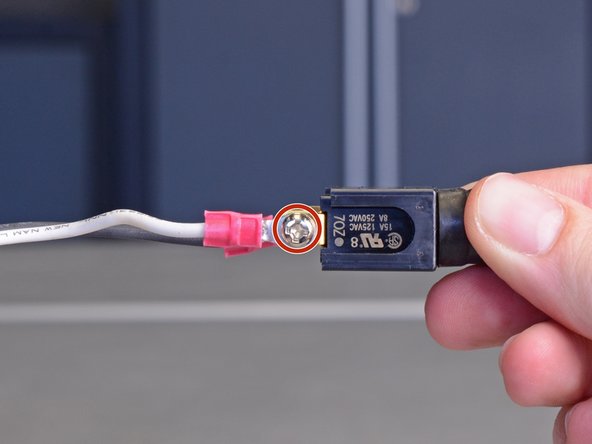
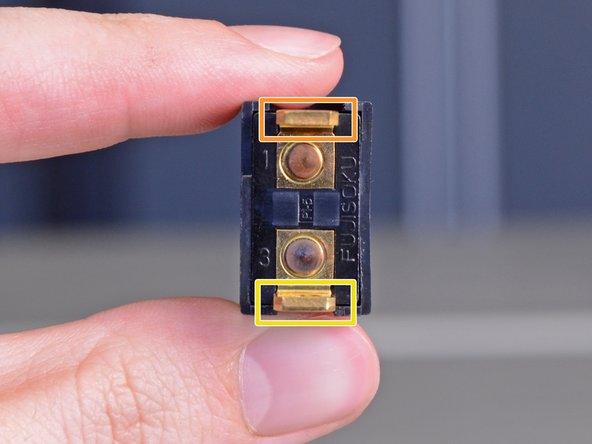
    • Unscrew the two Phillips screws on either side of the switch.

    • Reattach the cables from the new controller to the switch, making sure that they go back on the same sides you found them.

    • The white cable goes on the side labeled with the number 1.

    • The black cable goes on the side labeled with the number 3.

결론

To reassemble your device, follow these instructions in reverse order, taking note of any reassembly tips.

다른 5명이 해당 안내서를 완성하였습니다.

Taylor Dixon

회원 가입일: 06/26/18

67,146 평판

안내서 94개 작성하였습니다

댓글 0개

댓글 쓰기

조회 통계:

24 시간 전: 1

7일 전: 6

30일 전: 25

전체 시간: 1,694