소개
The battery in the Marshall Emberton is responsible for giving power to the speaker and allowing it to turn on. With the help of this guide you will be able to locate the battery and changing the battery.
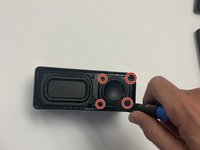
With an exhausted or degraded battery, battery life decreases significantly and repeated charging is required. Although the battery is located deep inside the speaker, it is very easy to replace.
필요한 것


To reassemble your device, follow these instructions in reverse order.
다른 3명이 해당 안내서를 완성하였습니다.
팀

CSU Los Angeles, Team 5-1, Adachi Fall 2022 CSU Los Angeles, Team 5-1, Adachi Fall 2022 회원
CSULA-ADACHI-F22S5G1
5 회원들
안내서 6개를 작성함
5가이드 댓글
Add any tools at the top you used in this repair guide and also any replacement parts if you can.
How can i buy battery
How can I buy the battery
How to buy a battery for my emberton?
From where to buy battery? What is the battery specification?