주요 콘텐츠로 건너뛰기

Marvel iHome MR-M66 Battery Replacement

필요한 것

  1. Marvel iHome MR-M66 Battery Replacement, Back Cover: 1 단계, 이미지 1/2 Marvel iHome MR-M66 Battery Replacement, Back Cover: 1 단계, 이미지 2/2
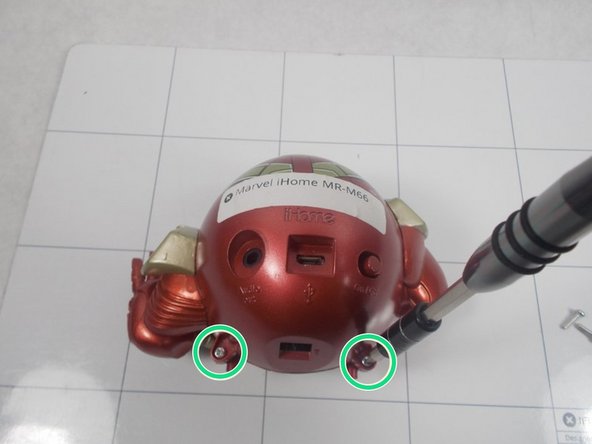
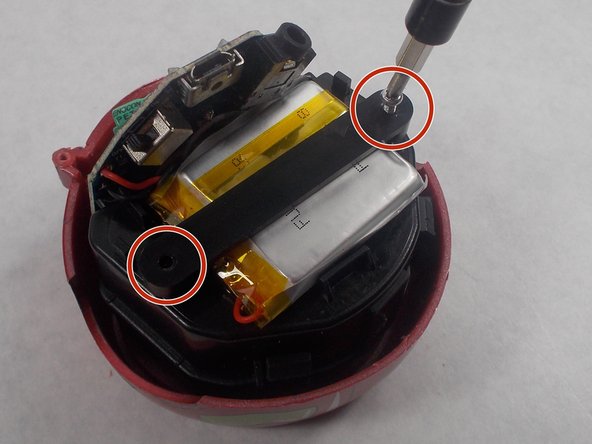
    • Remove two of the three screws shown on the bottom of the device.

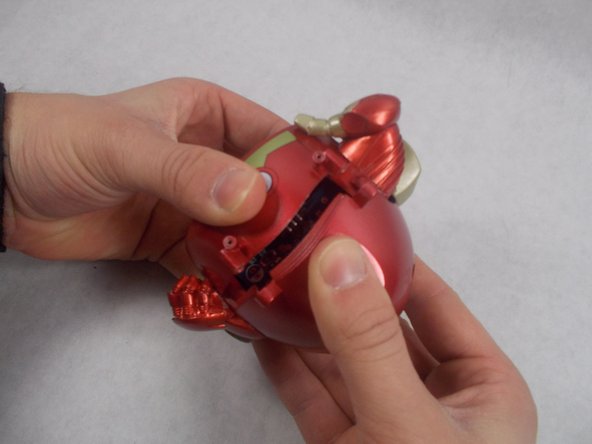
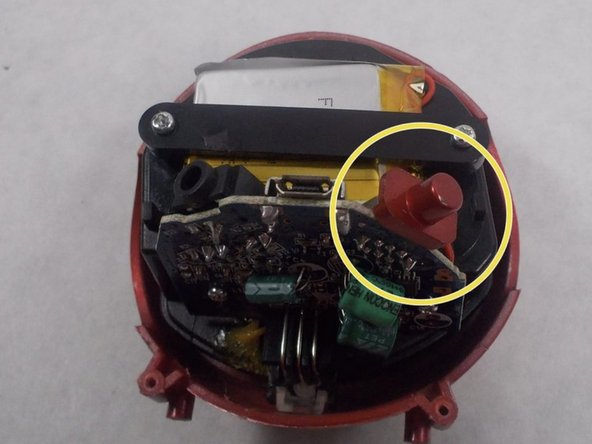
    • Begin removing the last screw, but leave it partially in the socket to remove the bottom cover easier.

  2. Marvel iHome MR-M66 Battery Replacement: 2 단계, 이미지 1/3 Marvel iHome MR-M66 Battery Replacement: 2 단계, 이미지 2/3 Marvel iHome MR-M66 Battery Replacement: 2 단계, 이미지 3/3
    • Remove the bottom cover by either pulling on the screw or using a plastic opening tool to pry the cover off.

    • After removing the bottom cover, remove the two screws.

  3. Marvel iHome MR-M66 Battery Replacement: 3 단계, 이미지 1/3 Marvel iHome MR-M66 Battery Replacement: 3 단계, 이미지 2/3 Marvel iHome MR-M66 Battery Replacement: 3 단계, 이미지 3/3
    • Use a spudger to release the small retaining clip that holds the feet to the bottom of the device.

    • Be careful here, as too much force can break the clip.

    • Remove the two screws from the back of the device.

  4. Marvel iHome MR-M66 Battery Replacement: 4 단계, 이미지 1/3 Marvel iHome MR-M66 Battery Replacement: 4 단계, 이미지 2/3 Marvel iHome MR-M66 Battery Replacement: 4 단계, 이미지 3/3
    • Using a plastic opening tool and your hand, separate the front and back covers from each other.

    • Starting from the bottom, use the plastic opening tool to create the initial separation and continue along the seam to the top of the device.

    • This step requires the most time and patience, so be careful.

    • The power switch will most likely come loose during this step and you will hear something rattling inside the device.

  5. Marvel iHome MR-M66 Battery Replacement: 5 단계, 이미지 1/3 Marvel iHome MR-M66 Battery Replacement: 5 단계, 이미지 2/3 Marvel iHome MR-M66 Battery Replacement: 5 단계, 이미지 3/3
    • Remove the two arms from either side of the device once a significant separation has been created.

    • They are not fixed to the body itself so you should be able to wiggle them free.

    • Continue pulling the back cover off the device.

    • Remove the red cover for the on/off switch from the device.

  6. Marvel iHome MR-M66 Battery Replacement, Battery: 6 단계, 이미지 1/1
    • Remove the red cover for the on/off switch from the device.

  7. Marvel iHome MR-M66 Battery Replacement: 7 단계, 이미지 1/1
    • Before taking anything else out or apart, make sure the device is turned off.

    • Confirm that the power switch is in the same position as shown in the picture.

  8. Marvel iHome MR-M66 Battery Replacement: 8 단계, 이미지 1/2 Marvel iHome MR-M66 Battery Replacement: 8 단계, 이미지 2/2
    • Loosen and remove the two Phillips screws holding down the battery cover (the black plastic strip that keeps the battery in place).

  9. Marvel iHome MR-M66 Battery Replacement: 9 단계, 이미지 1/1
    • Remove the battery cover. Set it aside with the on/off button cover, backplate, and other plastic pieces taken from the device.

    • The battery should be easy to lift as shown in the picture.

  10. Marvel iHome MR-M66 Battery Replacement: 10 단계, 이미지 1/1
    • Gently lift the battery from the rest of the front assembly to stretch the wires out slightly. Gently let the battery hang from the side of the device.

  11. Marvel iHome MR-M66 Battery Replacement: 11 단계, 이미지 1/1
    • Take the soldering iron and heat up the solder attaching the end of the red wire from the battery to the motherboard.

    • This will loosen the wire from the motherboard.

  12. Marvel iHome MR-M66 Battery Replacement: 12 단계, 이미지 1/1
    • Take the new battery, place the red wire into the hole on the left that the original battery wire was connected. Heat up the solder already there and place the end of the wire directly onto the solder.

    • If you let go of the wire and it disconnects from the motherboard, then you may need to add solder onto the motherboard over the hole you put the wire in. Heat the end of the solder and place it over the wire as you add it into the correct hole (on the left in the picture shown).

  13. Marvel iHome MR-M66 Battery Replacement: 13 단계, 이미지 1/1
    • Repeat the previous two steps with the second hole and wire

  14. Marvel iHome MR-M66 Battery Replacement: 14 단계, 이미지 1/1
    • Set aside the old battery.

    • After this step, the new battery should be connected and hanging from the side of the device.

결론

To reassemble your device, follow these instructions in reverse order starting with Step 12.

Tyler Jacob

회원 가입일: 03/08/17

201 평판

안내서 3개 작성하였습니다

UMass Dartmouth, Team S5-G3, Botvin Spring 2017 UMass Dartmouth, Team S5-G3, Botvin Spring 2017 회원

UMASSD-BOTVIN-S17S5G3

3 회원들

안내서 6개 작성하였습니다

댓글 0개

댓글 쓰기

조회 통계:

24 시간 전: 0

7일 전: 0

30일 전: 3

전체 시간: 132