주요 콘텐츠로 건너뛰기

Merangue Steel 3-Hole Punch Head Replacement

필요한 것

  1. Merangue Steel 3-Hole Punch Head Replacement, Punch Head: 1 단계, 이미지 3개 중 1개 Merangue Steel 3-Hole Punch Head Replacement, Punch Head: 1 단계, 이미지 3개 중 2개 Merangue Steel 3-Hole Punch Head Replacement, Punch Head: 1 단계, 이미지 3개 중 3개
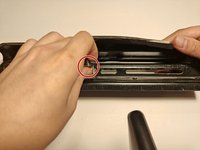
    • Tilt the hole puncher on its back.

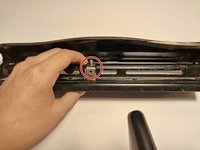
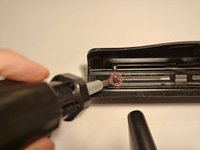
    • Use a flathead screwdriver to remove the three screws.

  2. Merangue Steel 3-Hole Punch Head Replacement: 2 단계, 이미지 3개 중 1개 Merangue Steel 3-Hole Punch Head Replacement: 2 단계, 이미지 3개 중 2개 Merangue Steel 3-Hole Punch Head Replacement: 2 단계, 이미지 3개 중 3개
    • Use your finger to slide the punch head out towards the opening (right in this case).

    • Remove the punch head from the opening and set it aside.

    • Repeat this step with the other punch heads.

  3. Merangue Steel 3-Hole Punch Head Replacement: 3 단계, 이미지 3개 중 1개 Merangue Steel 3-Hole Punch Head Replacement: 3 단계, 이미지 3개 중 2개 Merangue Steel 3-Hole Punch Head Replacement: 3 단계, 이미지 3개 중 3개
    • Take your replacement hole punch and push it into the opening.

    • Slide the hole punch to your desired alignment in my case, left).

    • Make sure the hole punch is properly aligned (the hole at the back should point directly at the ceiling).

  4. Merangue Steel 3-Hole Punch Head Replacement: 4 단계, 이미지 3개 중 1개 Merangue Steel 3-Hole Punch Head Replacement: 4 단계, 이미지 3개 중 2개 Merangue Steel 3-Hole Punch Head Replacement: 4 단계, 이미지 3개 중 3개
    • Use your fingers to screw one of the screws into the hole on the back of the punch head.

    • The screw can be a bit difficult to align so be patient and don't rush.

    • Take your flat head screwdriver and tighten the screw.

    • Repeat these steps for the other punch heads.

결승점

작성자

1다른 기여자 명과 함께

Noah Dela Calzada

회원 가입일: 01/16/24

109 평판

안내서 1개를 작성함

York University, Team P-6, O'Regan Winter 2024 York University, Team P-6, O'Regan Winter 2024 회원

YORK-O'REGAN-W24SPG6

2 회원들

안내서 2개를 작성함

댓글 0개

댓글 쓰기

조회 통계:

지난 24시간: 4

지난 7일: 6

지난 30일: 22

전체 시간: 154