주요 콘텐츠로 건너뛰기

Microsoft Surface Book 2 15" Heat Sink Replacement

  1. Microsoft Surface Book 2 15" Heat Sink Replacement, Motherboard: 1 단계, 이미지 1/1
    • Open the laptop, then orient it so the touchpad is on your left.

    • Starting at the hinge, count six holes up on the tablet portion of the laptop.

  2. Microsoft Surface Book 2 15" Heat Sink Replacement: 2 단계, 이미지 1/2 Microsoft Surface Book 2 15" Heat Sink Replacement: 2 단계, 이미지 2/2
    • Take a paper clip and unfold it.

    • Place the paperclip in the sixth hole and push until you hear a click.

    • Once you hear the click, lift up on the right side of the tablet from the base until it separates.

    • After the right side has been detached, lift up the left side as well.

  3. Microsoft Surface Book 2 15" Heat Sink Replacement: 3 단계, 이미지 1/1
    • Place the tablet on a flat surface.

    • Using a heat gun or iOpener, heat up the edges of the screen to soften up the adhesive.

  4. Microsoft Surface Book 2 15" Heat Sink Replacement: 4 단계, 이미지 1/1
    • Using a plastic pick, slice underneath the edge of the screen.

    • Use a suction cup to carefully lift the screen and create separation between the screen and frame.

    • Take care not to insert the tool too far to avoid cutting the ribbon cables.

    • Slowly make your way around the screen, and carefully cut the adhesive that secures the screen to the frame.

    • Don't use a metal tool, that could damage the screen or internal parts.

  5. Microsoft Surface Book 2 15" Heat Sink Replacement: 5 단계, 이미지 1/2 Microsoft Surface Book 2 15" Heat Sink Replacement: 5 단계, 이미지 2/2
    • Lift up the screen.

    • Detach the ribbon cables connecting the underside of the screen to the motherboard.

  6. Microsoft Surface Book 2 15" Heat Sink Replacement: 6 단계, 이미지 1/2 Microsoft Surface Book 2 15" Heat Sink Replacement: 6 단계, 이미지 2/2
    • Use a T3 Torx screwdriver to remove eleven 4 mm screws from the motherboard.

    • Use a T3 Torx screwdriver to remove the ten 2.5 mm screws from the top bar.

  7. Microsoft Surface Book 2 15" Heat Sink Replacement: 7 단계, 이미지 1/1
    • Once the screws are removed from the top bar, gently lift up and remove it.

    • Be careful not to damage any ribbon cables or wires.

    • Gently lift up on the motherboard to remove it.

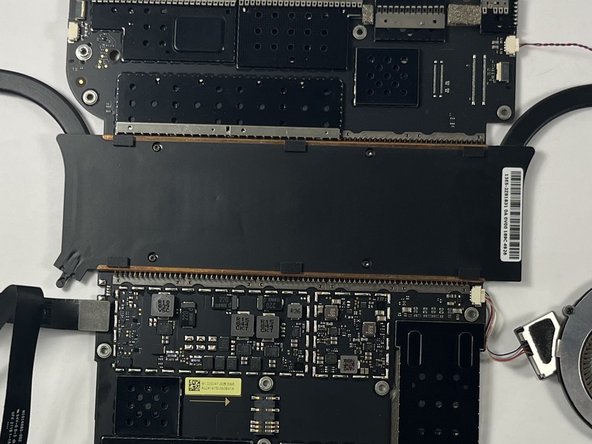
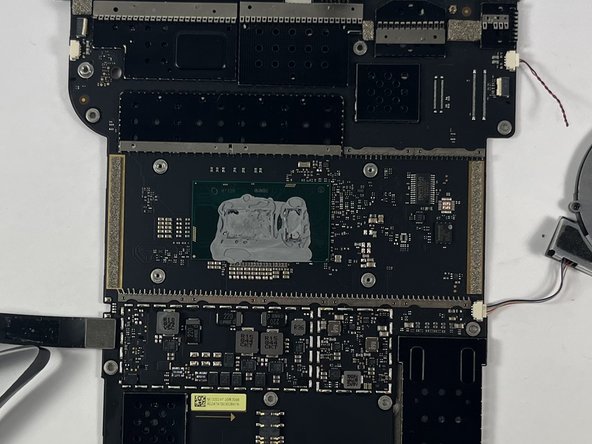
  8. Microsoft Surface Book 2 15" Heat Sink Replacement, Heat Sink: 8 단계, 이미지 1/2 Microsoft Surface Book 2 15" Heat Sink Replacement, Heat Sink: 8 단계, 이미지 2/2
    • With the motherboard removed flip it over.

  9. Microsoft Surface Book 2 15" Heat Sink Replacement: 9 단계, 이미지 1/2 Microsoft Surface Book 2 15" Heat Sink Replacement: 9 단계, 이미지 2/2
    • Remove the 4 torx 3 2.5mm screws holding in the heatsink.

    • Lift up and remove the heatsink. This requires a small amount of force.

결론

To reassemble your device, follow these instructions in reverse order.

Ryan Picewick

회원 가입일: 03/13/23

471 평판

안내서 4개 작성하였습니다

UMass Dartmouth, Team 3-3, Petersen Spring 2023 UMass Dartmouth, Team 3-3, Petersen Spring 2023 회원

UMASSD-PETERSEN-S23S3G3

4 회원들

안내서 23개 작성하였습니다

댓글 0개

댓글 쓰기

조회 통계:

24 시간 전: 3

7일 전: 13

30일 전: 32

전체 시간: 438