소개
Follow this guide to remove or replace a faulty USB port assembly on a Microsoft Surface Book.
This procedure requires you to remove the back panel. Note: It’s not necessary to remove the SD card to get to the USB ports.
필요한 것
-
-
Press and hold the Detach button on the keyboard.
-
Alternatively, click the Detach icon on the right-hand side of the Windows 10 taskbar.
-
Remove the display.
-
-
-
Flip open the display as far as it will go.
-
Lift the device up and place it on its side, with the display facing away from you and the SurfaceConnect port facing up.
-
-
-
Insert the straight end of the paper clip at a 45 degree angle into the sixth hole from the left.
-
-
-
Firmly push the paper clip into the hole.
-
Pull the base away from the display to detach it.
You should feel slight resistance when pressing against the internal lever arm. If you don’t feel the resistance after about half an inch, back out and try again. Be careful not to push the paper clip too far, as it can scratch the screen bezel from the inside, leaving a visible mark.
This doesn't work on mine... there's a 90° metal support bracket that covers the entire corner (goes up to about the 8-9th hole on the side) and blocks any & all access to the screen release mechanism. After seeing this "solution" online so many times, I never understood how this worked for anyone else...
I could detach mine following these instructions. When inserting the paper clip you will feel a resistance like pushing a spring. In my case, pushing the paper clip in about 5 millimeters and holding it when I hear a "click" sound. Be sure to grab the tablet when you see it separating (or have at hand a plastic spudger or opening pick to avoid snapping into place again due to the very strong magnets present).
-
-
-
-
With one side detached, pull firmly to pivot the display out to disconnect the second side.
-
-
-
Flip the keyboard over so you can see the back panel.
In this photo, there is a clear crevice around the edge of the panel and the keyboard. On my Surface Book, there is no such crevice. The panel is flush up to the keyboard with a gap that looks to be maybe 0.2mm max. There is no way to fit a tool into the crevice to lift off the panel. Any tips?
-
-
-
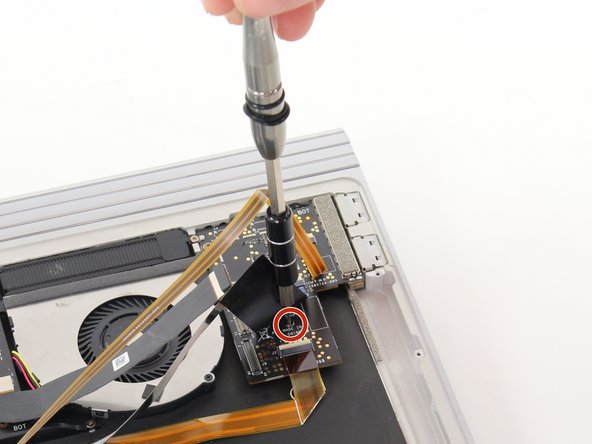
Orient your keyboard with the internals facing up and the USB Port on the right.
-


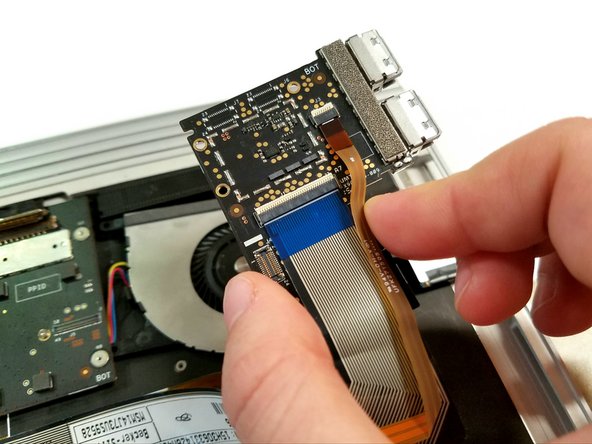
Compare your new replacement part to the original part—you may need to transfer remaining components or remove adhesive backings from the new part before installing.
To reassemble your device, follow the above steps in reverse order.
Take your e-waste to an R2 or e-Stewards certified recycler.
Repair didn’t go as planned? Check out our Answers community for troubleshooting help.
다른 4명이 해당 안내서를 완성하였습니다.
팀

Cal Poly, Team 20-3, Livingston Fall 2016 Cal Poly, Team 20-3, Livingston Fall 2016 회원
CPSU-LIVINGSTON-F16S20G3
4 회원들
안내서 12개 작성하였습니다
댓글 5개
How do you re-glue the bottom cover back on?
Where do you get the replacement USB board? Is there’s a part number for it that I can look up?
Can the same be done for the type c port
There are quite a few questions raised Tunnel Rush. Maybe I missed a few details in the manual.