이 버전에는 잘못된 편집 사항이 있을 수 있습니다. 최신 확인된 스냅샷으로 전환하십시오.
소개
이 안내서를 사용하여 Microsoft Surface Laptop 3 (15") 스크린을 분리 또는 교체하세요.
필요한 것
-
-
각 고무패킹에는 분리를 쉽게하는 숨겨진 홈이 있습니다.
-
Spudger/스퍼저가 홈에 있는지 확인하려면, 사진 처럼, 스퍼저를 노트북의 짧은 가장자리와 평행하게 밀면서 가장 가까운 긴 가장자리에 끼우세요.
-
-
-
Spudger/스퍼저의 뾰족한 끝을 후면 가장자리 고무패킹 둘 중 하나의 아랫면에 끼우세요.
-
고무패킹 밑으로 spudger/스퍼저를 밀어 올려 고무패킹을 분리하세요.
-
이 절차를 반복하여 두 번째 후면 고무패킹을 분리하세요.
-
-
-
Spudger/스퍼저의 뾰족한 끝을 전면 가장자리 고무패킹 둘 중 하나의 아랫면에 끼우세요.
-
고무패킹 밑으로 spudger/스퍼저를 밀어 올려 고무패킹을 분리하세요.
-
이 절차를 반복하여 두 번째 전면 고무패킹을 분리하세요.
-
-
-
T5 Torx/톡스 드라이버를 사용하여 기기의 상단 케이스를 고정하는 고무패킹 구멍에서 3mm 나사 네 개를 풀어주세요.
-
-
-
-
키보드 위의 상단 케이스 가장자리를 잡고 똑바로 들어 올려서 분리하세요.
-
노트북에서 멀게 상단 케이스의 전면 가장자리를 들어 올려 아랫면에 있는 키보드와 터치패드 리본 케이블에 무리를 주지 않도록 주의하세요.
-
-
-
리본 케이블 커넥터의 한쪽 가장자리 아랫면에 spudger/스퍼저의 평평한 끝을 끼우고 위로 들어 올려 분리하세요.
-
마더보드에서 리본 케이블을 분리하세요.
-
-
이 단계는 번역되지 않았습니다. 번역을 도와주십시오
-
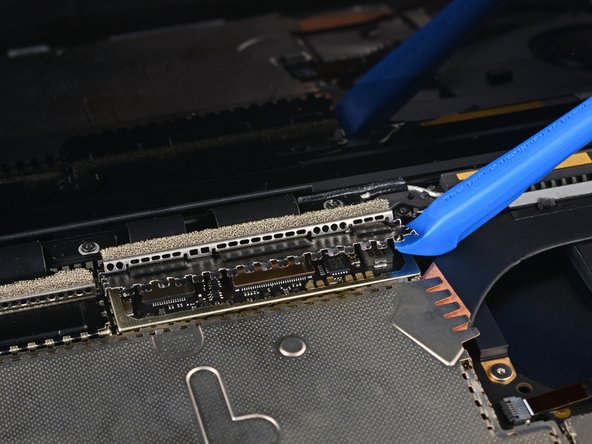
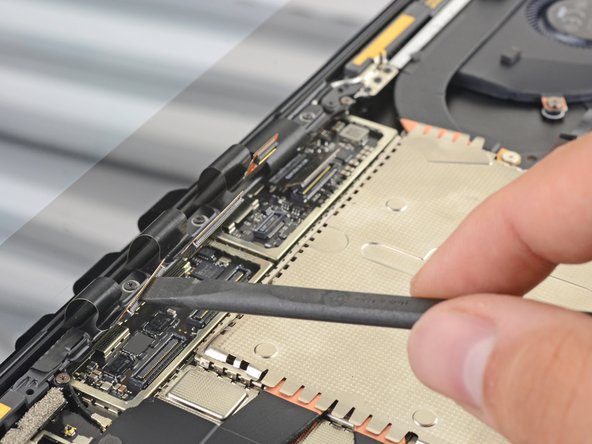
Use an opening tool to pry up the black shield covering the right bank of display connectors.
-
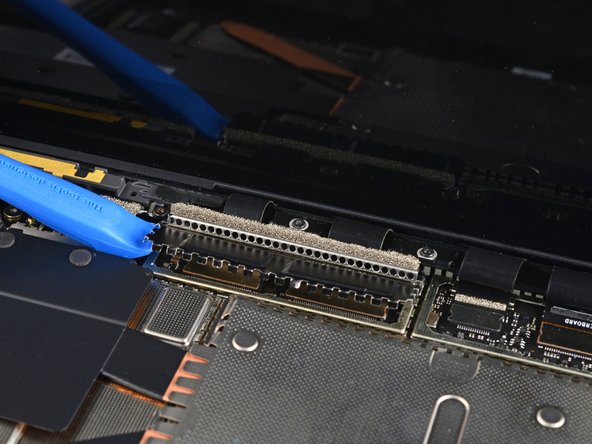
Repeat at different points around the shield until it becomes loose.
-
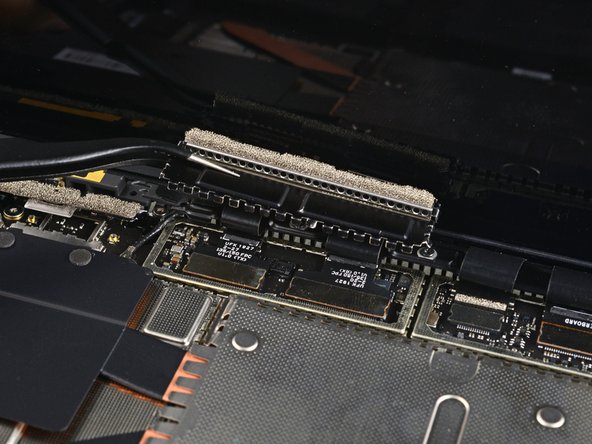
Remove the shield.
-
-
이 단계는 번역되지 않았습니다. 번역을 도와주십시오
-
Repeat the previous step to remove the remaining shield from the left bank of display connectors.
-
-
이 단계는 번역되지 않았습니다. 번역을 도와주십시오
-
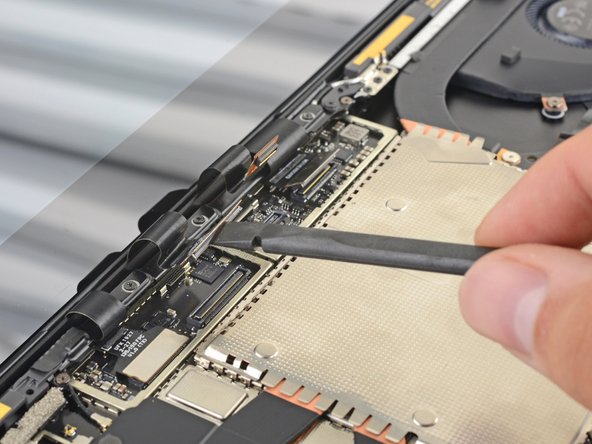
Use the flat end of a spudger to pry the first display cable up and out of its socket on the motherboard to disconnect it.
-
-
이 단계는 번역되지 않았습니다. 번역을 도와주십시오
-
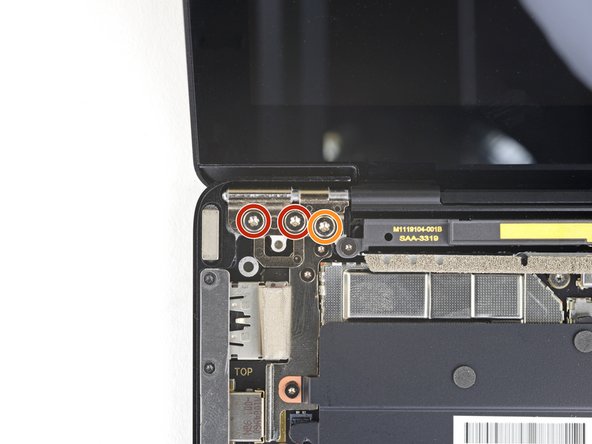
While holding the screen steady, use a T6 Torx driver to remove the four outermost 5.9 mm screws securing the screen, two on each side.
-
Leave the two innermost hinge screws in place for now, one on each side.
-
-
이 단계는 번역되지 않았습니다. 번역을 도와주십시오
-
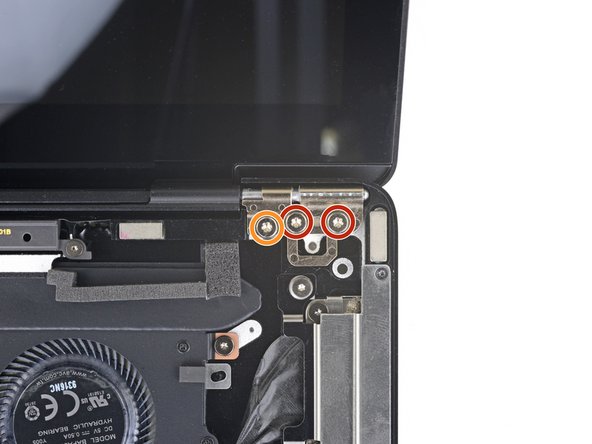
While holding the screen steady, use a T6 Torx driver to remove the two remaining 5.9 mm screws securing the screen, one on each side.
-


새 교체 부품을 원래 부품과 비교하세요—설치하기 전에 나머지 부품을 옮기거나 새 부품에서 접착 뒷면을 제거해야 할 수 있습니다.
기기를 재조립하려면, 위의 단계들을 역순으로 따르세요.
전자 폐기물을 R2 또는 e-Stewards 인증 재활용 센터로 가져가세요.
새 교체 부품을 원래 부품과 비교하세요—설치하기 전에 나머지 부품을 옮기거나 새 부품에서 접착 뒷면을 제거해야 할 수 있습니다.
기기를 재조립하려면, 위의 단계들을 역순으로 따르세요.
전자 폐기물을 R2 또는 e-Stewards 인증 재활용 센터로 가져가세요.
다음 번역가들에게 특별히 감사 드립니다:
0%

Christian Kim님은 저희가 세상을 수리하는데 동참하신 분입니다! 기여하시겠습니까?
번역 시작하기 ›


댓글 9개
This is not a display replacement but just disconnecting.
So far so good! nice job!
This is not a screen replacement but rather the lid/screen/hinge assembly replacement.
Neither Microsoft nor iFixit sell the entire lid assembly (which actually includes the front camera/microphones/Windows Hello sensors). All the replacement screens I've been able to find elsewhere are just the bare screen/LCD panel.
Andrew,
Correct! This guide is for replacing the Surface Laptop 3's entire 15" screen assembly. Keep an eye out for a standalone display panel guide in the future—in the meantime, happy fixing!
Hi,
I've got a 15" model with a cracked screen too.
I'm also struggling for a guide.
I have seen a guide for the 13.5" model: Microsoft Surface Laptop 3 13.5" LCD Assembly Replacement
It looks similar and it might help.