주요 콘텐츠로 건너뛰기

Microsoft Surface Laptop 3 13.5" LCD Assembly Replacement

필요한 것

  1. Microsoft Surface Laptop 3 13.5" LCD Assembly Replacement, LCD Assembly: 1 단계, 이미지 1/1
    • It's far easier than any other Surface device.

  2. Microsoft Surface Laptop 3 13.5" LCD Assembly Replacement: 2 단계, 이미지 1/1
    • From the bottom, carefully pry up the rubber feet on all 4 corners.

  3. Microsoft Surface Laptop 3 13.5" LCD Assembly Replacement: 3 단계, 이미지 1/1
    • Using a T5 screwdriver remove the 4 screws on each corner.

  4. Microsoft Surface Laptop 3 13.5" LCD Assembly Replacement: 4 단계, 이미지 1/1
    • Make sure the device is completely turned off before proceeding.

  5. Microsoft Surface Laptop 3 13.5" LCD Assembly Replacement: 5 단계, 이미지 1/1
    • With the screen open, lift the keyboard out. It doesn't take much force as the part is only held in with magnets once the screws are removed.

  6. Microsoft Surface Laptop 3 13.5" LCD Assembly Replacement: 6 단계, 이미지 1/2 Microsoft Surface Laptop 3 13.5" LCD Assembly Replacement: 6 단계, 이미지 2/2
    • Invert the keyboard on itself and remove the unshielded keyboard assembly connector.

  7. Microsoft Surface Laptop 3 13.5" LCD Assembly Replacement: 7 단계, 이미지 1/3 Microsoft Surface Laptop 3 13.5" LCD Assembly Replacement: 7 단계, 이미지 2/3 Microsoft Surface Laptop 3 13.5" LCD Assembly Replacement: 7 단계, 이미지 3/3
    • Remove the clip-on shields for the display assembly.

  8. Microsoft Surface Laptop 3 13.5" LCD Assembly Replacement: 8 단계, 이미지 1/1
    • Unclip the connectors. They are pretty tight so I'd suggest using a spudger or 2.

  9. Microsoft Surface Laptop 3 13.5" LCD Assembly Replacement: 9 단계, 이미지 1/2 Microsoft Surface Laptop 3 13.5" LCD Assembly Replacement: 9 단계, 이미지 2/2
    • Using a T6 screwdriver, remove the 6 screws holding in the display.

  10. Microsoft Surface Laptop 3 13.5" LCD Assembly Replacement: 10 단계, 이미지 1/2 Microsoft Surface Laptop 3 13.5" LCD Assembly Replacement: 10 단계, 이미지 2/2
    • Lay the display on a heating pad being careful of the connectors. A heat gun would work too.

    • I used 60 Degrees C for around 15 minutes.

  11. Microsoft Surface Laptop 3 13.5" LCD Assembly Replacement: 11 단계, 이미지 1/2 Microsoft Surface Laptop 3 13.5" LCD Assembly Replacement: 11 단계, 이미지 2/2
    이 단계에 사용된 도구:
    Plastic Cards
    $2.99
    구매
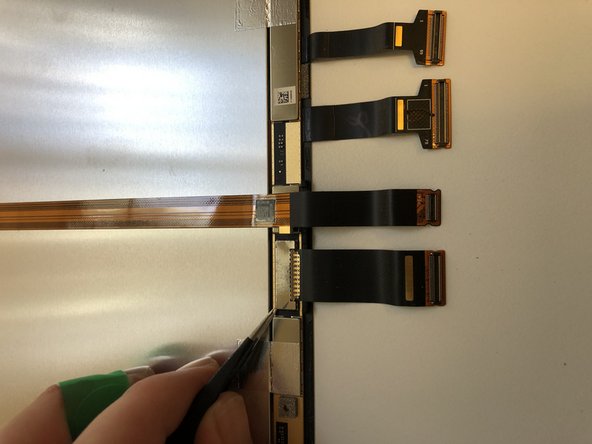
    • Use a metal card to get in between the glass and the housing. Swap to a plastic card to cut through the rest of the adhesive.

  12. Microsoft Surface Laptop 3 13.5" LCD Assembly Replacement: 12 단계, 이미지 1/1
    • Watch out for the Sensors up the top. If you damage these the device will fail to turn on. It basically bricks completely without the sensors.

  13. Microsoft Surface Laptop 3 13.5" LCD Assembly Replacement: 13 단계, 이미지 1/2 Microsoft Surface Laptop 3 13.5" LCD Assembly Replacement: 13 단계, 이미지 2/2
    • Heat up the bottom of the display and horizontally pull the screen out. Try to leave the bottom adhesive intact as we are going to be using this later.

  14. Microsoft Surface Laptop 3 13.5" LCD Assembly Replacement: 14 단계, 이미지 1/3 Microsoft Surface Laptop 3 13.5" LCD Assembly Replacement: 14 단계, 이미지 2/3 Microsoft Surface Laptop 3 13.5" LCD Assembly Replacement: 14 단계, 이미지 3/3
    • Remove one side of the plastic bar holding the cables in place. Slide the display out leaving the plastic bar intact.

  15. Microsoft Surface Laptop 3 13.5" LCD Assembly Replacement: 15 단계, 이미지 1/1
    • Screen off. Time to move on.

  16. Microsoft Surface Laptop 3 13.5" LCD Assembly Replacement: 16 단계, 이미지 1/2 Microsoft Surface Laptop 3 13.5" LCD Assembly Replacement: 16 단계, 이미지 2/2
    • Remove the snap-on shield and cable. We will need this later.

  17. Microsoft Surface Laptop 3 13.5" LCD Assembly Replacement: 17 단계, 이미지 1/2 Microsoft Surface Laptop 3 13.5" LCD Assembly Replacement: 17 단계, 이미지 2/2
    • CAREFULLY loosen the sensor cable on the back of the display.

  18. Microsoft Surface Laptop 3 13.5" LCD Assembly Replacement: 18 단계, 이미지 1/3 Microsoft Surface Laptop 3 13.5" LCD Assembly Replacement: 18 단계, 이미지 2/3 Microsoft Surface Laptop 3 13.5" LCD Assembly Replacement: 18 단계, 이미지 3/3
    • Heat the area around the sensors from the front. The adhesive here isn't very strong so you don't need loads of heat.

  19. Microsoft Surface Laptop 3 13.5" LCD Assembly Replacement: 19 단계, 이미지 1/3 Microsoft Surface Laptop 3 13.5" LCD Assembly Replacement: 19 단계, 이미지 2/3 Microsoft Surface Laptop 3 13.5" LCD Assembly Replacement: 19 단계, 이미지 3/3
    • Remove the old adhesive and make sure it's clean. You really don't want to be removing this screen once it's set down.

  20. Microsoft Surface Laptop 3 13.5" LCD Assembly Replacement: 20 단계, 이미지 1/2 Microsoft Surface Laptop 3 13.5" LCD Assembly Replacement: 20 단계, 이미지 2/2
    • Install the new adhesive. Remove any large clumps on the bottom. We left the old stuff down there as it's a bit awkward to get to cleaning and reapplying-wise.

  21. Microsoft Surface Laptop 3 13.5" LCD Assembly Replacement: 21 단계, 이미지 1/1
    • Test the new screen. Make sure you connect the sensors or it won't start or respond at all.

  22. Microsoft Surface Laptop 3 13.5" LCD Assembly Replacement: 22 단계, 이미지 1/2 Microsoft Surface Laptop 3 13.5" LCD Assembly Replacement: 22 단계, 이미지 2/2
    • Slide the cable back under the plastic bar and set it back in place. Lightly pull the cables to make sure there's no slack internally.

  23. Microsoft Surface Laptop 3 13.5" LCD Assembly Replacement: 23 단계, 이미지 1/1
    • Remove the plastic layer on top of your adhesive and set the screen into the housing. You need to push the screen in quite a bit at the bottom to make it sit correctly.

  24. Microsoft Surface Laptop 3 13.5" LCD Assembly Replacement: 24 단계, 이미지 1/3 Microsoft Surface Laptop 3 13.5" LCD Assembly Replacement: 24 단계, 이미지 2/3 Microsoft Surface Laptop 3 13.5" LCD Assembly Replacement: 24 단계, 이미지 3/3
    • Place the assembly in then screw it in. Connect the cables and replace the shields.

  25. Microsoft Surface Laptop 3 13.5" LCD Assembly Replacement: 25 단계, 이미지 1/1
    • Install the screws and feet and you're done!

결론

Let me know how you got on. I think we can all agree this was much easier than a Book 1… lot less nerve-racking too.

다른 9명이 해당 안내서를 완성하였습니다.

Eric

회원 가입일: 01/24/17

1,486 평판

안내서 1개 작성함

smashedit.co.nz smashedit.co.nz 회원

Business

9 회원들

안내서 3개 작성하였습니다

댓글 2개

Real very helpful and very nicely explained

Praveen - 답글

Thanks Praveen

Eric -

댓글 쓰기

조회 통계:

24 시간 전: 6

7일 전: 30

30일 전: 121

전체 시간: 8,673