주요 콘텐츠로 건너뛰기

Microsoft Surface Pro 2 Motherboard Replacement

필요한 것

  1. Microsoft Surface Pro 2 Motherboard Replacement, LCD Display: 1 단계, 이미지 1/2 Microsoft Surface Pro 2 Motherboard Replacement, LCD Display: 1 단계, 이미지 2/2
    • To avoid electrical shocks, unplug and turn off your Surface Pro 2 before proceeding.

  2. Microsoft Surface Pro 2 Motherboard Replacement: 2 단계, 이미지 1/1
    • Avoid any skin or eye contact with the heating pad or heating gun because they may cause bodily harm.

    • Using a heating pad or heating gun, heat the edges of the screen to soften the glue. This area extends roughly one inch from the edge of the device.

    • The glue is under the darker border of the device display.

  3. Microsoft Surface Pro 2 Motherboard Replacement: 3 단계, 이미지 1/1
    • Using a plastic opening tool and a suction cup as needed for leverage, gently insert one edge of the opening tool under the corner of the screen.

    • If the tool does not easily slide under the screen, return to heating before proceeding.

    • Slowly work the tool around the entire edge of the screen.

  4. Microsoft Surface Pro 2 Motherboard Replacement: 4 단계, 이미지 1/3 Microsoft Surface Pro 2 Motherboard Replacement: 4 단계, 이미지 2/3 Microsoft Surface Pro 2 Motherboard Replacement: 4 단계, 이미지 3/3
    • Detach the orange cables that connect the screen to the motherboard by pulling on the small tabs. Using the nylon spudger, release these cables.

    • Please note the third small connector in red.

    • Allow the glue to cool before letting it come into contact with any other surface.

  5. Microsoft Surface Pro 2 Motherboard Replacement, Motherboard: 5 단계, 이미지 1/3 Microsoft Surface Pro 2 Motherboard Replacement, Motherboard: 5 단계, 이미지 2/3 Microsoft Surface Pro 2 Motherboard Replacement, Motherboard: 5 단계, 이미지 3/3
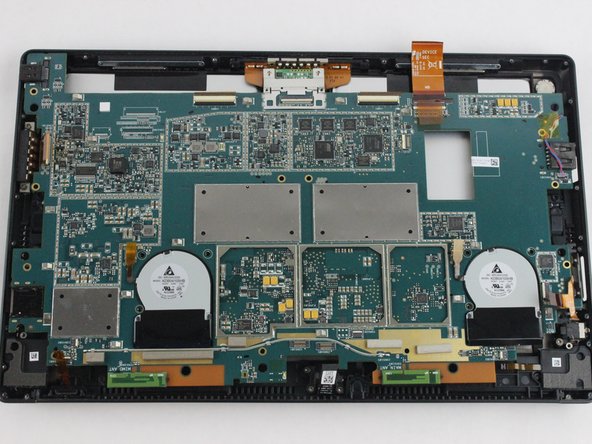
    • Make sure that the front-facing camera is completely disconnected, and then remove the plastic bracket.

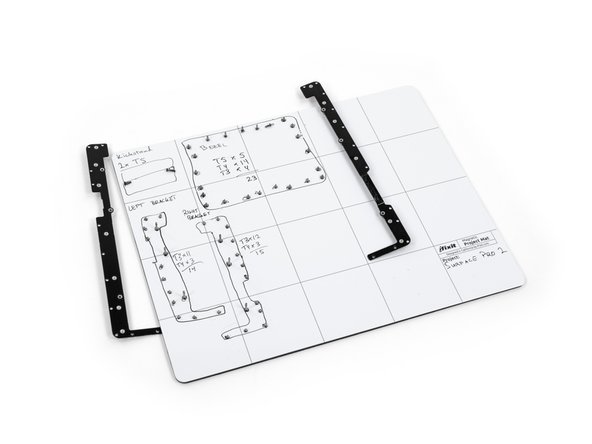
    • Remove the 22 screws on the bezel.

    • Remove the left and right brackets; the left has 16 screws and the right has 15 screws.

    • The three different torx screws used are T3, T4, and T5.

  6. Microsoft Surface Pro 2 Motherboard Replacement: 6 단계, 이미지 1/3 Microsoft Surface Pro 2 Motherboard Replacement: 6 단계, 이미지 2/3 Microsoft Surface Pro 2 Motherboard Replacement: 6 단계, 이미지 3/3
    • Once the brackets are removed, set them aside.

    • The motherboard itself also has screws.

    • Remove the 25 screws of varying sizes that attach the motherboard to the back plate.

    • View the attached photo of a screw diagram to help keep track of your screws.

  7. Microsoft Surface Pro 2 Motherboard Replacement: 7 단계, 이미지 1/3 Microsoft Surface Pro 2 Motherboard Replacement: 7 단계, 이미지 2/3 Microsoft Surface Pro 2 Motherboard Replacement: 7 단계, 이미지 3/3
    • You have now completely removed the motherboard, and it should look like the pictures shown.

    • Be sure to be cautious with all the connections with the cables on the motherboard.

결론

To reassemble your device, follow these instructions in reverse order.

다른 2명이 해당 안내서를 완성하였습니다.

Christopher Doyle

회원 가입일: 09/07/16

131 평판

안내서 1개 작성함

USF Tampa, Team 6-2, Remmell Fall 2016 USF Tampa, Team 6-2, Remmell Fall 2016 회원

USFT-REMMELL-F16S6G2

4 회원들

안내서 9개 작성하였습니다

댓글 0개

댓글 쓰기

조회 통계:

24 시간 전: 0

7일 전: 10

30일 전: 62

전체 시간: 6,204