이 버전에는 잘못된 편집 사항이 있을 수 있습니다. 최신 확인된 스냅샷으로 전환하십시오.
필요한 것
-
이 단계는 번역되지 않았습니다. 번역을 도와주십시오
-
Use a heated iOpener or a heat gun to heat the edges of the display and soften its adhesive.
-
-
이 단계는 번역되지 않았습니다. 번역을 도와주십시오
-
Apply a suction cup as close as possible to the edge of the display.
-
Use the suction cup to lift the edge of the display enough to insert an opening pick under the edge.
-
Slide the opening pick all the way around the edges of the display to cut through the adhesive on the bezel.
-
-
이 단계는 번역되지 않았습니다. 번역을 도와주십시오
-
Starting from the top edge, lift the display slightly. If you feel any resistance, use heat and an opening pick to slice through any remaining adhesive.
-
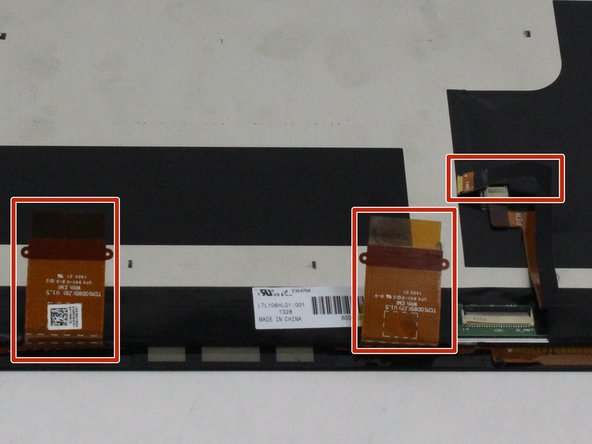
Before completely removing the display, disconnect the three display cables.
-
-
-
이 단계는 번역되지 않았습니다. 번역을 도와주십시오
-
Using a T3 Torx screwdriver, remove a total of 23 screws from the screen bezel of the Surface Pro.
-
-
이 단계는 번역되지 않았습니다. 번역을 도와주십시오
-
Remove the 6 T5 screws from the panels on each side of the frame.
-
Remove 23 T2 screws from the panels.
-
-
이 단계는 번역되지 않았습니다. 번역을 도와주십시오
-
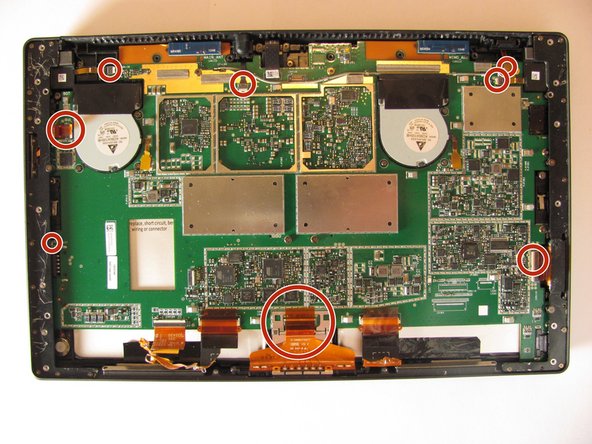
Using tweezers, gently pull the eight orange ribbon cables from their sockets.
-
-
이 단계는 번역되지 않았습니다. 번역을 도와주십시오
-
Unscrew the 17 T5 torx screws on the mother board with the T5 torx screw driver
-
-
이 단계는 번역되지 않았습니다. 번역을 도와주십시오
-
Once all screws are removed, gently lift up the logic board with your hands to pull it out.
-
-
이 단계는 번역되지 않았습니다. 번역을 도와주십시오
-
Use your hands to pry off the entire battery pack with enough force to overcome the glue keeping the batteries in place.
-


다른 35명이 해당 안내서를 완성하였습니다.

팀

Cal Poly, Team 8-20, Regan Fall 2013 Cal Poly, Team 8-20, Regan Fall 2013 회원
CPSU-REGAN-F13S8G20
4 회원들
안내서 16개 작성하였습니다
댓글 24개
Thank you for that awesome guide!
Do you know where can i buy a battery for surface pro 2??
Thanks
I am also trying to find out where to acquire the Surface Pro batteries...???
im also looking for a surface pro replacement battery.
I just bought one for $70 at a site called newpower99.com... should be here in 2 days. I have no idea if it will work, but it says it comes with a toolkit to replace it. I hope it works.
Matt -