소개
Use this guide to remove the SSD in a Microsoft Surface Pro X. The SSD has proprietary shielding, so normal M.2 2230 drives may not be fully compatible.
Before you perform this repair, if at all possible, back up your existing SSD. Then, either familiarize yourself with internet recovery or create a bootable external drive so you’ll be ready to install the operating system onto your new drive and migrate your data to the new SSD.
필요한 것
-
-
Lift the kickstand to at least a 90° angle, so that it is perpendicular to the Surface's screen. The further you open the hinge, the easier it is to access the SSD and SIM card door.
-
-
-
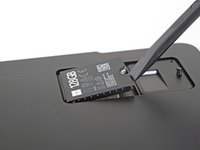
Insert a SIM card eject tool or a paperclip into the small hole in the bottom right corner of the SSD and SIM card door, located near the bottom right corner of the Surface.
-
Press firmly to open the door.
-
-
-
-
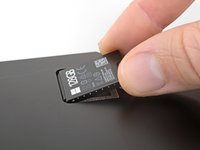
Lift the SSD and SIM card door and remove it from the Surface.
-
-
-
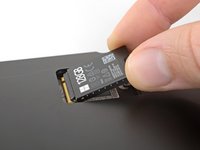
Use your finger or a spudger to lift the SSD just enough that it clears the edges of its recess.
-
Gently pull the SSD straight out of its socket.
-


To reassemble your device, follow the above steps in reverse order.
Take your e-waste to an R2 or e-Stewards certified recycler.
Repair didn’t go as planned? Check out our Answers community for troubleshooting help.
다른 8명이 해당 안내서를 완성하였습니다.

6가이드 댓글
The only question remaining is: where does one purchase a M2. 2230 SSD?
How do you clone or copy windows to the new drive?
To “richard.brock57”, you can search for M.2 2230 SSD and you should find retailers including CDW, Newegg and Insight who sell these. Or you can look specifically for a version, such as KIOXIA BG4 (Kioxia is the rebranding of Toshiba’s SSD drive business). Unfortunately retailers do not yet sell the 1TB version (at least as of my writing this on May 12, 2020), so if you really want 1TB you can do what this fellow did:
https://dancharblog.wordpress.com/2020/0... who purchases the Caldigit Tuf Nano 1TB external drive and swaps the Kioxia BG4 1TB M.2 2230 SSD in there for the one in his Surface Pro X. Currently that drives sells for $219 on Amazon.
To “Ismail Akudi”, you can go to https://support.microsoft.com/en-us/surf... to download a recovery image of Windows 10 onto a USB drive and use that to set up your Surface after you’ve upgraded the drive. You can look at the instructions at the link; they’re reasonably straightforward.
Where can one find a replacement 2.4mm screw, and what is the exact size/type?