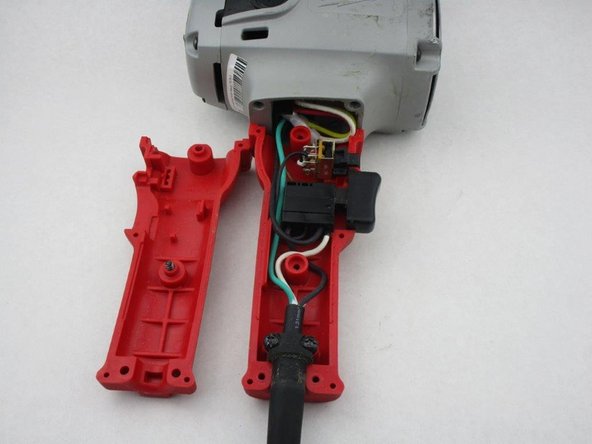
주요 콘텐츠로 건너뛰기

Milwaukee Hole Hawg 1675-1 Field Replacement

필요한 것

  1. Milwaukee Hole Hawg 1675-1 Field Replacement, Motor Brushes: 1 단계, 이미지 1/1
    • Ensure that the drill is unplugged.

    • Position the drill so that it is on its side.

  2. Milwaukee Hole Hawg 1675-1 Field Replacement: 2 단계, 이미지 1/3 Milwaukee Hole Hawg 1675-1 Field Replacement: 2 단계, 이미지 2/3 Milwaukee Hole Hawg 1675-1 Field Replacement: 2 단계, 이미지 3/3
    • Remove the brush cap with a flathead screwdriver.

  3. Milwaukee Hole Hawg 1675-1 Field Replacement: 3 단계, 이미지 1/2 Milwaukee Hole Hawg 1675-1 Field Replacement: 3 단계, 이미지 2/2
    • Pry up on the copper brush holder with a screwdriver or spudger.

    • Continue lifting up the copper brush holder to remove the brush.

    • Repeat on the opposite side.

  4. Milwaukee Hole Hawg 1675-1 Field Replacement, Field: 4 단계, 이미지 1/2 Milwaukee Hole Hawg 1675-1 Field Replacement, Field: 4 단계, 이미지 2/2
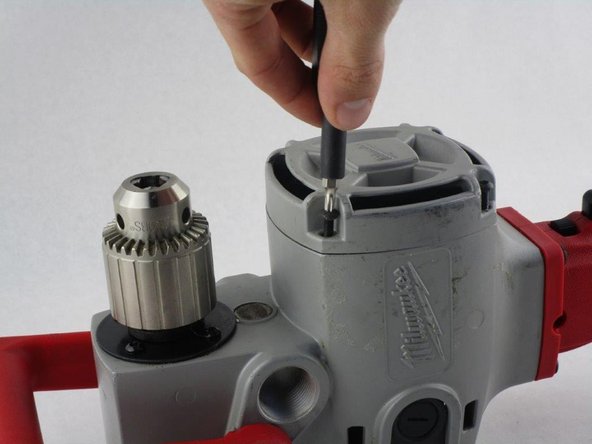
    • Position the the drill upright and remove the four 19mm Torx T15 screws securing the motor cover.

  5. Milwaukee Hole Hawg 1675-1 Field Replacement: 5 단계, 이미지 1/3 Milwaukee Hole Hawg 1675-1 Field Replacement: 5 단계, 이미지 2/3 Milwaukee Hole Hawg 1675-1 Field Replacement: 5 단계, 이미지 3/3
    • Remove the motor cover and withdraw the armature.

    • Take note to not lose the washer that sits on top of the armature.

  6. Milwaukee Hole Hawg 1675-1 Field Replacement: 6 단계, 이미지 1/2 Milwaukee Hole Hawg 1675-1 Field Replacement: 6 단계, 이미지 2/2
    • Remove the black insulator ring.

    • Remove the two 45mm Torx T15 screws securing the field to the drill.

  7. Milwaukee Hole Hawg 1675-1 Field Replacement: 7 단계, 이미지 1/3 Milwaukee Hole Hawg 1675-1 Field Replacement: 7 단계, 이미지 2/3 Milwaukee Hole Hawg 1675-1 Field Replacement: 7 단계, 이미지 3/3
    • Position drill on its side.

    • Remove the four 19mm Torx T15 screws.

    • Remove the two 25mm Torx T27 screws.

    • Remove the top portion of the handle.

  8. Milwaukee Hole Hawg 1675-1 Field Replacement: 8 단계, 이미지 1/2 Milwaukee Hole Hawg 1675-1 Field Replacement: 8 단계, 이미지 2/2
    • Lift the switch up and away to allow room to work.

    • Uncrimp the wire connector on the yellow field wire attached to the switch to disconnect it.

  9. Milwaukee Hole Hawg 1675-1 Field Replacement: 9 단계, 이미지 1/1
    • Lift the field out of the device, feeding the yellow wire through the handle.

결론

To reassemble your device, follow these instructions in reverse order.

Colby Green

회원 가입일: 01/13/20

183 평판

안내서 1개 작성함

댓글 0개

댓글 쓰기

조회 통계:

24 시간 전: 1

7일 전: 1

30일 전: 10

전체 시간: 562