이 버전에는 잘못된 편집 사항이 있을 수 있습니다. 최신 확인된 스냅샷으로 전환하십시오.
필요한 것
-
이 단계는 번역되지 않았습니다. 번역을 도와주십시오
-
Slide the battery cover toward the bottom edge of the phone.
-
Remove the battery cover from the rear of the phone.
-
-
이 단계는 번역되지 않았습니다. 번역을 도와주십시오
-
Lift the battery out of the Droid 2 from the edge closest to the bottom of the phone.
-
Remove the battery from the Droid 2.
-
-
이 단계는 번역되지 않았습니다. 번역을 도와주십시오
-
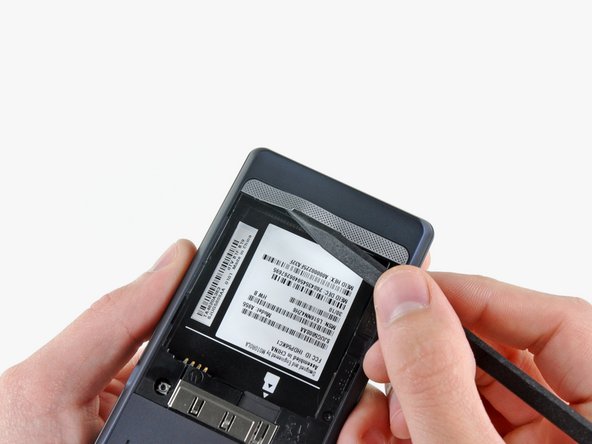
Using the tip of a spudger, peel up one corner of the silver ribbon below the battery compartment.
-
Peel the ribbon off the phone.
-
-
이 단계는 번역되지 않았습니다. 번역을 도와주십시오
-
Insert the flat end of a spudger and pry the plastic camera cover up off the phone.
-
-
-
이 단계는 번역되지 않았습니다. 번역을 도와주십시오
-
Use the tip of a spudger to remove the camera bezel stuck to the rear case.
-
-
이 단계는 번역되지 않았습니다. 번역을 도와주십시오
-
Remove the seven 5.5 mm T5 Torx screws securing the rear case to the inner case.
-
-
이 단계는 번역되지 않았습니다. 번역을 도와주십시오
-
Insert the flat end of a spudger and pry downwards to release the plastic tab holding the rear case to the motherboard screw.
-
-
이 단계는 번역되지 않았습니다. 번역을 도와주십시오
-
Gently insert a spudger between the rear case and front case at the top of the phone, near the audio jack.
-
Carefully pry the top edge of the rear case up from the rest of the phone.
-
-
이 단계는 번역되지 않았습니다. 번역을 도와주십시오
-
With the spudger still inserted between the rear case and front case, slide the spudger along the right edge of the device, moving toward the bottom, prying as you go.
-
Continue prying along the bottom edge of the device from right to left, freeing it from the front panel.
-
-
이 단계는 번역되지 않았습니다. 번역을 도와주십시오
-
Continue prying the rear case from the front case along the left side, moving from bottom to top.
-
Lift the rear case up out of the phone.
-


다른 3명이 해당 안내서를 완성하였습니다.
