주요 콘텐츠로 건너뛰기

Motorola Droid 2 Speaker Replacement

필요한 것

  1. Motorola Droid 2 Speaker Replacement, Battery: 1 단계, 이미지 1/3 Motorola Droid 2 Speaker Replacement, Battery: 1 단계, 이미지 2/3 Motorola Droid 2 Speaker Replacement, Battery: 1 단계, 이미지 3/3
    • Slide the battery cover toward the bottom edge of the phone.

    • Remove the battery cover from the rear of the phone.

  2. Motorola Droid 2 Speaker Replacement: 2 단계, 이미지 1/2 Motorola Droid 2 Speaker Replacement: 2 단계, 이미지 2/2
    • Lift the battery out of the Droid 2 from the edge closest to the bottom of the phone.

    • Remove the battery from the Droid 2.

  3. Motorola Droid 2 Speaker Replacement, Rear Case: 3 단계, 이미지 1/2 Motorola Droid 2 Speaker Replacement, Rear Case: 3 단계, 이미지 2/2
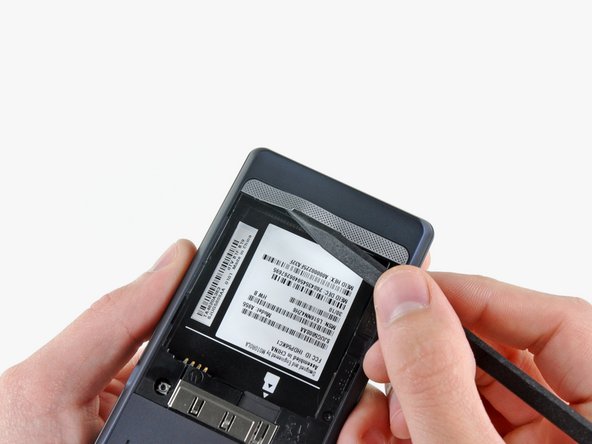
    • Using the tip of a spudger, peel up one corner of the silver ribbon below the battery compartment.

    • Peel the ribbon off the phone.

  4. Motorola Droid 2 Speaker Replacement: 4 단계, 이미지 1/1
    • Insert the flat end of a spudger and pry the plastic camera cover up off the phone.

    • The thin plastic cover is attached to the phone with an adhesive. Work slowly and carefully.

  5. Motorola Droid 2 Speaker Replacement: 5 단계, 이미지 1/1
    • Use the tip of a spudger to remove the camera bezel stuck to the rear case.

  6. Motorola Droid 2 Speaker Replacement: 6 단계, 이미지 1/1
    • Remove the seven 5.5 mm T5 Torx screws securing the rear case to the inner case.

  7. Motorola Droid 2 Speaker Replacement: 7 단계, 이미지 1/1
    • Insert the flat end of a spudger and pry downwards to release the plastic tab holding the rear case to the motherboard screw.

  8. Motorola Droid 2 Speaker Replacement: 8 단계, 이미지 1/1
    • Gently insert a spudger between the rear case and front case at the top of the phone, near the audio jack.

    • Carefully pry the top edge of the rear case up from the rest of the phone.

  9. Motorola Droid 2 Speaker Replacement: 9 단계, 이미지 1/2 Motorola Droid 2 Speaker Replacement: 9 단계, 이미지 2/2
    • With the spudger still inserted between the rear case and front case, slide the spudger along the right edge of the device, moving toward the bottom, prying as you go.

    • Continue prying along the bottom edge of the device from right to left, freeing it from the front panel.

  10. Motorola Droid 2 Speaker Replacement: 10 단계, 이미지 1/2 Motorola Droid 2 Speaker Replacement: 10 단계, 이미지 2/2
    • Continue prying the rear case from the front case along the left side, moving from bottom to top.

    • Lift the rear case up out of the phone.

    • At this point, the button covers on the side of the phone are free and may fall out if you tip the phone upside down.

  11. Motorola Droid 2 Speaker Replacement, Speaker: 11 단계, 이미지 1/1
    • Carefully lift the speaker/antenna assembly up and out of the phone.

    • If you are re-assembling your phone, insert any power, camera, or volume buttons that may have fallen out at this point.

결론

To reassemble your device, follow these instructions in reverse order.

다른 3명이 해당 안내서를 완성하였습니다.

Andrew Bookholt

585,500 평판

안내서 619개 작성하였습니다

댓글 0개

댓글 쓰기

조회 통계:

24 시간 전: 0

7일 전: 0

30일 전: 3

전체 시간: 6,927