주요 콘텐츠로 건너뛰기

Motorola Droid 4 Rear Bezel Replacement

필요한 것

  1. Motorola Droid 4 Rear Bezel Replacement, Removing Rear Panel: 1 단계, 이미지 1/3 Motorola Droid 4 Rear Bezel Replacement, Removing Rear Panel: 1 단계, 이미지 2/3 Motorola Droid 4 Rear Bezel Replacement, Removing Rear Panel: 1 단계, 이미지 3/3
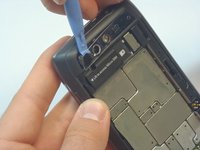
    • Insert the rear cover removal tool, or a paper clip, in the hole near the back camera lens.

    • Slide the cover down to remove.

  2. Motorola Droid 4 Rear Bezel Replacement, Battery: 2 단계, 이미지 1/1
    • Remove the sticker on the rear compartment to reveal the battery.

    • Hold the battery with your thumb while removing the sticker or you might end up ripping the battery out of the phone, damaging the flex cable.

  3. Motorola Droid 4 Rear Bezel Replacement: 3 단계, 이미지 1/2 Motorola Droid 4 Rear Bezel Replacement: 3 단계, 이미지 2/2
    이 단계에 사용된 도구:
    T5 Torx Screwdriver
    $5.49
    구매
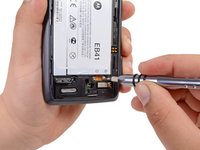
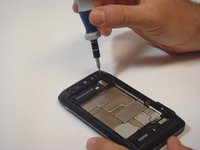
    • Use the T5 Torx Screwdriver to remove both 2.5 mm screws from the battery cable.

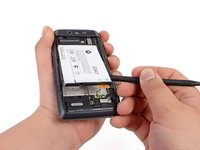
    • Use the Spudger to unstick the battery.

    • It's difficult to remove the battery without a pry tool like the spudger because of the strong adhesive. If you try removing it with just your fingers, the battery may bend.

  4. Motorola Droid 4 Rear Bezel Replacement, Camera Cover Removal: 4 단계, 이미지 1/3 Motorola Droid 4 Rear Bezel Replacement, Camera Cover Removal: 4 단계, 이미지 2/3 Motorola Droid 4 Rear Bezel Replacement, Camera Cover Removal: 4 단계, 이미지 3/3
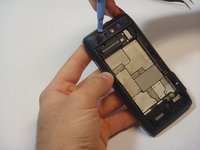
    • Using the blue plastic opening tool, pry off the thin plastic camera cover.

    • The plastic cover is fragile, so proceed carefully.

  5. Motorola Droid 4 Rear Bezel Replacement, Remove Screws: 5 단계, 이미지 1/2 Motorola Droid 4 Rear Bezel Replacement, Remove Screws: 5 단계, 이미지 2/2
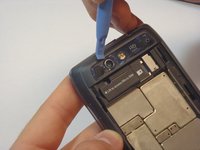
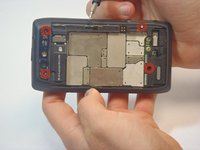
    • Remove the four screws, indicated by the red circles, with the screwdriver and T5 Torx bit.

    • The screws are philips 2.5mm. One screw is a different color (silver) from the others (black).

  6. Motorola Droid 4 Rear Bezel Replacement, Remove Bezel: 6 단계, 이미지 1/3 Motorola Droid 4 Rear Bezel Replacement, Remove Bezel: 6 단계, 이미지 2/3 Motorola Droid 4 Rear Bezel Replacement, Remove Bezel: 6 단계, 이미지 3/3
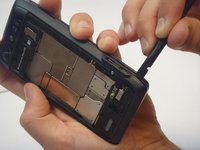
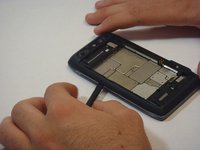
    • Insert the spudger between the rear bezel and the main housing.

    • The bezel is fragile, so proceed carefully.

    • Slide the spudger around all sides of the phone to separate the bezel from the housing.

    • Pry the bezel free.

    • Be careful of the adhesive that holds the bezel to the main housing. Prying too hard may damage your phone.

결론

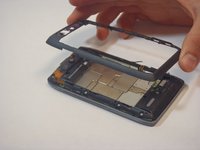
To reassemble your device, follow these instructions in reverse order.

Cheriann

회원 가입일: 09/23/14

156 평판

안내서 1개 작성함

USF Tampa, Team 5-1, Mcgee Fall 2014 USF Tampa, Team 5-1, Mcgee Fall 2014 회원

USFT-MCGEE-F14S5G1

5 회원들

안내서 5개 작성하였습니다

댓글 0개

댓글 쓰기

조회 통계:

24 시간 전: 0

7일 전: 0

30일 전: 11

전체 시간: 525