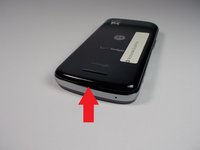
주요 콘텐츠로 건너뛰기

Motorola Droid Pro Screen Replacement

필요한 것

  1. Motorola Droid Pro Screen Replacement, SD Card/SIM Card PCB Board: 1 단계, 이미지 2개 중 1개 Motorola Droid Pro Screen Replacement, SD Card/SIM Card PCB Board: 1 단계, 이미지 2개 중 2개
    • Remove the back cover and battery by using the thumb tabs.

  2. Motorola Droid Pro Screen Replacement: 2 단계, 이미지 1개 중 1개
    • Unscrew the 8 back panel screws using the T4 Torx screwdriver.

  3. Motorola Droid Pro Screen Replacement: 3 단계, 이미지 1개 중 1개
    • Use a spudger to open the phone along the sides between the back panel and the chrome trim.

    • It is held together by small clips that lock in. You may have to use a little force to unlock them.

    • Go around on all sides then pull the back panel off.

  4. Motorola Droid Pro Screen Replacement: 4 단계, 이미지 2개 중 1개 Motorola Droid Pro Screen Replacement: 4 단계, 이미지 2개 중 2개
    • Gently lift the SD & SIM card board (PCB) as shown in the following pictures.

    • This will expose the ribbon cable attached to the board and another ribbon cable for the mother board. Remove them both using the spudger.

    • Once the small one is removed the small board can be pulled off.

  5. Motorola Droid Pro Screen Replacement, Screen: 5 단계, 이미지 1개 중 1개
    • Unscrew the 6 screws using the T5 Torx screwdriver.

  6. Motorola Droid Pro Screen Replacement: 6 단계, 이미지 1개 중 1개
    • Unlock the ribbon cable and then you can pull the screen out.

    • When replacing screen make sure you lock the ribbon cable back in place.

결론

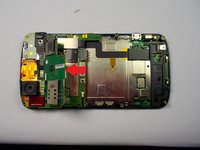
To reassemble your device, follow these instructions in reverse order.

작성자

6다른 기여자 명과 함께

Peter Cakounes

회원 가입일: 10/21/14

19 평판

안내서 4개를 작성함

UMass Dartmouth, Team 5-8, Vijaybhaskar Fall 2014 UMass Dartmouth, Team 5-8, Vijaybhaskar Fall 2014 회원

UMASSD-VIJAYBHASKAR-F14S5G8

4 회원들

안내서 8개를 작성함

댓글 0개

댓글 쓰기

조회 통계:

지난 24시간: 1

지난 7일: 1

지난 30일: 5

전체 시간: 298