주요 콘텐츠로 건너뛰기

Motorola Droid Turbo Front Facing Camera Replacement

필요한 것

  1. Motorola Droid Turbo Front Facing Camera Replacement, Rear Case: 1 단계, 이미지 1/1
    • Prepare an iOpener and lay it over the rear case to soften the adhesive on securing the rear case to the phone.

  2. Motorola Droid Turbo Front Facing Camera Replacement: 2 단계, 이미지 1/2 Motorola Droid Turbo Front Facing Camera Replacement: 2 단계, 이미지 2/2
    • Use a plastic opening tool to pry the rear case off of the rest of the device.

    • Remove the rear case.

    • The wireless charging coil may try to stick to the rear case, so make sure to remove it from the case before fully separating the rear case from the rest of the device.

  3. Motorola Droid Turbo Front Facing Camera Replacement, Midframe: 3 단계, 이미지 1/1
    • Remove the midframe bezel.

  4. Motorola Droid Turbo Front Facing Camera Replacement: 4 단계, 이미지 1/1
    • Remove the four Torx T5 screws securing the midframe plate.

  5. Motorola Droid Turbo Front Facing Camera Replacement: 5 단계, 이미지 1/1
    • Remove the midframe.

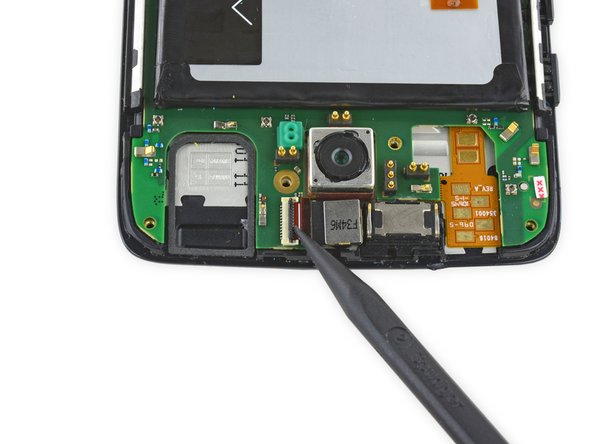
  6. Motorola Droid Turbo Front Facing Camera Replacement, Front Facing Camera: 6 단계, 이미지 1/2 Motorola Droid Turbo Front Facing Camera Replacement, Front Facing Camera: 6 단계, 이미지 2/2
    • Use the pointed end of a spudger to flip up the black retaining flap of the front facing camera's ZIF connector.

  7. Motorola Droid Turbo Front Facing Camera Replacement: 7 단계, 이미지 1/2 Motorola Droid Turbo Front Facing Camera Replacement: 7 단계, 이미지 2/2
    • Remove the front-facing camera.

결론

To reassemble your device, follow these instructions in reverse order.

Luis Arangu

회원 가입일: 01/20/16

1,127 평판

안내서 3개 작성하였습니다

USF Tampa, Team 15-5, Remmell Spring 2016 USF Tampa, Team 15-5, Remmell Spring 2016 회원

USFT-REMMELL-S16S15G5

3 회원들

안내서 6개 작성하였습니다

댓글 0개

댓글 쓰기

조회 통계:

24 시간 전: 0

7일 전: 1

30일 전: 1

전체 시간: 1,702