이 버전에는 잘못된 편집 사항이 있을 수 있습니다. 최신 확인된 스냅샷으로 전환하십시오.
필요한 것
-
이 단계는 번역되지 않았습니다. 번역을 도와주십시오
-
Locate the power button at the top of the phone. Depress power button for 2 seconds until a menu appears.
-
-
이 단계는 번역되지 않았습니다. 번역을 도와주십시오
-
Once the menu appears, select the "power off" option. Wait until the phone is completely off.
-
-
이 단계는 번역되지 않았습니다. 번역을 도와주십시오
-
Place thumb on the back cover, and push down towards the bottom of the device. Once the cover releases, pull it away from the phone and set it aside.
-
-
이 단계는 번역되지 않았습니다. 번역을 도와주십시오
-
Find the yellow pull tab located in the upper left corner. Pull the tab until the battery dislodges. Grab the battery by the raised edge, and remove it from the case.
-
-
이 단계는 번역되지 않았습니다. 번역을 도와주십시오
-
Locate the seam between the back case and the end cover on the top edge of the phone.
-
Use the plastic opening tool to detach the two clips by wedging the tool into the right side of the seam and moving right to left. Once the cover comes off set it aside
-
-
이 단계는 번역되지 않았습니다. 번역을 도와주십시오
-
Use a T5 Torx screwdriver to remove the screws in each corner of the phone.
-
-
이 단계는 번역되지 않았습니다. 번역을 도와주십시오
-
Flip the phone over and locate the screw on the middle of the left side. Unscrew it using the T5 Torx screwdriver and set it aside.
-
-
이 단계는 번역되지 않았습니다. 번역을 도와주십시오
-
Identify the screw located in the bottom right corner of the battery case. Remove the screw with a T5 (or in some cases T6) torx screwdriver and set it aside.
-
-
-
이 단계는 번역되지 않았습니다. 번역을 도와주십시오
-
Locate the seam along the right edge of the phone. Use the prying tool to disconnect the two clips along the edge.
-
-
이 단계는 번역되지 않았습니다. 번역을 도와주십시오
-
Locate the two clips on the inside of the case and use the spudger tool to detach them from the case. To detach each clip, use the sharp end to press the small, black plastic in the center of the clip.
-
-
이 단계는 번역되지 않았습니다. 번역을 도와주십시오
-
Remove the screws along both sides of the motherboard using a T3 Torx screwdriver. On some phones this may require a #1 Phillips Screw Driver.
-
-
이 단계는 번역되지 않았습니다. 번역을 도와주십시오
-
Carefully remove the white connecting wire from the motherboard using tweezers.
-
-
이 단계는 번역되지 않았습니다. 번역을 도와주십시오
-
Scrape away the electrical tape that covers the LCD and digitizer cable using the spudger tool or a fingernail.
-
-
이 단계는 번역되지 않았습니다. 번역을 도와주십시오
-
Use the spudger tool to pop the Digitizer cable off of the motherboard.
-
-
이 단계는 번역되지 않았습니다. 번역을 도와주십시오
-
Carefully flip the small white connector up and away from the motherboard.
-
-
이 단계는 번역되지 않았습니다. 번역을 도와주십시오
-
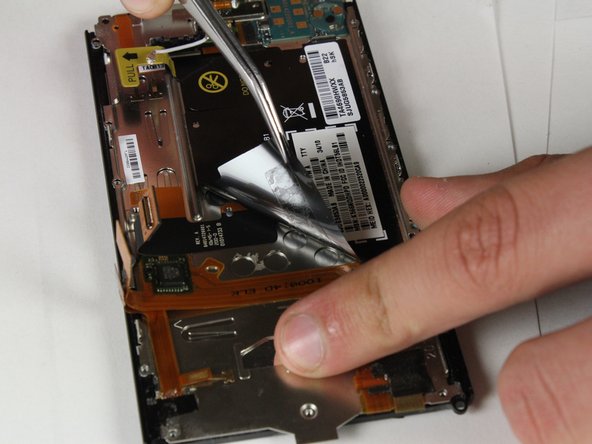
Carefully lift the motherboard and camera module up. Do not remove it from the phone!
-
-
이 단계는 번역되지 않았습니다. 번역을 도와주십시오
-
Using the spudger tool, pop the black cable connector off of the motherboard.
-
-
이 단계는 번역되지 않았습니다. 번역을 도와주십시오
-
Using tweezers, peel the orange and black cable away from the device, stopping before reaching the electrical tape at the near the edge of the screen.
-
-
이 단계는 번역되지 않았습니다. 번역을 도와주십시오
-
Peel black the black electrical tape located near the bottom of the device.
-
-
이 단계는 번역되지 않았습니다. 번역을 도와주십시오
-
Unscrew the screw at the base of the screen using the T4 torx screwdriver .
-
-
이 단계는 번역되지 않았습니다. 번역을 도와주십시오
-
Peel back the orange and gold connector from the left side of the phone.
-


다른 18명이 해당 안내서를 완성하였습니다.
팀

Cal Poly, Team 18-40, Regan Fall 2012 Cal Poly, Team 18-40, Regan Fall 2012 회원
CPSU-REGAN-F12S18G40
3 회원들
안내서 10개 작성하였습니다
댓글 2개
Thank you. This is very helpful.