소개
Over time, the speaker on the Motorola Moto G4 can crackle or distort audio. This guide will show you how to replace the speaker.
Before you begin, download the Rescue and Smart Assistant app to backup your device and diagnose whether your problem is software or hardware related.
필요한 것
-
-
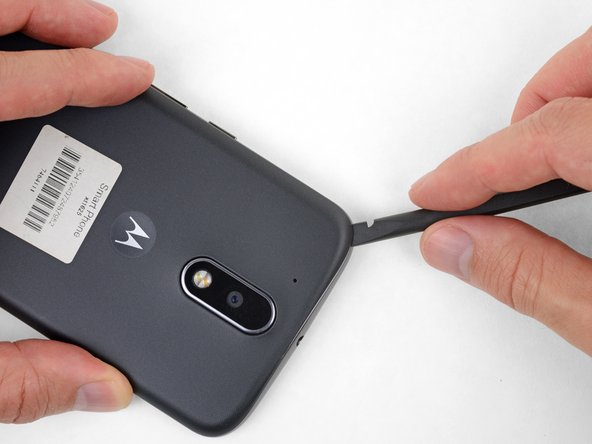
Insert a fingernail or a spudger into the notch on the bottom edge of the phone, near the charge port.
-
Gently twist or pry to open a small gap between the back cover and the body of the phone.
-
While keeping your tool (or fingernail) inserted into the gap between the back cover and the body of the phone, slide it around the corner to begin loosening the plastic clips holding the cover in place.
-
-
-
-
Use a T3 Torx driver to remove the nineteen identical 3.1 mm screws securing the midframe.
In my kit, the T3 Torx bit came in the ‘repair part’ box, while a T5 Torx bit was in the ‘repair tools’ box.
my phone had t4, not t3
unable to remove 8 of the screws. any suggestions?
My T4 is the tool that fit. I can see why people strip these. They were dam tight for such little screws.
I also had a tough time getting them out of the socket once loose. Magnet in the tool was not very strong. I used my tweezers, and scratch the screw heads. That means they are real soft steel, and strip easy.
-
-
-
Insert a spudger under the midframe at the top left corner, and gently twist to separate it from the body of the phone.
-
-
-
Remove the midframe.
During the midframe removal, be careful and do not put too much torsional stress on the loudspeaker pickup wires (to the right of the main camera). It’s not that difficult to crush or shear the pickups there. Doing so will render your phone silent.
Kevin Kwan - 답글
Exactly what happened to me. Both contacts broke off and if just loosely put where they were, they can't make proper contact anymore.
There should be a warning about this in the guide itself!
-
-
-
Insert a thin tool (such as one of your tweezer tips) under the red and black battery wires, and slide it underneath the battery connector.
-
Gently pry straight up to disconnect the battery.
-
-
-
Strong adhesive secures the earpiece speaker. If necessary, apply heat or a few drops of isopropyl alcohol to help weaken the adhesive and make it easier to remove.
-
Pry up the speaker with a pry tool or a pair of tweezers. Be careful not to damage any surrounding components.
You should have clearly told us not to use the tweezers in such a way as to touch the bottom side of that speaker box. I accidentally touched the other side with my tweezer while removing which caused a hole in the thin metal membrane. Now my speaker works but has an incredible amount of distortion. You MUST put a warning for these things. Now I have to buy a new speaker module.
On my Moto g4 plus I can't hear with ear piece speaker but I can hear with speaker phone mode, even after replacing with new speaker
-
To reassemble your device, follow these instructions in reverse order.
To reassemble your device, follow these instructions in reverse order.
다른 6명이 해당 안내서를 완성하였습니다.
댓글 4개
i have problem with speaker. no sound. tried direct connecting external speaker . still no sound. so seems like its not sending signal. i checked all the settings
You should have clearly told us not to use the tweezers in such a way as to touch the bottom side of that speaker box. I accidentally touched the other side with my tweezer while removing which caused a hole in the thin metal membrane. Now my speaker works but has an incredible amount of distortion. You MUST put a warning for these things. Now I have to buy a new speaker module.
The warning should have told us to touch only the plastic black parts with the pointy end of the tweezers
will use on my other phone, people can hear me, I can’t hear them after a drop. Now I know how to check the phone speaker. Thanks
Is it essential to disconnect the battery? Or is that more safety protocol?


