주요 콘텐츠로 건너뛰기

이 버전에는 잘못된 편집 사항이 있을 수 있습니다. 최신 확인된 스냅샷으로 전환하십시오.

단지 전제 조건
이 안내서는 다른 가이드의 선행 작업으로 사용하기 위한 것입니다. 그 자체로는 불완전합니다.

필요한 것

  1. 이 단계는 번역되지 않았습니다. 번역을 도와주십시오

    : 1 단계, 이미지 1/3 : 1 단계, 이미지 2/3 : 1 단계, 이미지 3/3
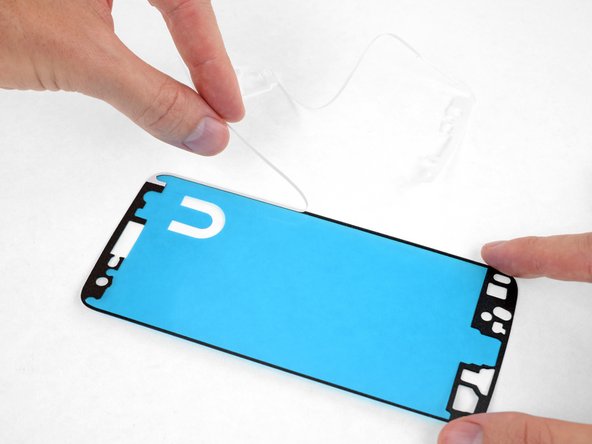
    • Peel away and remove all the old display adhesive from the body of your phone.

    • If you're reinstalling your existing display, remove all the old adhesive from that as well.

    • Use the point of your spudger to scour away and remove any smaller bits of adhesive that remain stuck.

    • Be extremely careful not to accidentally puncture the battery with your spudger.

    • For best results, clean the area underneath the removed adhesive with isopropyl alcohol to help prep the surface so the new adhesive bonds more strongly.

  2. 이 단계는 번역되지 않았습니다. 번역을 도와주십시오

    : 2 단계, 이미지 1/2 : 2 단계, 이미지 2/2
    • Some pre-cut adhesive sheets for the display contain up to three layers: a plastic liner (usually blue), an adhesive layer in the middle (black), and a wax paper liner (white).

    • If yours came with a paper liner, peel it away and remove it.

  3. 이 단계는 번역되지 않았습니다. 번역을 도와주십시오

    : 3 단계, 이미지 1/3 : 3 단계, 이미지 2/3 : 3 단계, 이미지 3/3
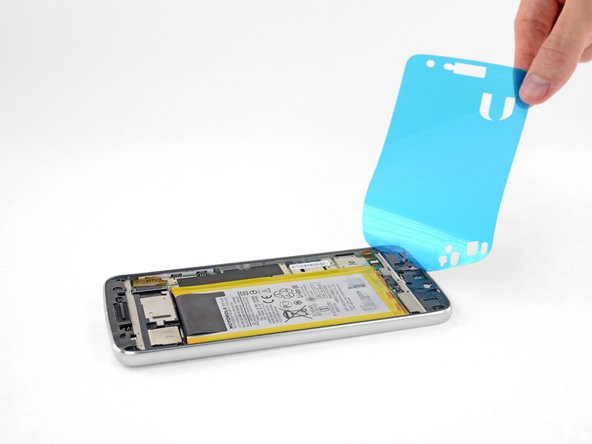
    • Peel off and discard any remaining paper liner, exposing the adhesive on one side.

    • Before you continue, the adhesive sheet should look like the third image.

  4. 이 단계는 번역되지 않았습니다. 번역을 도와주십시오

    : 4 단계, 이미지 1/2 : 4 단계, 이미지 2/2
    • Hold the adhesive sheet with the exposed adhesive facing down, and carefully align it into the lower edge of the phone.

    • Make sure the adhesive sheet is oriented correctly—the edge with multiple holes lines up with the bottom edge, and the rectangular cutout for the earpiece speaker lines up at the top.

    • When it's correctly aligned, lower the rest of the adhesive sheet into the phone.

  5. 이 단계는 번역되지 않았습니다. 번역을 도와주십시오

    : 5 단계, 이미지 1/3 : 5 단계, 이미지 2/3 : 5 단계, 이미지 3/3
    • Firmly press the adhesive into place.

    • Use the flat edge of your spudger to press along the edges and hard-to-reach areas.

    • Be very careful not to accidentally puncture the battery with your spudger.

  6. 이 단계는 번역되지 않았습니다. 번역을 도와주십시오

    : 6 단계, 이미지 1/2 : 6 단계, 이미지 2/2
    • Peel off and discard the plastic liner, exposing the display adhesive.

  7. 이 단계는 번역되지 않았습니다. 번역을 도와주십시오

    : 7 단계, 이미지 1/2 : 7 단계, 이미지 2/2
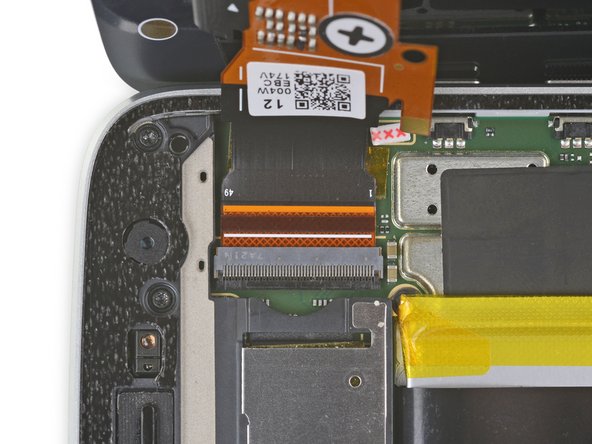
    • Before sealing the display in place, connect the flex cables for the display and fingerprint sensor, and then power your phone on.

    • Test all functions to make sure your repair was successful before sealing up the display.

    • When fully inserted, the white line across each flex cable should be even with the markings on the motherboard on each side of the cable.

    • Do not remove, insert, or adjust the cables while the phone is powered on.

    • The cables can be tricky to align and install. Be sure not to touch the gold contacts on the back, or your finger oils may cause a malfunction. If you do accidentally touch them, wipe them gently with isopropyl alcohol.

  8. 이 단계는 번역되지 않았습니다. 번역을 도와주십시오

    : 8 단계, 이미지 1/1
    • When your repair is tested and complete, press the display firmly into place and remove any plastic liners from the screen.

    • To help the display adhesive bond more securely, heat the perimeter of the display and then place the phone face-up under a heavy stack of books for 30 minutes.

    • Don't rest the phone on its camera bump while doing this, or the uneven pressure may prevent your display from adhering correctly. Place a couple thin books under the phone on either side of the camera bump to elevate it and keep the pressure in the right place.

결승점

Jeff Suovanen

회원 가입일: 08/06/13

428,098 평판

안내서 259개 작성하였습니다

iFixit iFixit 회원

Staff

135 회원들

안내서 16,817개 작성하였습니다

댓글 0개

댓글 쓰기

조회 통계:

24 시간 전: 0

7일 전: 0

30일 전: 0

전체 시간: 86