주요 콘텐츠로 건너뛰기

Motorola Moto Z2 Play Rear Facing Camera Replacement

필요한 것

  1. Motorola Moto Z2 Play Rear Facing Camera Replacement, Eject the SIM tray: 1 단계, 이미지 1/3 Motorola Moto Z2 Play Rear Facing Camera Replacement, Eject the SIM tray: 1 단계, 이미지 2/3 Motorola Moto Z2 Play Rear Facing Camera Replacement, Eject the SIM tray: 1 단계, 이미지 3/3
    • Insert a SIM eject tool, bit, or a straightened paperclip into the hole in the SIM tray, located at the top left edge of the phone.

    • Double-check to make sure that you are not mistakenly inserting the tool into the microphone hole.

    • Push firmly to eject the tray.

    • Pull the tray straight out to remove the tray.

  2. Motorola Moto Z2 Play Rear Facing Camera Replacement, Screen Removal: 2 단계, 이미지 1/1
    • Power off your phone before you complete any replacement steps.

  3. Motorola Moto Z2 Play Rear Facing Camera Replacement: 3 단계, 이미지 1/1
    • Heat the edges of your Motorola Moto Z2 Play screen for two to three minutes with a heat gun. You adjust the heat gun to 85 degrees centigrade, and be careful not to hold the heat gun on one position for too long; to avoid damaging, or "hotspotting" the LCD. The screen should be very warm, but not painful, to the touch. Reheat as necessary.

    • If screen is cracked put strong adhesive tape across the screen in order to avoid breaking the screen further and receiving cuts.

    • If you don’t have access to a heat gun, a hair dryer can be used.

  4. Motorola Moto Z2 Play Rear Facing Camera Replacement: 4 단계, 이미지 1/1
    • Place suction cup in the middle of the screen and press down.

  5. Motorola Moto Z2 Play Rear Facing Camera Replacement: 5 단계, 이미지 1/3 Motorola Moto Z2 Play Rear Facing Camera Replacement: 5 단계, 이미지 2/3 Motorola Moto Z2 Play Rear Facing Camera Replacement: 5 단계, 이미지 3/3
    • Pry the screen by wedging the plastic opening tool under the screen at the charging port.

    • Work your way around the screen with the plastic opening tool.

    • When you pry near the top-right and bottom-right corners, be careful not to pry too far, or you risk damaging the display cable.

    • Complete these steps carefully because the screen is delicate and can easily crack. If the screen begins to resist prying, reheat the adhesive with your heat gun.

  6. Motorola Moto Z2 Play Rear Facing Camera Replacement: 6 단계, 이미지 1/3 Motorola Moto Z2 Play Rear Facing Camera Replacement: 6 단계, 이미지 2/3 Motorola Moto Z2 Play Rear Facing Camera Replacement: 6 단계, 이미지 3/3
    이 단계에 사용된 도구:
    Plastic Cards
    $2.99
    구매
    • Use a suction cup to lift up screen from left to right.

    • If you don’t have a suction cup, wedge a spudger or a small plastic card under the screen and lift slowly.

    • Failure to lift screen from left to right can cause damage to interior wires of your phone.

  7. Motorola Moto Z2 Play Rear Facing Camera Replacement: 7 단계, 이미지 1/3 Motorola Moto Z2 Play Rear Facing Camera Replacement: 7 단계, 이미지 2/3 Motorola Moto Z2 Play Rear Facing Camera Replacement: 7 단계, 이미지 3/3
    • Identify ribbon connector at the top right of the phone.

    • Pry the black locking bar up gently with a plastic opening tool.

    • Remove the ribbon wires by pulling them out of the connector with a tweezer.

    • The locking bar is the small black bar located on the digitizer’s ZIF connector.

    • Be sure to push the locking bar back down using a spudger after you put the ribbon wire back in since the lock does not lock automatically.

  8. Motorola Moto Z2 Play Rear Facing Camera Replacement: 8 단계, 이미지 1/3 Motorola Moto Z2 Play Rear Facing Camera Replacement: 8 단계, 이미지 2/3 Motorola Moto Z2 Play Rear Facing Camera Replacement: 8 단계, 이미지 3/3
    • Identify the ribbon cable, located at the bottom right of the phone.

    • If present, remove kapton (orange) tape covering the cable connector.

    • Flip up the small locking flap on the ZIF connector and use tweezers to slide the cable straight out of its socket.

    • Excessive force is not needed.

  9. Motorola Moto Z2 Play Rear Facing Camera Replacement: 9 단계, 이미지 1/1
    • Lift the screen from the phone to completely detach.

    • If screen doesn't detach, go back to step 7 and 8 to make sure the bar is unlocked and ribbon connector is fully detached.

    • During reassembly, you may need to apply or replace the display adhesive on your display assembly. Use our display adhesive application guide to apply the adhesive and reseal your device.

  10. Motorola Moto Z2 Play Rear Facing Camera Replacement, Battery: 10 단계, 이미지 1/2 Motorola Moto Z2 Play Rear Facing Camera Replacement, Battery: 10 단계, 이미지 2/2
    • Remove the orange tape, located at the bottom right of the phone, using tweezers.

    • Do not discard tape.

  11. Motorola Moto Z2 Play Rear Facing Camera Replacement: 11 단계, 이미지 1/2 Motorola Moto Z2 Play Rear Facing Camera Replacement: 11 단계, 이미지 2/2
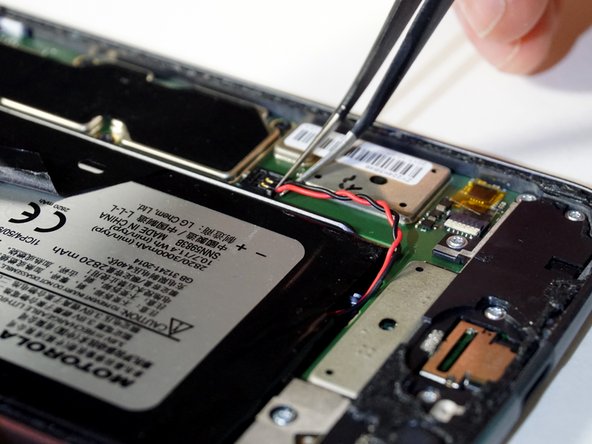
    • Detach the red and black battery wire by lifting up with tweezers.

  12. Motorola Moto Z2 Play Rear Facing Camera Replacement: 12 단계, 이미지 1/2 Motorola Moto Z2 Play Rear Facing Camera Replacement: 12 단계, 이미지 2/2
    • Peel back the black tape that is located on the battery.

    • Make sure you pull back gently so you can reuse the tape with reassembly.

  13. Motorola Moto Z2 Play Rear Facing Camera Replacement: 13 단계, 이미지 1/3 Motorola Moto Z2 Play Rear Facing Camera Replacement: 13 단계, 이미지 2/3 Motorola Moto Z2 Play Rear Facing Camera Replacement: 13 단계, 이미지 3/3
    • Lift the black tape and slide a card under the battery.

    • Align the card parallel and under the battery.

    • Wedge the card further under the battery.

    • Lift the card up to assist in removing the battery from the adhesive.

  14. Motorola Moto Z2 Play Rear Facing Camera Replacement: 14 단계, 이미지 1/1
    • Lift to remove the battery from the device completely.

  15. Motorola Moto Z2 Play Rear Facing Camera Replacement, Speaker: 15 단계, 이미지 1/1
    • Remove the three silver 2.6 mm T3 Torx screws on the speaker shell at the top of the phone with a screwdriver by turning counterclockwise.

    • Remove the four black 3.5 mm T3 Torx screws on the speaker shell at the top of the phone with a screwdriver by turning counterclockwise.

    • It is helpful to keep screws on a magnetic surface to avoid losing them.

  16. Motorola Moto Z2 Play Rear Facing Camera Replacement: 16 단계, 이미지 1/1
    • Lift up the silver metallic tape using the tweezers.

  17. Motorola Moto Z2 Play Rear Facing Camera Replacement: 17 단계, 이미지 1/3 Motorola Moto Z2 Play Rear Facing Camera Replacement: 17 단계, 이미지 2/3 Motorola Moto Z2 Play Rear Facing Camera Replacement: 17 단계, 이미지 3/3
    • Lift gently to completely remove speaker housing using tweezers.

    • Try lifting the speaker housing from both sides slightly before removing completely.

  18. Motorola Moto Z2 Play Rear Facing Camera Replacement: 18 단계, 이미지 1/2 Motorola Moto Z2 Play Rear Facing Camera Replacement: 18 단계, 이미지 2/2
    • Place the housing upside down in order to continue working.

    • Pry the speaker from the housing with a plastic opening tool.

    • When reassembling, make sure the metal connectors of speaker are in the bottom left and right corners (correct orientation).

    • Speaker clicks in on reassembly.

  19. Motorola Moto Z2 Play Rear Facing Camera Replacement, Audio Jack: 19 단계, 이미지 1/1
    • Remove the seven silver 2.6 mm T3 Torx screws on the black battery cable cover at the bottom of the phone with a screwdriver by turning counterclockwise.

    • Remove the single black 3.5 mm T3 Torx screw on the black battery cable cover at the bottom of the phone with a screwdriver by turning counterclockwise.

    • It is helpful to keep screws on a magnetic surface to avoid losing them.

  20. Motorola Moto Z2 Play Rear Facing Camera Replacement: 20 단계, 이미지 1/3 Motorola Moto Z2 Play Rear Facing Camera Replacement: 20 단계, 이미지 2/3 Motorola Moto Z2 Play Rear Facing Camera Replacement: 20 단계, 이미지 3/3
    • Lift the battery cover with tweezers starting on the right side slightly to dislodge the cover.

    • Lift the battery cover with tweezers from the left side slightly to dislodge the cover.

    • Remove the battery cover with tweezers by solidly gripping the left side of the cover and lifting up.

  21. Motorola Moto Z2 Play Rear Facing Camera Replacement: 21 단계, 이미지 1/3 Motorola Moto Z2 Play Rear Facing Camera Replacement: 21 단계, 이미지 2/3 Motorola Moto Z2 Play Rear Facing Camera Replacement: 21 단계, 이미지 3/3
    • Tilt the front of the black audio jack up with tweezers.

    • Lift the audio jack out of its housing with tweezers.

    • Little force is required to remove the audio jack.

  22. Motorola Moto Z2 Play Rear Facing Camera Replacement, Motherboard: 22 단계, 이미지 1/2 Motorola Moto Z2 Play Rear Facing Camera Replacement, Motherboard: 22 단계, 이미지 2/2
    • Remove the three black 2.6 mm T3 Torx screws on the motherboard panel at the side of the phone with a screwdriver by turning counterclockwise.

  23. Motorola Moto Z2 Play Rear Facing Camera Replacement: 23 단계, 이미지 1/1
    • Place a plastic opening tool under the edge of the motherboard.

  24. Motorola Moto Z2 Play Rear Facing Camera Replacement: 24 단계, 이미지 1/1
    • Lift the motherboard from the right edge like a book towards the left.

    • Identify the connector on the top left of the device.

  25. Motorola Moto Z2 Play Rear Facing Camera Replacement: 25 단계, 이미지 1/2 Motorola Moto Z2 Play Rear Facing Camera Replacement: 25 단계, 이미지 2/2
    • Detach the connection on the bottom of the motherboard.

  26. Motorola Moto Z2 Play Rear Facing Camera Replacement, Rear-Facing Camera: 26 단계, 이미지 1/3 Motorola Moto Z2 Play Rear Facing Camera Replacement, Rear-Facing Camera: 26 단계, 이미지 2/3 Motorola Moto Z2 Play Rear Facing Camera Replacement, Rear-Facing Camera: 26 단계, 이미지 3/3
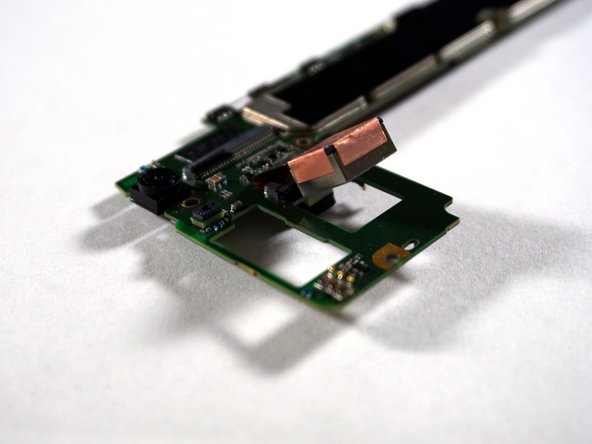
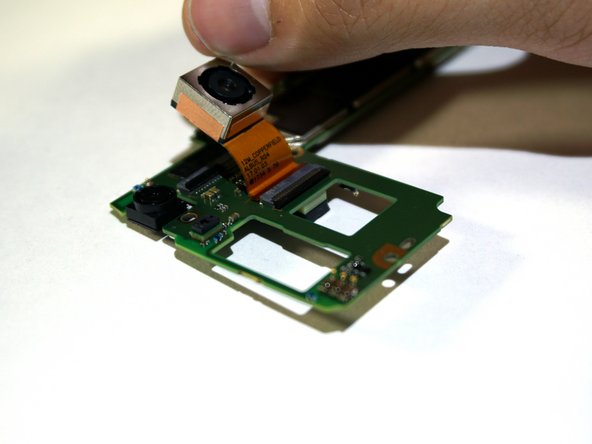
    • Flip over the motherboard so the rear-facing camera and its ribbon can be seen.

    • Bend the camera back to reveal its ribbon-wire port.

  27. Motorola Moto Z2 Play Rear Facing Camera Replacement: 27 단계, 이미지 1/2 Motorola Moto Z2 Play Rear Facing Camera Replacement: 27 단계, 이미지 2/2
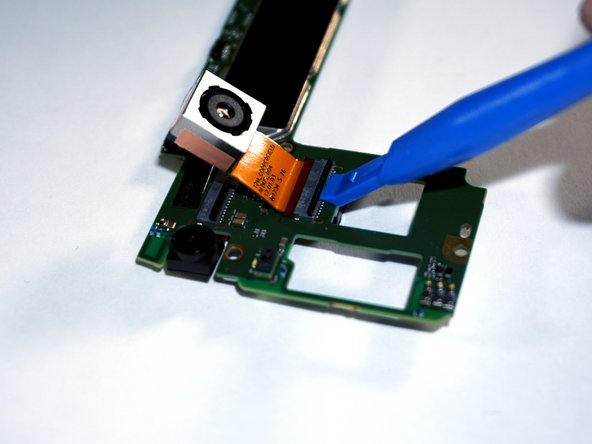
    • Lift the locking bar on the ZIF connector that is under the rear facing camera with a plastic opening tool.

    • You can also use a spudger to complete this step.

  28. Motorola Moto Z2 Play Rear Facing Camera Replacement: 28 단계, 이미지 1/1
    • Pull out the ribbon connector for the rear-facing camera.

결론

To reassemble your device, follow these instructions in reverse order.

mitch miller

회원 가입일: 01/24/18

2,055 평판

안내서 8개 작성하였습니다

Cal Poly, Team S19-G5, Livingston Winter 2018 Cal Poly, Team S19-G5, Livingston Winter 2018 회원

CPSU-LIVINGSTON-W18S19G5

4 회원들

안내서 30개 작성하였습니다

댓글 0개

댓글 쓰기

조회 통계:

24 시간 전: 0

7일 전: 1

30일 전: 6

전체 시간: 1,235