주요 콘텐츠로 건너뛰기

Motorola RIZR Z3 LCD Replacement

필요한 것

  1. Motorola RIZR Z3 LCD Replacement, Battery: 1 단계, 이미지 1/2 Motorola RIZR Z3 LCD Replacement, Battery: 1 단계, 이미지 2/2
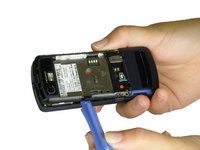
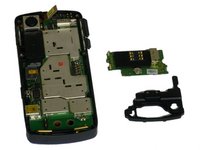
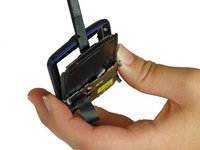
    • Press the panel release button on the top of the phone and simultaneously pull the rear panel away from the phone.

  2. Motorola RIZR Z3 LCD Replacement: 2 단계, 이미지 1/2 Motorola RIZR Z3 LCD Replacement: 2 단계, 이미지 2/2
    • Tilt the battery by lifting at the exposed notch.

    • Slide the battery out of its casing.

  3. Motorola RIZR Z3 LCD Replacement, Motherboard: 3 단계, 이미지 1/1
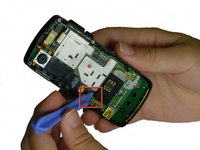
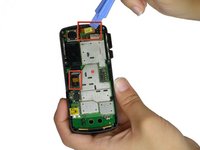
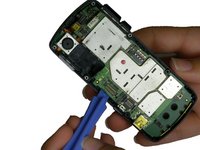
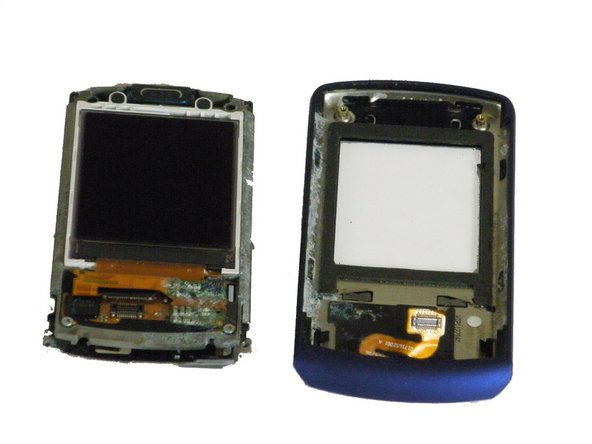
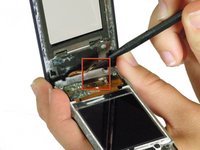
    • Use a T4 screwdriver to unscrew all six of the .216 inch screws that attach the housing to the case.

  4. Motorola RIZR Z3 LCD Replacement: 4 단계, 이미지 1/2 Motorola RIZR Z3 LCD Replacement: 4 단계, 이미지 2/2
    • Use a plastic opening tool to lift the plastic casing.

    • Pull the plastic casing directly away from the phone.

  5. Motorola RIZR Z3 LCD Replacement: 5 단계, 이미지 1/1
    • Lift the black rubber loudspeaker housing up and out of the plastic casing.

  6. Motorola RIZR Z3 LCD Replacement: 6 단계, 이미지 1/2 Motorola RIZR Z3 LCD Replacement: 6 단계, 이미지 2/2
    • Use a plastic opening tool to gently lift up the SIM card reader, located above the rubber antenna casing. You should hear a click as it releases.

    • Caution: Remove carefully, if broken, the phone will not be able to make calls.

  7. Motorola RIZR Z3 LCD Replacement: 7 단계, 이미지 1/2 Motorola RIZR Z3 LCD Replacement: 7 단계, 이미지 2/2
    • Use a plastic opening tool to pry the two ribbon cable connectors, unclipping them from their sockets on the motherboard.

    • Caution: Remove carefully, if broken, the phone will not function properly.

  8. Motorola RIZR Z3 LCD Replacement: 8 단계, 이미지 1/2 Motorola RIZR Z3 LCD Replacement: 8 단계, 이미지 2/2
    • Use a plastic opening tool to gently pry the motherboard up until you can tilt it with your fingers. Unhook it from the casing and slowly pull it out.

    • Caution: Do this gently Unclipping too fast may cause damage to your phone.

  9. Motorola RIZR Z3 LCD Replacement, LCD: 9 단계, 이미지 1/1
    • Turn the phone to the front.

    • Push the keypad out through the plastic casing.

  10. Motorola RIZR Z3 LCD Replacement: 10 단계, 이미지 1/1
    • Turn the phone to the side.

    • Thread the hinges of the slider through their holes in the casing and pull the slider down and away from the casing.

  11. Motorola RIZR Z3 LCD Replacement: 11 단계, 이미지 1/1
    • Use a T4 screwdriver to unscrew the two .15 inch screws holding the LCD to the faceplate.

  12. Motorola RIZR Z3 LCD Replacement: 12 단계, 이미지 1/3 Motorola RIZR Z3 LCD Replacement: 12 단계, 이미지 2/3 Motorola RIZR Z3 LCD Replacement: 12 단계, 이미지 3/3
    • Use a spudger to pry the plastic screen casing partially up from the LCD unit.

    • Use the spudger to pry the ribbon cable away from its clip on the LCD unit.

    • Caution: Do this carefully, damage to this ribbon cable will cause a blank screen.

    • Pull the plastic screen casing directly away from the LCD unit.

  13. Motorola RIZR Z3 LCD Replacement: 13 단계, 이미지 1/2 Motorola RIZR Z3 LCD Replacement: 13 단계, 이미지 2/2
    • Use a spudger to lift the LCD partially away from the metal casing.

    • Use the spudger to pry the ribbon cable directly up from its clip on the metal casing.

    • Caution: Damage to the ribbon cable here will cause screen damage.

    • Pull the LCD completely away from the metal casing.

결론

To reassemble your device, follow these instructions in reverse order.

Brooke Shuford

회원 가입일: 10/10/11

65 평판

안내서 3개 작성하였습니다

Cal Poly, Team 5-34, Amido Fall 2011 Cal Poly, Team 5-34, Amido Fall 2011 회원

CPSU-AMIDO-F11S5G34

4 회원들

안내서 6개 작성하였습니다

댓글 0개

댓글 쓰기

조회 통계:

24 시간 전: 0

7일 전: 1

30일 전: 1

전체 시간: 953